About AUTD3
AUTD3 is an ultrasound phased array device for midair haptics. An ultrasound phased array is an array of ultrasound transducers whose phases can be individually controlled (typically arranged in a grid). By controlling the phase of the ultrasound, it is possible to generate arbitrary sound fields in space.
The energy of sound waves sufficiently focused using a phased array generates acoustic radiation pressure. This pressure can be used to push the surface of the human body without contact. The position of the focal point can be freely controlled by electronically controlling the phased array. Additionally, by solving the inverse problem, it is possible to create more complex sound pressure spatial distributions, not just a single focal point.
The upper limit of the pressure that can be generated by a phased array is currently about . The spatial resolution is up to the wavelength used (about at ). Although there are such limitations with phased arrays, it is attracting attention as a technology that can freely design the spatiotemporal distribution of force and create various haptic sensations.
This field of technology, which stimulates haptics without contact, is called Midair Haptics, and we call this ultrasound midair haptic device Airborne Ultrasound Tactile Display (AUTD). The essential part of AUTD was proposed and established by the University of Tokyo from 20081 to the early 2010s2. Since then, universities and companies around the world have entered the field, and active research and development are being conducted. AUTD3 is the third version of AUTD developed by our Shinoda-Makino Laboratory at the University of Tokyo.
A list of research using AUTD is posted on the laboratory’s homepage. Please refer to it as well.
This manual summarizes the autd3 software library for operating this AUTD3.
-
Takayuki Iwamoto, Mari Tatezono, and Hiroyuki Shinoda: Non-contact Method for Producing Tactile Sensation Using Airborne Ultrasound, Haptics: Perception, Devices and Scenarios: 6th International Conference, Eurohaptics 2008 Proceedings (Lecture Notes in Computer Science), pp.504-513, 2008. ↩
-
Takayuki Hoshi, Masafumi Takahashi, Takayuki Iwamoto, and Hiroyuki Shinoda: Noncontact Tactile Display Based on Radiation Pressure of Airborne Ultrasound, IEEE Trans. on Haptics, Vol. 3, No. 3, pp.155-165, 2010. ↩
Getting Started
This section first describes the setup of AUTD3 hardware, firmware, and software.
Hardware
AUTD3 Device
The AUTD3 device consists of 249 transducers per unit1. Furthermore, multiple devices can be connected and expanded via daisy-chain. From the SDK, the phase/intensity of all these transducers can be individually specified.
The coordinate system of AUTD3 adopts the right-handed coordinate system, with the center of the 0-th transducer as the origin. The x-axis is in the long axis direction, i.e., the direction from 0 to 17, and the y-axis is in the direction from 0 to 18.
Also, the unit of distance is mm. The transducers are arranged at intervals of , and the size including the board is .
Setup
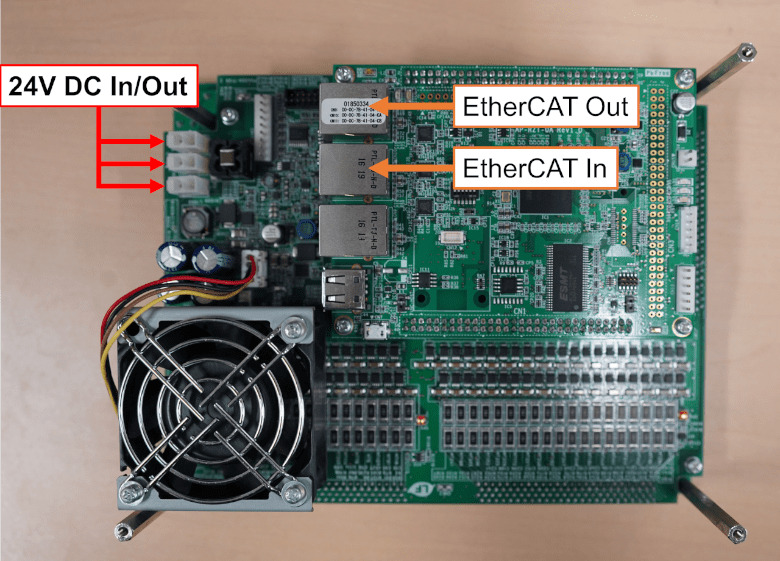
Connect the PC and “EtherCAT In” of the first device with an ethernet cable (CAT 5e or higher), and connect “EtherCAT Out” of the -th device to “EtherCAT In” of the -th device.
The power supply for AUTD3 uses a DC. The power supply can be connected mutually, and any of the three power connectors can be used. The power connector on the AUTD3 device side uses Molex 5566-02A.
NOTE: AUTD3 consumes a maximum of per device. Pay attention to the maximum output current of the power supply.
Dimension Diagram
-
Out of , 3 transducers are removed for screws. The reason for placing the screw holes in this position is to minimize the gap when multiple units are lined up. ↩
Firmware
To update the firmware, you need a Windows 10/11 64bit PC with Vivado and J-Link Software installed. We tested with Vivado 2025.2 and J-Link Software v9.12.
NOTE: If the sole purpose is to update the firmware, it is strongly recommended to use “Vivado Lab Edition”. ML Edition requires more than 60 GB of disk space for installation. Lab Edition requires about 6 GB of disk space.
NOTE: When using an old J-Link device, check “Install legacy USB Driver for J-Link”. For example, J-Link Plus V10 and earlier require a legacy USB Driver. (The version is written on the back of the J-Link Plus device.) For more details, refer to the Segger Wiki. If the device you are using has the WinUSB feature, the legacy USB Driver is not required.
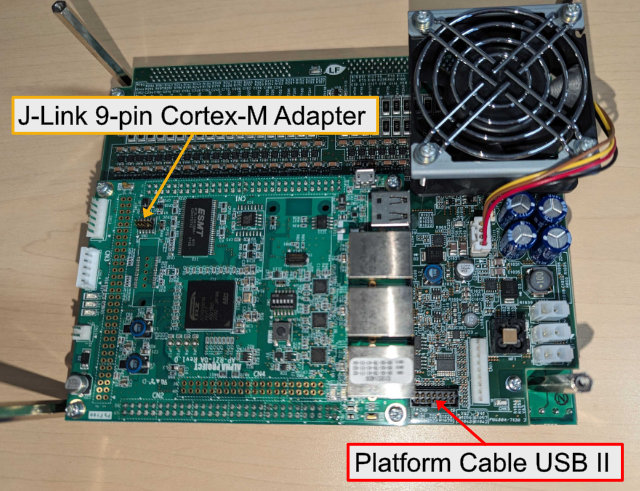
First, connect the AUTD3 device and the PC with a XILINX Platform Cable and a J-Link 9-Pin Cortex-M Adapter attached to a J-Link Plus, and turn on the power of the AUTD3.
Next, execute autd_firmware_writer.ps1 in the autd3-firmware from PowerShell and follow the instructions. The update takes a few minutes.
git clone https://github.com/shinolab/autd3-firmware
cd autd3-firmware
pwsh autd_firmware_writer.ps1
Software
Basically, it supports the standard package managers for each language.
Can be installed using CMake’s FetchContent.
- autd3
- Windows: https://github.com/shinolab/autd3-cpp/releases/download/v38.0.1/autd3-v38.0.1-win-x64.zip
- macOS: https://github.com/shinolab/autd3-cpp/releases/download/v38.0.1/autd3-v38.0.1-macos-aarch64.tar.gz
- Linux: https://github.com/shinolab/autd3-cpp/releases/download/v38.0.1/autd3-v38.0.1-linux-x64.tar.gz
- autd3-link-ethercrab
- Windows: https://github.com/shinolab/autd3-cpp-link-ethercrab/releases/download/v38.0.1/autd3-link-ethercrab-v38.0.1-win-x64.zip
- macOS: https://github.com/shinolab/autd3-cpp-link-ethercrab/releases/download/v38.0.1/autd3-link-ethercrab-v38.0.1-macos-aarch64.tar.gz
- Linux: https://github.com/shinolab/autd3-cpp-link-ethercrab/releases/download/v38.0.1/autd3-link-ethercrab-v38.0.1-linux-x64.tar.gz
Published on NuGet.
Can be installed via Unity Package Manager. Add the following repositories.
- AUTD3Sharp: https://github.com/shinolab/AUTD3Sharp.git#upm/latest
- AUTD3Sharp.Link.EtherCrab: https://github.com/shinolab/AUTD3Sharp.Link.EtherCrab.git#upm/latest
Published on PyPI.
Tutorial
This section describes the steps to actually operate the AUTD3 devices.
Single Device
This section explains how to drive a single device.
Installing Dependencies
This tutorial uses EtherCrab. If you are using Windows, install Npcap in “WinPcap API-compatible Mode”.
Note that if the firmware is outdated, proper operation is not guaranteed. The firmware version assumed in this document is v12.1.0. Refer to Getting Started/Firmware for firmware updates.
Sample Programs
First, create a project and add the autd3 library as a dependency.
Also, add the autd3-link-ethercrab library for communication with the device.
cargo new --bin autd3-sample
cd autd3-sample
cargo add autd3
cargo add autd3-link-ethercrab
Next, edit the src/main.rs file as follows.
This is the source code for applying AM modulation of to a single focal point.
use autd3::prelude::*;
use autd3_link_ethercrab::{EtherCrab, EtherCrabOption};

fn main() -> Result<(), Box<dyn std::error::Error>> {
    // Open controller with EtherCrab link
    // Here, the AUTD3 device is placed at the origin
    let mut autd = Controller::open(
        [AUTD3 {
            pos: Point3::origin(),
            rot: UnitQuaternion::identity(),
        }],
        EtherCrab::new(
            // The first argument is a callback that is called when error occurs
            |idx, status| {
                eprintln!("Device[{}]: {}", idx, status);
            },
            // The second argument is a option of EtherCrab link, here we use default option
            EtherCrabOption::default(),
        ),
    )?;

    // Check firmware version
    // This code assumes that the version is v12.1.0
    autd.firmware_version()?.iter().for_each(|firm_info| {
        println!("{}", firm_info);
    });

    // Enable silencer
    // Note that this is enabled by default, so it is not actually necessary
    // To disable, send Silencer::disable()
    autd.send(Silencer::default())?;

    // A focus at 150mm directly above the center of the device
    let g = Focus {
        pos: autd.center() + Vector3::new(0., 0., 150.0 * mm),
        option: FocusOption::default(),
    };

    // 150 Hz sine wave modulation
    let m = Sine {
        freq: 150 * Hz,
        option: SineOption::default(),
    };

    // Send data
    autd.send((m, g))?;

    println!("press enter to quit...");
    let mut _s = String::new();
    std::io::stdin().read_line(&mut _s)?;

    // Close controller
    autd.close()?;

    Ok(())
}
Then, run it.
cargo run --release
Notes for Linux and macOS Users
On Linux and macOS, administrator privileges could be required. In that case, run:
cargo build --release && sudo ./target/release/autd3_sample
Installing Dependencies
This tutorial uses CMake, so make sure it is installed.
Creating an AUTD3 Client Program
First, open a terminal and prepare an appropriate directory.
mkdir autd3-sample
cd autd3-sample
Next, create CMakeLists.txt and main.cpp files under autd3-sample.
└─autd3-sample
        CMakeLists.txt
        main.cpp
Next, edit CMakeLists.txt as follows.
cmake_minimum_required(VERSION 3.21)

project(autd3-sample)

set(CMAKE_CXX_STANDARD 23)
set(CMAKE_CXX_STANDARD_REQUIRED ON)
set(CMAKE_CXX_EXTENSIONS OFF)

if(${CMAKE_VERSION} VERSION_GREATER_EQUAL "3.24.0")
  cmake_policy(SET CMP0135 NEW)
endif()

include(FetchContent)
if(WIN32)
  FetchContent_Declare(
    autd3
    URL https://github.com/shinolab/autd3-cpp/releases/download/v38.0.1/autd3-v38.0.1-win-x64.zip
  )
elseif(APPLE)
  FetchContent_Declare(
    autd3
    URL https://github.com/shinolab/autd3-cpp/releases/download/v38.0.1/autd3-v38.0.1-macos-aarch64.tar.gz
  )
else()
  FetchContent_Declare(
    autd3
    URL https://github.com/shinolab/autd3-cpp/releases/download/v38.0.1/autd3-v38.0.1-linux-x64.tar.gz
  )
endif()
if(WIN32)
  FetchContent_Declare(
    autd3-link-ethercrab
    URL https://github.com/shinolab/autd3-cpp-link-ethercrab/releases/download/v38.0.1/autd3-link-ethercrab-v38.0.1-win-x64.zip
  )
elseif(APPLE)
  FetchContent_Declare(
    autd3-link-ethercrab
    URL https://github.com/shinolab/autd3-cpp-link-ethercrab/releases/download/v38.0.1/autd3-link-ethercrab-v38.0.1-macos-aarch64.tar.gz
  )
else()
  FetchContent_Declare(
    autd3-link-ethercrab
    URL https://github.com/shinolab/autd3-cpp-link-ethercrab/releases/download/v38.0.1/autd3-link-ethercrab-v38.0.1-linux-x64.tar.gz
  )
endif()
set(USE_SYSTEM_EIGEN OFF)
FetchContent_MakeAvailable(autd3 autd3-link-ethercrab)

add_executable(main main.cpp)

target_link_libraries(main PRIVATE autd3::autd3 autd3::link::ethercrab)
NOTE: In the above example, the dependency library (Eigen3) is automatically downloaded. If Eigen3 is already installed, you can disable the automatic download by turning on
USE_SYSTEM_EIGENand use the installed one.
Also, edit main.cpp as follows. This is the source code for applying AM modulation of to a single focal point.
#include <iostream>

#include "autd3.hpp"
#include "autd3_link_ethercrab.hpp"

using namespace autd3;

int main() try {
  auto autd =
      Controller::open({AUTD3{
                           .pos = Point3::origin(),
                           .rot = Quaternion::Identity(),
                       }},
                       link::EtherCrab(
                           [](const uint16_t idx, const link::Status status) {
                             std::cout << std::format("Device[{}]: ", idx)
                                       << status << std::endl;
                           },
                           link::EtherCrabOption{}));

  for (auto&& firm : autd.firmware_version()) std::cout << firm << std::endl;

  autd.send(Silencer{});

  Focus g(autd.center() + Vector3(0, 0, 150), FocusOption{});
  Sine m(150 * Hz, SineOption{});

  autd.send((m, g));

  std::cout << "press enter to finish..." << std::endl;
  std::cin.ignore();

  autd.close();

  return 0;
} catch (std::exception& ex) {
  std::cerr << ex.what() << std::endl;
}
Next, build with CMake.
mkdir build
cd build
cmake .. -DCMAKE_BUILD_TYPE=Release
cmake --build . --config Release
This will generate an executable file, so run it.
.\Release\main.exe
sudo ./main
Troubleshooting
- There may be build errors if anaconda (miniconda) is activated.
- In this case, delete the
builddirectory, runconda deactivate, and then runcmakeagain.
- In this case, delete the
First, open a terminal, create an appropriate project, and add the AUTD3Sharp library.
dotnet new console --name autd3-sample
cd autd3-sample
dotnet add package AUTD3Sharp
dotnet add package AUTD3Sharp.Link.EtherCrab
Next, edit Program.cs as follows.
This is the source code for applying AM modulation of to a single focal point.
using AUTD3Sharp;
using AUTD3Sharp.Utils;
using AUTD3Sharp.Link;
using AUTD3Sharp.Gain;
using AUTD3Sharp.Modulation;
using static AUTD3Sharp.Units;

using var autd = Controller.Open(
    [new AUTD3(pos: Point3.Origin, rot: Quaternion.Identity)],
    new EtherCrab(
        (idx, status) =>
            {
                Console.Error.WriteLine($"Device[{idx}]: {status}");
            },
        new EtherCrabOption()
    )
);

var firmList = autd.FirmwareVersion();
foreach (var firm in firmList)
    Console.WriteLine(firm);

autd.Send(new Silencer());

var g = new Focus(
    pos: autd.Center() + new Vector3(0, 0, 150),
    option: new FocusOption()
);
var m = new Sine(
    freq: 150u * Hz,
    option: new SineOption()
);
autd.Send((m, g));

Console.ReadKey(true);

autd.Close();
Then, run it.
dotnet run -c:Release
Notes for Linux and macOS Users
On Linux and macOS, administrator privileges may be required. In that case, run:
sudo dotnet run -c:Release
Installing the pyautd3 Library
First, install the pyautd3 and pyautd3_link_ethercrab libraries via pip.
pip install pyautd3
pip install pyautd3_link_ethercrab
Next, create main.py and edit it as follows.
This is the source code for applying AM modulation of to a single focal point.
import numpy as np
from pyautd3 import (
    AUTD3,
    Controller,
    Focus,
    FocusOption,
    Hz,
    Silencer,
    Sine,
    SineOption,
)
from pyautd3_link_ethercrab import EtherCrab, EtherCrabOption, Status


def err_handler(idx: int, status: Status) -> None:
    print(f"Device[{idx}]: {status}")


if __name__ == "__main__":
    with Controller.open(
        [AUTD3(pos=[0.0, 0.0, 0.0], rot=[1, 0, 0, 0])],
        EtherCrab(err_handler=err_handler, option=EtherCrabOption()),
    ) as autd:
        firmware_version = autd.firmware_version()
        print(
            "\n".join(
                [f"[{i}]: {firm}" for i, firm in enumerate(firmware_version)],
            ),
        )

        autd.send(Silencer())

        g = Focus(
            pos=autd.center() + np.array([0.0, 0.0, 150.0]),
            option=FocusOption(),
        )
        m = Sine(
            freq=150 * Hz,
            option=SineOption(),
        )
        autd.send((m, g))

        _ = input()

        autd.close()
Then, run it.
python main.py
Notes for Linux Users
On Linux, administrator privileges could be required. In that case, run:
sudo setcap cap_net_raw,cap_net_admin=eip <your python path>
Then, run main.py.
python main.py
Notes for macOS Users
On macOS, administrator privileges may be required. In that case, run:
sudo chmod +r /dev/bpf*
Then, run main.py.
python main.py
Multiple Devices
AUTD3 can connect multiple devices in a daisy-chain to form a large array. The SDK is designed to be used transparently even when multiple devices are connected.
When using multiple devices with the SDK, specify the AUTD3 structure for each connected device in order in the first argument of the Controller::open function.
Refer to Getting Started/Hardware for hardware connection methods.
Below are the steps for connecting two devices.
Translation Only
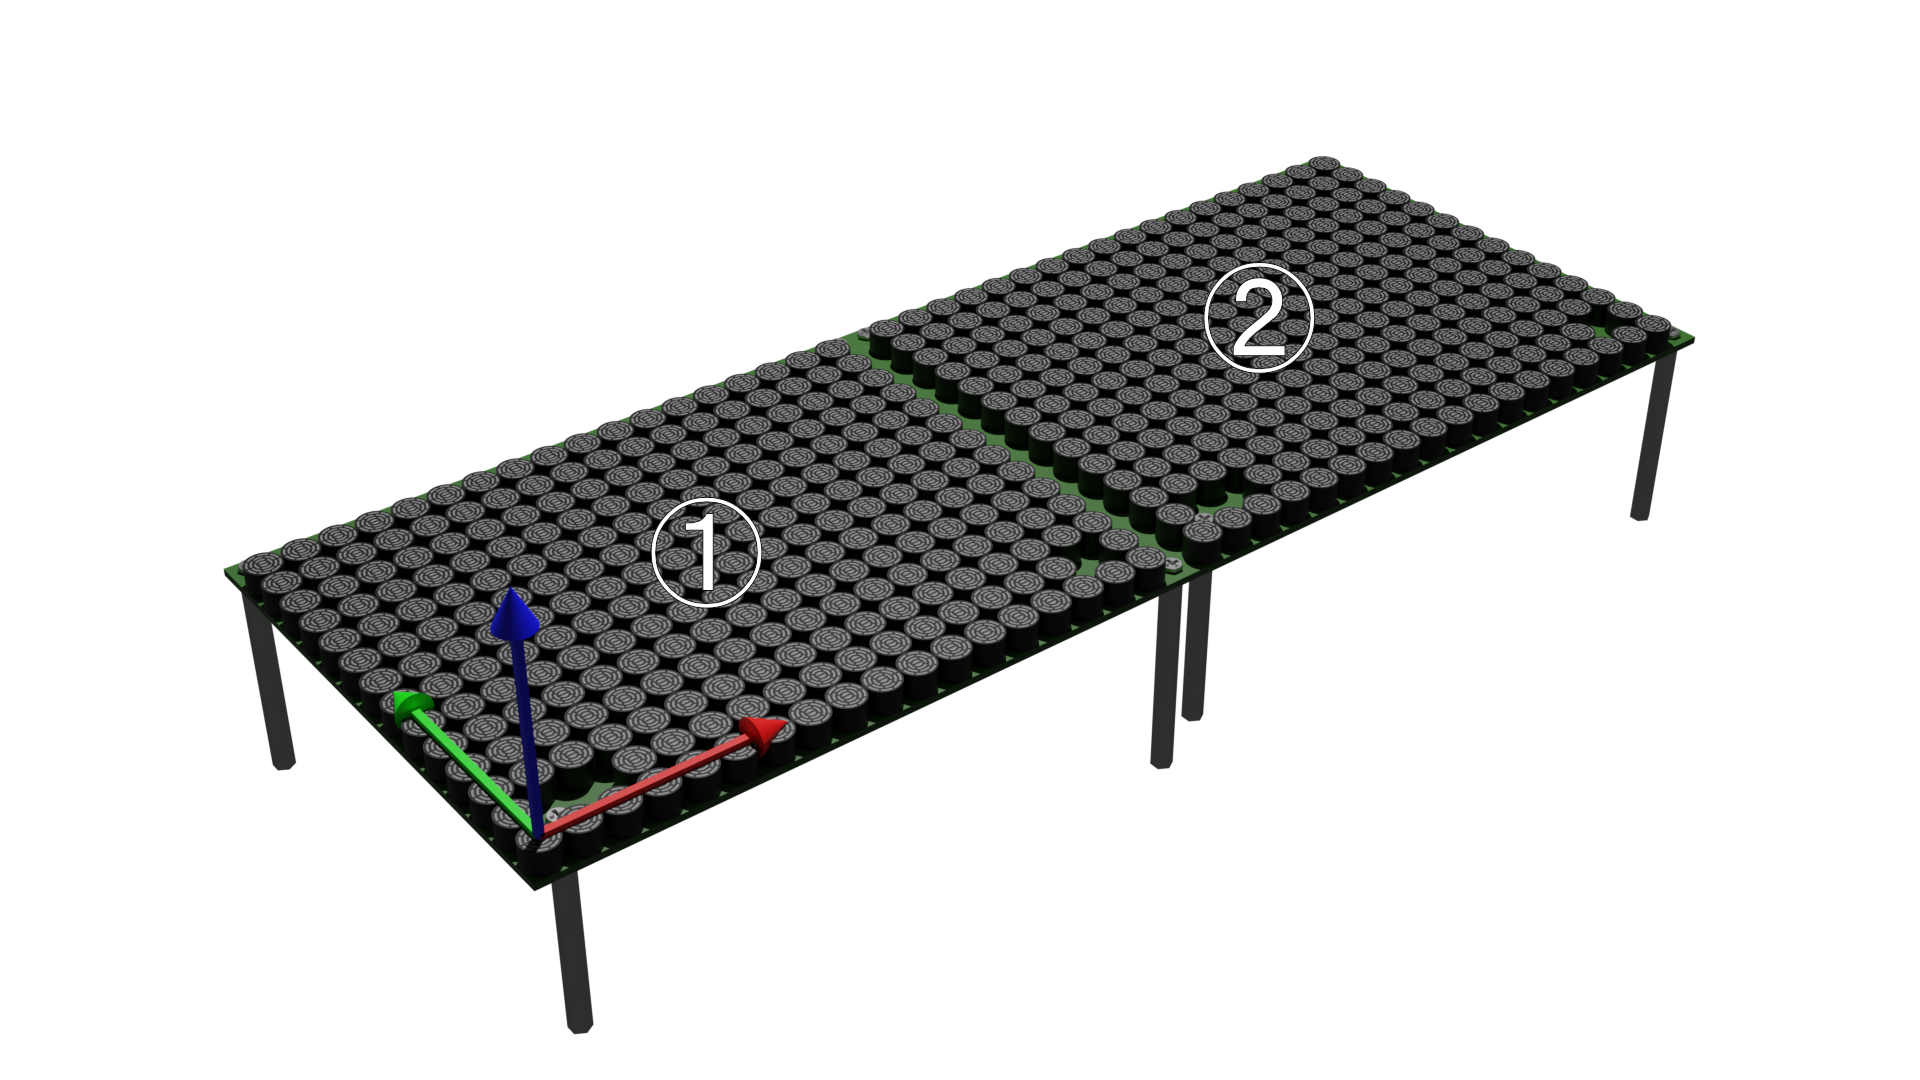
For example, if the devices are arranged and connected as shown above, with the device on the left being the first and the device on the right being the second, and the global coordinates are taken to be the same as the local coordinates of the first device, the code is as follows.
use autd3::prelude::*;

fn main() -> Result<(), Box<dyn std::error::Error>> {
let link = autd3::link::Nop::new();
let _ =
Controller::open(
    [
        AUTD3 {
            pos: Point3::origin(),
            rot: UnitQuaternion::identity(),
        },
        AUTD3 {
            pos: Point3::new(AUTD3::DEVICE_WIDTH, 0., 0.),
            rot: UnitQuaternion::identity(),
        },
    ],
    link,
)?;
    Ok(())
}
#include<chrono>
#include<autd3.hpp>
#include<autd3/link/nop.hpp>
int main() {
using namespace autd3;
link::Nop link;
Controller::open({AUTD3{
.pos = Point3::origin(),
.rot = Quaternion::Identity(),
},
AUTD3{
.pos = Point3(AUTD3::DEVICE_WIDTH, 0, 0),
.rot = Quaternion::Identity(),
}},
std::move(link));
return 0; }
using AUTD3Sharp;
using AUTD3Sharp.Link;
using AUTD3Sharp.Utils;
var link = new Nop();
Controller.Open([
   new AUTD3(pos: Point3.Origin, rot: Quaternion.Identity),
   new AUTD3(pos: new Point3(AUTD3.DeviceWidth, 0, 0), rot: Quaternion.Identity)
], link)
;
from pyautd3 import AUTD3, Controller
from pyautd3.link.nop import Nop
link = Nop()
Controller.open(
    [
        AUTD3(pos=[0.0, 0.0, 0.0], rot=[1, 0, 0, 0]),
        AUTD3(pos=[AUTD3.DEVICE_WIDTH, 0.0, 0.0], rot=[1, 0, 0, 0]),
    ],
    link,
)
Here, pos represents the position of the device in global coordinates.
Note that AUTD3::DEVICE_WIDTH is the width of the device (including the outer shape of the board).
Setting Global Coordinates
The origin and orientation of the global coordinates used by the SDK can be freely set by the user.
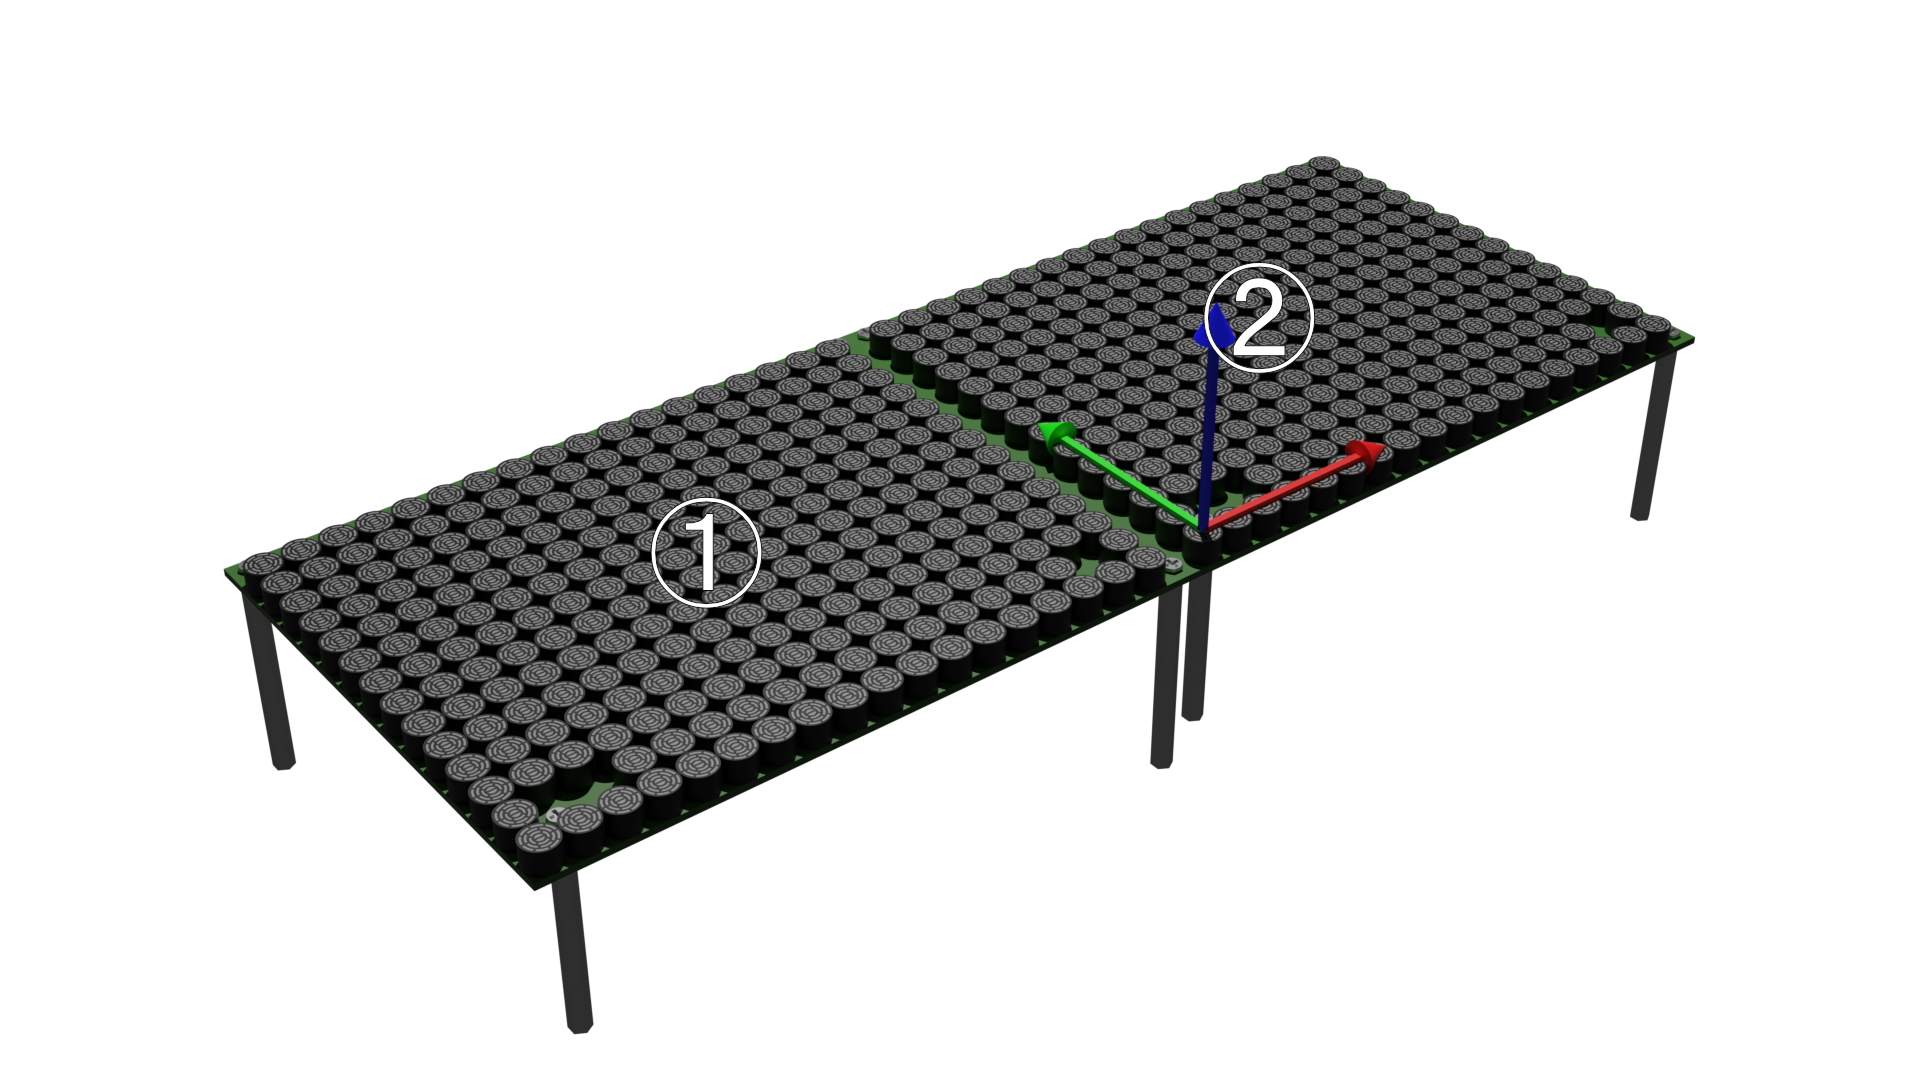
For example, if the global coordinates are taken to be the same as the local coordinates of the second device, the code is as follows.
use autd3::prelude::*;

fn main() -> Result<(), Box<dyn std::error::Error>> {
let link = autd3::link::Nop::new();
let _ =
Controller::open(
    [
        AUTD3 {
            pos: Point3::new(-AUTD3::DEVICE_WIDTH, 0., 0.),
            rot: UnitQuaternion::identity(),
        },
        AUTD3 {
            pos: Point3::origin(),
            rot: UnitQuaternion::identity(),
        },
    ],
    link,
)?;
    Ok(())
}
#include<chrono>
#include<autd3.hpp>
#include<autd3/link/nop.hpp>
int main() {
using namespace autd3;
link::Nop link;
Controller::open(
{
AUTD3{
.pos = Point3(-AUTD3::DEVICE_WIDTH, 0, 0),
.rot = Quaternion::Identity(),
},
AUTD3{
.pos = Point3::origin(),
.rot = Quaternion::Identity(),
},
},
std::move(link));
return 0; }
using AUTD3Sharp;
using AUTD3Sharp.Link;
using AUTD3Sharp.Utils;
var link = new Nop();
Controller.Open([
   new AUTD3(pos: new Point3(-AUTD3.DeviceWidth, 0, 0), rot: Quaternion.Identity),
   new AUTD3(pos: Point3.Origin, rot: Quaternion.Identity)
], link)
;
from pyautd3 import AUTD3, Controller
from pyautd3.link.nop import Nop
link = Nop()
Controller.open(
    [
        AUTD3(pos=[-AUTD3.DEVICE_WIDTH, 0.0, 0.0], rot=[1, 0, 0, 0]),
        AUTD3(pos=[0.0, 0.0, 0.0], rot=[1, 0, 0, 0]),
    ],
    link,
)
Translation and Rotation
To specify the rotation of the device, use rot.
Rotation can be specified using Euler angles or quaternions.
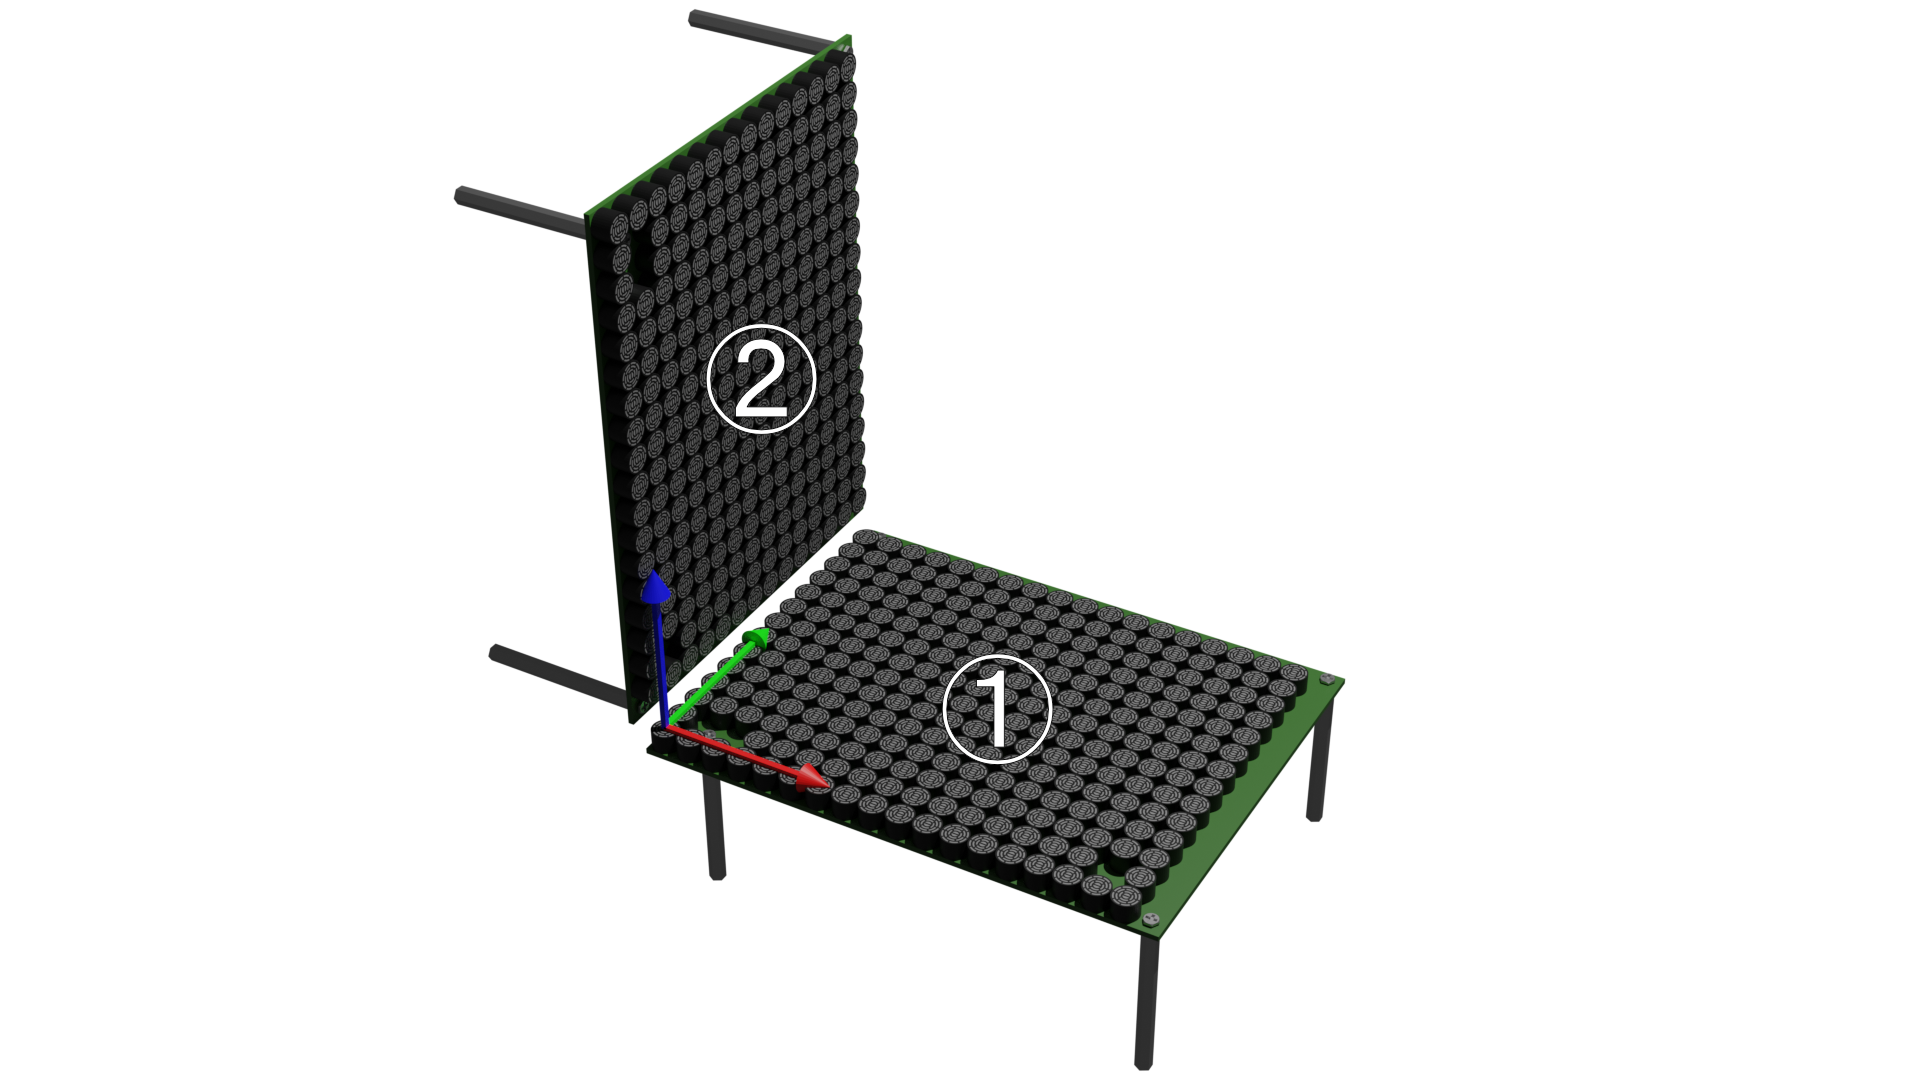
For example, if the devices are arranged as shown above, with the bottom being the first device and the left being the second device, and the global coordinates are taken to be the same as the local coordinates of the first device, the code is as follows.
use autd3::prelude::*;

fn main() -> Result<(), Box<dyn std::error::Error>> {
let link = autd3::link::Nop::new();
let _ =
Controller::open(
    [
        AUTD3 {
            pos: Point3::origin(),
            rot: UnitQuaternion::identity(),
        },
        AUTD3 {
            pos: Point3::new(0., 0., AUTD3::DEVICE_WIDTH),
            rot: EulerAngle::ZYZ(0. * rad, PI/2.0 * rad, 0. * rad).into(),
        },
    ],
    link,
)?;
    Ok(())
}
#include<chrono>
#include<autd3.hpp>
#include<autd3/link/nop.hpp>
int main() {
using namespace autd3;
link::Nop link;
Controller::open({AUTD3{
.pos = Point3::origin(),
.rot = Quaternion::Identity(),
},
AUTD3{
.pos = Point3(0, 0, AUTD3::DEVICE_WIDTH),
.rot = EulerAngles::ZYZ(0. * rad, pi / 2.0 * rad,
0. * rad),
}},
std::move(link));
return 0; }
using System;
using AUTD3Sharp;
using AUTD3Sharp.Link;
using AUTD3Sharp.Utils;
using static AUTD3Sharp.Units;
var link = new Nop();
Controller.Open([
   new AUTD3(pos: Point3.Origin, rot: Quaternion.Identity),
   new AUTD3(
      pos: new Point3(0, 0, AUTD3.DeviceWidth),
      rot: EulerAngles.Zyz(0 * rad, MathF.PI / 2 * rad, 0 * rad))
], link)
;
import numpy as np
from pyautd3 import AUTD3, Controller, EulerAngles, Nop, rad
link = Nop()
Controller.open(
    [
        AUTD3(pos=[0.0, 0.0, 0.0], rot=[1.0, 0.0, 0.0, 0.0]),
        AUTD3(
            pos=[0.0, 0.0, AUTD3.DEVICE_WIDTH],
            rot=EulerAngles.ZYZ(0 * rad, np.pi / 2 * rad, 0 * rad),
        ),
    ],
    link,
)
NOTE: Only the Rust version supports all 12 types of Euler angles. Other languages support only XYZ and ZYZ.
Concept
The main components that make up the SDK are as follows.
Controller- All operations on the AUTD3 device are performed through this.Geometry- Container forDevice.Device- Corresponds to the AUTD3 device. Manages how the device is positioned in the real world. Container forTransducer.Transducer- Corresponds to the transducer. Manages where the transducer is located in the real world.
Link- Interface with the device.Gain- Manages the phase/intensity of each transducer.STM- Provides Spatio-Temporal Modulation (STM) functionality. Manages the time series of phase/intensity data for each transducer.Modulation- Provides AM modulation functionality. Manages the time series of modulation data.Silencer- Manages the silencing process.
The usage of the software is as follows.
First, specify the arrangement of the AUTD3 devices in the real world, decide which Link to use, and open the Controller.
Then, through the Controller, send Gain (or STM), Modulation, and Silencer data to the device.
Based on the sent data, PWM signals are applied to the transducers. The flow until the signal is generated is as follows.

The intensity data specified by Gain/STM is sequentially multiplied by the modulation data specified by Modulation and then passed to the Silencer.
The phase data specified by Gain/STM is passed directly to the Silencer.
The Silencer processes these data for silencing1.
Finally, based on the intensity/phase data processed by the Silencer, PWM signals are generated and applied to the transducers.
Note that the intensity/phase data and modulation data are all .
Geometry
Geometry manages how AUTD3 devices are arranged in the real world.
Device/Transducer Index
Devices are assigned an index starting from 0 in the order they are connected.
Each device has 249 transducers arranged, and they are assigned local indices (refer to “AUTD Surface Photo” in Getting Started/Hardware).
Geometry API
num_devices(): Get the number of devicesnum_transducers(): Get the number of all transducerscenter(): Get the center of all transducers
Note that Geometry can be accessed directly from Controller.
use autd3::prelude::*;
#[allow(unused_variables)]
fn main() -> Result<(), Box<dyn std::error::Error>> {
let autd = Controller::open([AUTD3::default()], autd3::link::Nop::new())?;
let num_dev = autd.num_devices();
let num_tr = autd.num_transducers();
let center = autd.center();
Ok(())
}
#include<chrono>
#include<autd3.hpp>
#include<autd3/link/nop.hpp>
int main() {
using namespace autd3;
auto autd =
Controller::open({AUTD3{}}, link::Nop{});
const auto num_dev = autd.num_devices();
const auto num_tr = autd.num_transducers();
const auto center = autd.center();
return 0; }
using AUTD3Sharp;
using AUTD3Sharp.Link;
using AUTD3Sharp.Utils;
using var autd = Controller.Open([new AUTD3()], new Nop());
var numDevices = autd.NumDevices();
var numTransducers = autd.NumTransducers();
var center = autd.Center();
from pyautd3 import AUTD3, Controller
from pyautd3.link.nop import Nop
autd = Controller.open([AUTD3()], Nop())
num_devices = autd.num_devices()
num_transducers = autd.num_transducers()
center = autd.center()
Getting a Device
Geometry is a container of Device, and Device is a container of Transducer.
To get a Device, use an indexer.
Alternatively, you can use an iterator.
use autd3::prelude::*;
#[allow(unused_variables)]
fn main() -> Result<(), Box<dyn std::error::Error>> {
let autd = Controller::open([AUTD3::default()], autd3::link::Nop::new())?;
let dev = &autd[0];
for dev in &autd {
    // do something
}
Ok(())
}
#include<chrono>
#include<autd3.hpp>
#include<autd3/link/nop.hpp>
int main() {
using namespace autd3;
auto autd =
Controller::open({AUTD3{}}, link::Nop{});
{
auto dev = autd[0];
}
{
for (auto& dev : autd) {
// do something
}
}
return 0; }
using AUTD3Sharp;
using AUTD3Sharp.Link;
using AUTD3Sharp.Utils;
using var autd = Controller.Open([new AUTD3()], new Nop());
{
var dev = autd[0];
}
foreach (var dev in autd)
{
  // do something
}
from pyautd3 import AUTD3, Controller
from pyautd3.link.nop import Nop
autd = Controller.open([AUTD3()], Nop())
dev = autd[0]
for _dev in autd:
    pass
Device API
idx(): Device indexrotation(): Rotation of the devicex_direction(): X-direction vector of the devicey_direction(): Y-direction vector of the deviceaxial_direction(): Axial direction vector of the device (direction the transducers face)
use autd3::prelude::*;
#[allow(unused_variables)]
fn main() -> Result<(), Box<dyn std::error::Error>> {
let mut autd = Controller::open([AUTD3::default()], autd3::link::Nop::new())?;
let dev = &mut autd[0];
let idx = dev.idx();
let rotation = dev.rotation();
let x_dir = dev.x_direction();
let y_dir = dev.y_direction();
let axial_dir = dev.axial_direction();
Ok(())
}
#include<chrono>
#include<autd3.hpp>
#include<autd3/link/nop.hpp>
int main() {
using namespace autd3;
auto autd =
Controller::open({AUTD3{}}, link::Nop{});
auto dev = autd[0];
const auto idx = dev.idx();
const auto rotation = dev.rotation();
const auto x_dir = dev.x_direction();
const auto y_dir = dev.y_direction();
const auto axial_dir = dev.axial_direction();
return 0; }
using AUTD3Sharp;
using AUTD3Sharp.Link;
using AUTD3Sharp.Utils;
using var autd = Controller.Open([new AUTD3()], new Nop());
var dev = autd[0];
var idx = dev.Idx();
var rotation = dev.Rotation();
var xDir = dev.XDirection();
var yDir = dev.YDirection();
var axialDir = dev.AxialDirection();
from pyautd3 import AUTD3, Controller
from pyautd3.link.nop import Nop
autd = Controller.open([AUTD3()], Nop())
dev = autd[0]
idx = dev.idx()
rotation = dev.rotation()
x_dir = dev.x_direction()
y_dir = dev.y_direction()
axial_dir = dev.axial_direction()
Getting a Transducer
Device is a container of Transducer, and Transducer stores information about each transducer.
To get a Transducer, use an indexer.
Alternatively, you can use an iterator.
use autd3::prelude::*;
#[allow(unused_variables)]
fn main() -> Result<(), Box<dyn std::error::Error>> {
let autd = Controller::open([AUTD3::default()], autd3::link::Nop::new())?;
let tr = &autd[0][0];
for tr in autd[0].iter() {
    // do something
}
Ok(())
}
#include<chrono>
#include<autd3.hpp>
#include<autd3/link/nop.hpp>
int main() {
using namespace autd3;
auto autd =
Controller::open({AUTD3{}}, link::Nop{});
{
auto tr = autd[0][0];
}
{
for (auto& tr : autd[0]) {
// do something
}
}
return 0; }
using AUTD3Sharp;
using AUTD3Sharp.Link;
using AUTD3Sharp.Utils;
using var autd = Controller.Open([new AUTD3()], new Nop());
{
var tr = autd[0][0];
}
foreach (var tr in autd[0])
{
  // do something
}
from pyautd3 import AUTD3, Controller
from pyautd3.link.nop import Nop
autd = Controller.open([AUTD3()], Nop())
tr = autd[0][0]
for _tr in autd[0]:
    pass
Transducer API
The following information can be obtained.
idx(): (Local) index of the transducerdev_idx(): Index of the device to which the transducer belongsposition(): Position of the transducer
use autd3::prelude::*;
#[allow(unused_variables)]
fn main() -> Result<(), Box<dyn std::error::Error>> {
let autd = Controller::open([AUTD3::default()], autd3::link::Nop::new())?;
let tr = &autd[0][0];
let idx = tr.idx();
let dev_idx = tr.dev_idx();
let position = tr.position();
Ok(())
}
#include<autd3.hpp>
#include<autd3/link/nop.hpp>
int main() {
using namespace autd3;
auto autd =
Controller::open({AUTD3{}}, link::Nop{});
const auto tr = autd[0][0];
const auto idx = tr.idx();
const auto dev_idx = tr.dev_idx();
const auto position = tr.position();
return 0; }
using AUTD3Sharp;
using AUTD3Sharp.Link;
using AUTD3Sharp.Utils;
using var autd = Controller.Open([new AUTD3()], new Nop());
var tr = autd[0][0];
var trIdx = tr.Idx();
var devIdx = tr.DevIdx();
var position = tr.Position();
from pyautd3 import AUTD3, Controller
from pyautd3.link.nop import Nop
autd = Controller.open([AUTD3()], Nop())
tr = autd[0][0]
idx = tr.idx()
dev_idx = tr.dev_idx()
position = tr.position()
Link
Link is the interface to the AUTD3 device. You need to choose one from the following.
TwinCAT
TwinCAT is the only official way to use EtherCAT on a Windows PC. TwinCAT is specialized software that only supports Windows and forces Windows to operate in real-time.
TwinCAT requires specific network controllers, so please check the list of compatible network controllers.
Note: Alternatively, after installing TwinCAT, you can see the Vendor ID and Device ID of supported network controllers in
C:/TwinCAT/3.1/Driver/System/TcI8254x.inf. The Vendor ID and Device ID of your network controller can be checked in “Device Manager” → “Ethernet Adapter” → “Properties” → “Details” → “Hardware ID”.
It may work with network controllers other than those listed above, but in that case, normal operation and real-time performance are not guaranteed.
Prerequisites
As a prerequisite, TwinCAT cannot coexist with Hyper-V or Virtual Machine Platform. Therefore, these features need to be disabled. For example, you can disable them by opening PowerShell with administrator privileges and typing:
Disable-WindowsOptionalFeature -Online -FeatureName Microsoft-Hyper-V-Hypervisor
Disable-WindowsOptionalFeature -Online -FeatureName VirtualMachinePlatform
Also, for Windows 11, you need to turn off the virtualization-based security feature.
Go to “Windows Security” → “Device Security” → “Core Isolation” → “Memory Integrity” and turn it off.
From Windows 11 24H2, you may also need to set the registry value HKEY_LOCAL_MACHINE\SYSTEM\CurrentControlSet\Control\DeviceGuard\EnableVirtualizationBasedSecurity to 0.
Installing TwinCAT
Refer to the official site and install TwinCAT 3.1 Build 4026. (You will need to register for a myBeckhoff account (free) to install it.) Make sure to install the 64-bit version of TwinCAT Xae Shell. Visual Studio Integration is not required.
After installing the Package Manager, you can install “TwinCAT Standard” using the Package Manager.
Installing AUTD3 Server
To use TwinCAT Link, you first need to install AUTD3 Server.
The installer is distributed on GitHub, so download it and follow the instructions to install it.
NOTE: There is also a CLI version.
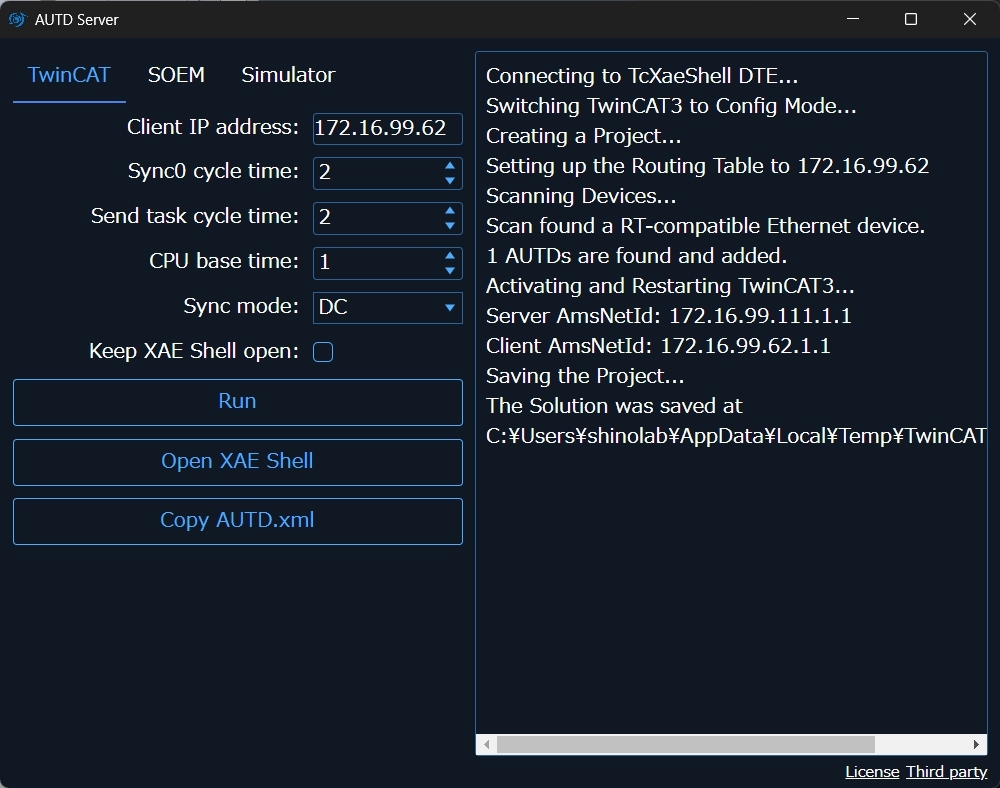
When you run AUTD3 Server, the following screen will appear, so open the TwinCAT tab.
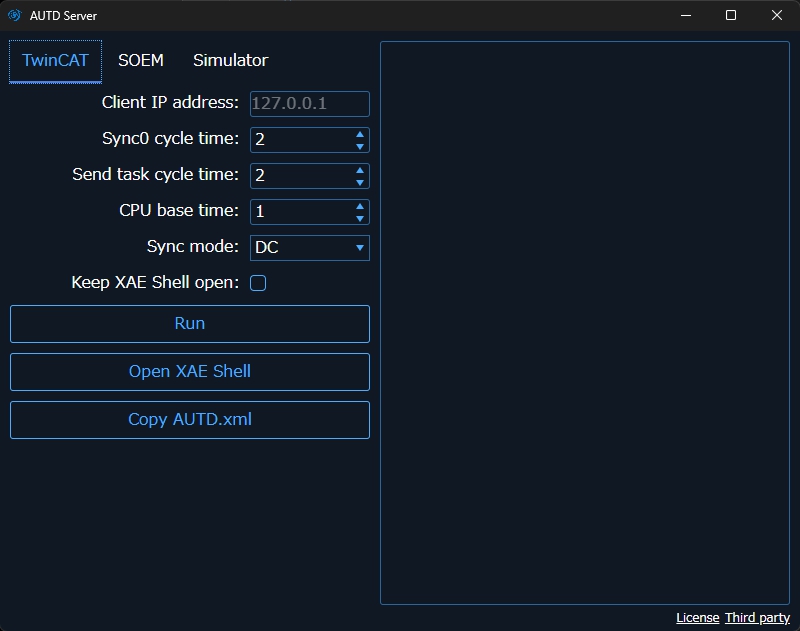
Initial Setup
The following tasks are required only for the first time.
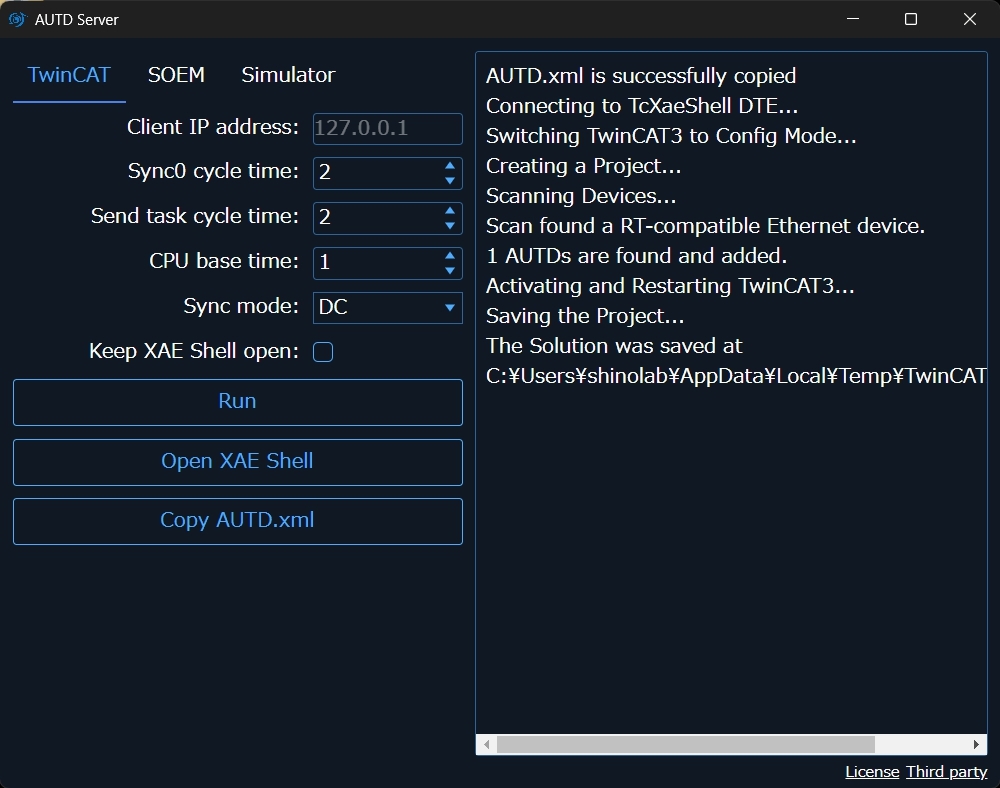
First, press the “Copy AUTD.xml” button. If a message like “AUTD.xml is successfully copied” appears, it is successful.
Next, press the “Open XAE Shell” button to open the XAE Shell. From the top menu of TwinCAT XAE Shell, open “TwinCAT” → “Show Realtime Ethernet Compatible Devices”, select the compatible device from “Compatible devices”, and click Install. If the installed adapter is displayed in “Installed and ready to use devices (realtime capable)”, it is successful.
If nothing is displayed in “Compatible devices”, the Ethernet device of that PC is not compatible with TwinCAT. Drivers in “Incompatible devices” can also be installed, and if installed, they will be displayed as “Installed and ready to use devices (for demo use only)”. In this case, it can be used but is not guaranteed to work.
Running AUTD Server
Connect AUTD3 to the PC and with AUTD3 powered on, press the “Run” button. At this time, leave the “Client IP address” field blank.
If a message appears indicating that the AUTD3 device has been found, as shown in the screen below, it is successful.
Note that TwinCAT will disconnect when the PC is powered off, enters sleep mode, etc., so you need to run it again each time.
License
If you encounter license-related errors, set the license. After setting the license, close “TwinCAT XAE Shell” and run it again.
If you have not set the license yet, you can issue a 7-day trial license using the following method.
Issuing a Trial License
Open “Solution Explorer” → “SYSTEM” → “License” in XAE Shell, click “7 Days Trial License …”, and enter the characters displayed on the screen.
TwinCAT Link
Install
cargo add autd3-link-twincat
target_link_libraries(<TARGET> PRIVATE autd3::link::twincat)
Included in the main library.
Included in the main library.
Included in the main library.
APIs
use autd3_link_twincat::TwinCAT;

fn main() -> Result<(), Box<dyn std::error::Error>> {
let _ =
TwinCAT::new()?;
Ok(())
}
#include "autd3/link/twincat.hpp"
int main() {
using namespace autd3;
link::TwinCAT();
return 0; }
using AUTD3Sharp.Link;

new TwinCAT();
from pyautd3.link.twincat import TwinCAT

TwinCAT()
Troubleshooting
When trying to use a large number of devices, an error like the one shown below may occur.
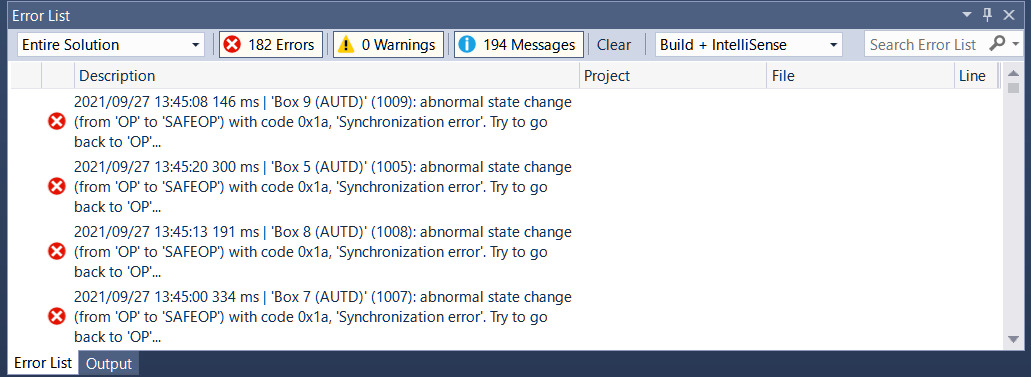
In this case, increase the values of Sync0 cycle time and Send task cycle time in AUTD3 Server, and run AUTD Server again.
The default values for these options are each.
The appropriate values depend on the number of devices connected. The smallest possible value that does not cause an error is desirable. For example, for 9 devices, a value of about – should work.
EtherCrab
NOTE: If TwinCAT is available, we generally recommend using TwinCAT.
This link uses EtherCrab, an open-source EtherCAT master library.
On Windows, install npcap in “WinPcap API compatible mode”. On Linux/macOS, no additional setup is required.
Install
cargo add autd3-link-ethercrab
target_link_libraries(<TARGET> PRIVATE autd3::link::ethercrab)
Included in the main library.
Included in the main library.
Included in the main library.
APIs
Pass the error callback function as the first argument, and options as the second argument.
use autd3_link_ethercrab::{EtherCrab, EtherCrabOption};
use std::time::Duration;

fn main() {
let _ =
EtherCrab::new(
    |idx, status| {
        eprintln!("Device[{}]: {}", idx, status);
    },
    EtherCrabOption {
        ifname: None,
        state_check_period: Duration::from_millis(100),
        sync0_period: Duration::from_millis(2),
        sync_tolerance: Duration::from_micros(1),
        sync_timeout: Duration::from_secs(10),
    },
);
}
#include <iostream>
#include <autd3_link_ethercrab.hpp>
int main() {
using namespace autd3;
link::EtherCrab(
[](const uint16_t idx, const link::Status status) {
std::cout << "Device[" << idx << "]: " << status << std::endl;
},
link::EtherCrabOption{
.ifname = std::nullopt,
.state_check_period = std::chrono::milliseconds(100),
.sync0_period = std::chrono::milliseconds(2),
.sync_tolerance = std::chrono::microseconds(1),
.sync_timeout = std::chrono::seconds(10),
});
return 0; }
using AUTD3Sharp;
using AUTD3Sharp.Link;
using AUTD3Sharp.Utils;

new EtherCrab(
    errHandler: (idx, status) =>
    {
        Console.Error.WriteLine($"Device[{idx}]: {status}");
    },
    option: new EtherCrabOption
    {
        Ifname = null,
        StateCheckPeriod = Duration.FromMillis(100),
        Sync0Period = Duration.FromMillis(2),
        SyncTolerance = Duration.FromMicros(1),
        SyncTimeout = Duration.FromSecs(10),
    }
);
from pyautd3 import Duration
from pyautd3_link_ethercrab import (
    EtherCrab,
    EtherCrabOption,
    Status,
)


def err_handler(idx: int, status: Status) -> None:
    print(f"Device[{idx}]: {status}")


EtherCrab(
    err_handler=err_handler,
    option=EtherCrabOption(
        ifname=None,
        state_check_period=Duration.from_millis(100),
        sync0_period=Duration.from_millis(2),
        sync_tolerance=Duration.from_micros(1),
        sync_timeout=Duration.from_secs(10),
    ),
)
The options available for the EtherCrab link are as follows. Default values are as shown above.
ifname: Network interface name. IfNone, the network interface to which the AUTD3 devices are connected is selected automatically.state_check_period: Interval at which to check for errors.sync0_period: Period of the SYNC0 signal.- When connecting a large number of devices, behavior may become unstable. In that case, increase
sync0_period. These values should be as small as possible without causing errors. The appropriate values depend on the number of connected units.
- When connecting a large number of devices, behavior may become unstable. In that case, increase
sync_tolerance: Synchronization tolerance. During initialization, the system waits until the difference in system time among devices falls below this value. If synchronization is not achieved within the timeout below, an error occurs. Changing this value is NOT recommended.sync_timeout: Synchronization timeout. Timeout for the system time difference measurement described above.
Remote
Remote link is used to connect to a remote server or an AUTD simulator.
Install
cargo add autd3-link-remote
target_link_libraries(<TARGET> PRIVATE autd3::link::remote)
Included in the main library.
Included in the main library.
Included in the main library.
APIs
In the constructor of Remote, specify the ip address and port number of the server.
You can also specify the timeout as an option.
use autd3_link_remote::{Remote, RemoteOption};

fn main() -> Result<(), Box<dyn std::error::Error>> {
let _ =
Remote::new("127.0.0.1:8080".parse()?, RemoteOption { timeout: None });
Ok(())
}
#include <optional>
#include "autd3/link/remote.hpp"
int main() {
using namespace autd3;
link::Remote("127.0.0.1:8080", link::RemoteOption{.timeout = std::nullopt});
return 0; }
using System.Net;
using AUTD3Sharp.Link;

new Remote(new IPEndPoint(IPAddress.Parse("127.0.0.1"), 8080), new RemoteOption
{
    Timeout = null,
});
from pyautd3.link.remote import Remote, RemoteOption

Remote("127.0.0.1:8080", RemoteOption(timeout=None))
RemoteTwinCAT
NOTE: This link is only available from Rust. Equivalent functionality is provided by
Remote.
As mentioned earlier, using AUTD3 with TwinCAT requires a Windows OS and a specific network adapter.
If you want to develop on a non-Windows PC, you can use the RemoteTwinCAT link to remotely operate TwinCAT from Linux/macOS.
Install
cargo add autd3-link-twincat --features remote
Setup
To use RemoteTwinCAT, you need two PCs.
One of these PCs must be able to use TwinCAT.
Hereby, this PC is referred to as the “server”.
The other PC, which is the development PC using the SDK, has no particular restrictions as long as it is connected to the same LAN as the server. H
ereby, this PC is referred to as the “client”.
First, connect the server to the AUTD device.
The LAN adapter used for this connection must be a TwinCAT-compatible adapter.
Then, connect the server and client via a different LAN.
This LAN adapter does not need to be TwinCAT-compatible1.
Next, check the IP addresses of the LAN between the server and client.
For example, let’s assume the server’s IP is 172.16.99.104 and the client’s IP is 172.16.99.62.
Next, start the AUTD Server on the server.
Specify the client’s IP address (in this example, 172.16.99.62) in the Client IP address field.
The “Server AmsNetId” and “Client AmsNetId” will be displayed on the right side of the screen, so make a note of them.
NOTE: The first four digits of the “Server AmsNetId” do not necessarily represent the server’s IP address.
APIs
In the constructor of RemoteTwinCAT, specify the ip address and AmsNetId of the server.
You can also specify the timeout and source address as options.
use autd3_link_twincat::{RemoteTwinCAT, RemoteTwinCATOption, Source, Timeouts};

fn main() -> Result<(), Box<dyn std::error::Error>> {
    let _ =
RemoteTwinCAT::new(
    "0.0.0.0".parse()?,
    "1.1.1.1.1.1".parse()?,
    RemoteTwinCATOption {
        timeouts: Timeouts::none(),
        source: Source::Auto,
    },
);
Ok(())
}
Firewall
If you encounter TCP-related errors, it is possible that the ADS protocol is being blocked by the firewall. In that case, configure the firewall to allow connections on TCP/UDP port 48898.
-
Wireless LAN is also acceptable. ↩
SOEM
NOTE: This link is only available in Rust.
NOTE: This link is distributed under the GPLv3 license.
SOEM is an open-source EtherCAT Master library developed by volunteers. Unlike TwinCAT, real-time performance is not guaranteed. Therefore, it is generally recommended to use TwinCAT. Using SOEM should be limited to unavoidable reasons or for development purposes only. On the other hand, SOEM has the advantage of being cross-platform and simple to install.
For Windows, install npcap in “WinPcap API compatible mode”. For Linux/macOS, no special preparation is required.
Install
cargo add autd3-link-soem
APIs
The first argument is a callback function for errors, and the second argument specifies options.
use autd3_link_soem::{Status, SOEM, SOEMOption};
use std::time::Duration;

fn main() {
let _ =
SOEM::new(
    |slave, status| {
        eprintln!("slave [{}]: {}", slave, status);
        if status == Status::Lost {
            std::process::exit(-1);
        }
    },
    SOEMOption {
        ifname: None,
        state_check_interval: Duration::from_millis(100),
        sync0_cycle: Duration::from_millis(1),
        sync_tolerance: Duration::from_micros(1),
        sync_timeout: Duration::from_secs(10),
    },
);
}
The options that can be specified for the SOEM link are as follows. The default values are as above.
buf_size: Transmission queue buffer size. Usually, there is no need to change this.ifname: Network interface name. If empty, the network interface to which the AUTD3 device is connected is automatically selected.state_check_interval: Interval to check for errorssync0_cycle: Synchronization signal cyclesend_cycle: Transmission cycleSOEMmay become unstable when connecting a large number of devices. In this case, increase the values ofsync0_cycleandsend_cycle. These values should be as small as possible without causing errors. The appropriate values depend on the number of connected devices. For example, for 9 devices, a value of about should work.
thread_priority: Thread priorityprocess_priority: Process priority (Windows only)sync_tolerance: Synchronization tolerance level. During initialization, this link waits until the system time difference of each device is below this value. If synchronization is not completed within the timeout period below, an error occurs. It is not recommended to change this value.sync_timeout: Synchronization timeout. Timeout period for the system time difference measurement above. ‐affinity: CPU affinity. IfNone, it is left to the OS.
Controller
This section introduces the APIs available in the Controller.
fpga_state
Retrieve the state of the FPGA.
Before using this, you need to enable state retrieval with ReadsFPGAState.
use autd3::prelude::*;
#[allow(unused_variables)]
fn main() -> Result<(), Box<dyn std::error::Error>> {
let mut autd = Controller::open([AUTD3::default()], autd3::link::Nop::new())?;
autd.send(ReadsFPGAState::new(|_dev| true))?;

let info = autd.fpga_state()?;
Ok(())
}
#include<autd3.hpp>
#include<autd3/link/nop.hpp>
int main() {
using namespace autd3;
auto autd =
Controller::open({AUTD3{}}, link::Nop{});
autd.send(ReadsFPGAState([](const auto&) { return true; }));
const auto info = autd.fpga_state();
return 0; }
using AUTD3Sharp;
using AUTD3Sharp.Link;
using AUTD3Sharp.Utils;
using var autd = Controller.Open([new AUTD3()], new Nop());
autd.Send(new ReadsFPGAState(_ => true));

var info = autd.FPGAState();
from pyautd3 import Controller, AUTD3, ReadsFPGAState
from pyautd3.link.nop import Nop
autd = Controller.open([AUTD3()], Nop())
autd.send(ReadsFPGAState(lambda _: True))

info = autd.fpga_state()
The argument of the ReadsFPGAState constructor is Fn(&Device) -> bool, which specifies whether to enable state retrieval for each device.
fpga_state returns None for devices that are not enabled.
The following information can currently be obtained as the state of the FPGA:
is_thermal_assert: Whether the temperature sensor for fan control is assertedcurrent_mod_segment: Current Modulation Segmentcurrent_stm_segment: Current FociSTM/GainSTM Segmentcurrent_gain_segment: Current Gain Segmentis_gain_mode: Whether Gain is currently being usedis_stm_mode: Whether FociSTM/GainSTM is currently being used
send
Send data to the device.
Data can be sent either individually or two at a time.
sender
You can specify settings for sending via sender.
use autd3::prelude::*;
use std::time::Duration;
fn main() -> Result<(), Box<dyn std::error::Error>> {
let mut autd = Controller::open([AUTD3::default()], autd3::link::Nop::new())?;
let mut sender = autd.sender(
    SenderOption {
        send_interval: Some(Duration::from_millis(1)),
        receive_interval: Some(Duration::from_millis(1)),
        timeout: None,
        parallel: ParallelMode::Auto,
    },
);
let d = Null {};
sender.send(d)?;
Ok(())
}
#include<chrono>
#include<autd3.hpp>
#include<autd3/link/nop.hpp>
int main() {
using namespace autd3;
auto autd = Controller::open({AUTD3{}}, link::Nop{});
auto sender =
autd.sender(SenderOption{.send_interval = std::chrono::milliseconds(1),
.receive_interval = std::chrono::milliseconds(1),
.timeout = std::nullopt});
const Null d;
sender.send(d);
return 0; }
using AUTD3Sharp;
using AUTD3Sharp.Link;
using AUTD3Sharp.Gain;
using AUTD3Sharp.Utils;
using var autd = Controller.Open([new AUTD3()], new Nop());
var sender = autd.Sender(
    new SenderOption
    {
        SendInterval = Duration.FromMillis(1),
        ReceiveInterval = Duration.FromMillis(1),
        Timeout = null,
    }
);
var d = new Null();
sender.Send(d);
from pyautd3 import AUTD3, Controller, Duration, Null, SenderOption
from pyautd3.link.nop import Nop
autd = Controller.open([AUTD3()], Nop())
sender = autd.sender(
    SenderOption(
        send_interval=Duration.from_millis(1),
        receive_interval=Duration.from_millis(1),
        timeout=None,
    ),
)
d = Null()
sender.send(d)
Here,
send_interval: Send intervalreceive_interval: Receive intervaltimeout: Timeout duration. See About Ack check for details.parallel: Parallel computation mode. See About Parallel Computation for details.
and the default values are as above.
Note that Controller::send is equivalent to Sender::send with the Controller::default_sender_option (which is configurable).
About ack check
If the timeout value is
- greater than 0, the
sendfunction waits until the sent data is processed by the device or the specified timeout duration elapses. If it cannot confirm that the sent data was processed by the device, it returns an error. - 0, the
sendfunction does not check whether the sent data was processed by the device.
If you want to ensure that the data is sent, it is recommended to set this to an appropriate value.
If timeout is not specified in SenderOption, the default value () is used.
When sending multiple data at once, the maximum timeout value of each data is used.
About Parallel Computation
Internal calculations for each data can be executed in parallel on a per-device basis.
Specifying ParallelMode::On enables parallel computation, and ParallelMode::Off disables it.
In the case of ParallelMode::Auto, parallel computation is enabled if the number of devices exceeds the parallel computation threshold value for each data as shown below.
| Parallel Computation Threshold Value | |
|---|---|
Clear/GPIOOutputs/ForceFan/PhaseCorrection/ReadsFPGAState/SwapSegment/Silencer/Synchronize/FociSTM (less than 4000 foci)/Modulation | 18446744073709551615 |
PulseWidthEncoder/FociSTM (4000 foci or more)// GainSTM/Gain | 4 |
inspect (available only in Rust)
The calculations for Gain, Modulation, GainSTM, and FociSTM are lazy for parallelization and to minimize memory allocation, and the calculation results are constructed directly within the frame.
Therefore, it is not possible to directly check these calculation results before sending.
By using Controller::inspect, you can check these calculation results without sending.
use autd3::prelude::*;
#[allow(unused_variables)]
fn main() -> Result<(), Box<dyn std::error::Error>> {
let autd = Controller::open([AUTD3::default()], autd3::link::Nop::new())?;
let r = autd.inspect(Null {})?;
dbg!(&r[0]); // result of device 0
// &r[0] = Some(
//     GainInspectionResult {
//         name: "Null",
//         data: [
//             Drive {
//                 phase: 0x00,
//                 intensity: 0x00,
//             },
//             ︙
//             Drive {
//                 phase: 0x00,
//                 intensity: 0x00,
//             },
//         ],
//         segment: S0,
//         transition_mode: None,
//     },
// )

Ok(())
}Gain
AUTD can individually control the phase/amplitude of each transducer, allowing it to generate various sound fields.
Gain is the structs that manages this, and the SDK provides several types of Gain to generate different sound fields by default.
- Null ‐ No output
- Focus - Single focus
- Bessel - Bessel beam
- Plane - Plane wave
- Uniform - Drive all transducers with the same phase/amplitude
- Custom - User can freely specify phase/amplitude
- GainGroup - Group transducers and apply different
Gainto each group - Holo - Multi-focus sound field
Null
Null is a Gain with an intensity of zero.
use autd3::prelude::*;
fn main() {
let _ =
Null {};
}
#include<autd3.hpp>
int main() {
using namespace autd3;
Null{};
return 0; }
using AUTD3Sharp.Gain;
new Null();
from pyautd3 import Null
Null()
Focus
Focus generates a single focal point.
use autd3::prelude::*;
fn main() {
let x = 0.;
let y = 0.;
let z = 0.;
let _ =
Focus {
    pos: Point3::new(x, y, z),
    option: FocusOption {
        intensity: Intensity::MAX,
        phase_offset: Phase::ZERO,
    },
};
}
#include<autd3.hpp>
int main() {
using namespace autd3;
const auto x = 0.0;
const auto y = 0.0;
const auto z = 0.0;
Focus(Point3(x, y, z), FocusOption{
.intensity = std::numeric_limits<Intensity>::max(),
.phase_offset = Phase::ZERO,
});
return 0; }
using AUTD3Sharp;
using AUTD3Sharp.Utils;
using AUTD3Sharp.Gain;
var x = 0.0f;
var y = 0.0f;
var z = 0.0f;
new Focus(
    pos: new Point3(x, y, z),
    option: new FocusOption
    {
        Intensity = Intensity.Max,
        PhaseOffset = Phase.Zero
    }
);
from pyautd3 import Intensity, Focus, FocusOption, Phase

x = 1.0
y = 0.0
z = 0.0
Focus(
    pos=[x, y, z],
    option=FocusOption(
        intensity=Intensity.MAX,
        phase_offset=Phase.ZERO,
    ),
)
Optionally, you can specify the output intensity and phase offset. The default values are as above.
Bessel
Bessel generates a Bessel beam.
This Gain is based on the paper by Hasegawa et al. 1.
use autd3::prelude::*;
fn main() {
let x = 0.;
let y = 0.;
let z = 0.;
let nx = 0.;
let ny = 0.;
let nz = 0.;
let theta = 0. * rad;
let _ =
Bessel {
    apex: Point3::new(x, y, z),
    dir: UnitVector3::new_normalize(Vector3::new(nx, ny, nz)),
    theta,
    option: BesselOption {
        intensity: Intensity::MAX,
        phase_offset: Phase::ZERO,
    },
};
}
#include<autd3.hpp>
int main() {
using namespace autd3;
const auto x = 0.0;
const auto y = 0.0;
const auto z = 0.0;
const auto nx = 0.0;
const auto ny = 0.0;
const auto nz = 1.0;
const auto theta = 0.0;
Bessel(Point3(x, y, z), Vector3(nx, ny, nz), theta* rad,
BesselOption{
.intensity = std::numeric_limits<Intensity>::max(),
.phase_offset = Phase::ZERO,
});
return 0; }
using AUTD3Sharp;
using AUTD3Sharp.Utils;
using AUTD3Sharp.Gain;
using static AUTD3Sharp.Units;
var x = 0.0f;
var y = 0.0f;
var z = 0.0f;
var nx = 0.0f;
var ny = 0.0f;
var nz = 1.0f;
var theta = 0.0f;
new Bessel(
    apex: new Point3(x, y, z),
    dir: new Vector3(nx, ny, nz),
    theta: theta * rad,
    option: new BesselOption
    {
        Intensity = Intensity.Max,
        PhaseOffset = Phase.Zero
    }
);
from pyautd3 import Bessel, BesselOption, Intensity, Phase, rad

x = 0.0
y = 0.0
z = 0.0
nx = 1.0
ny = 0.0
nz = 0.0
theta = 0.0
Bessel(
    apex=[x, y, z],
    direction=[nx, ny, nz],
    theta=theta * rad,
    option=BesselOption(
        intensity=Intensity.MAX,
        phase_offset=Phase.ZERO,
    ),
)
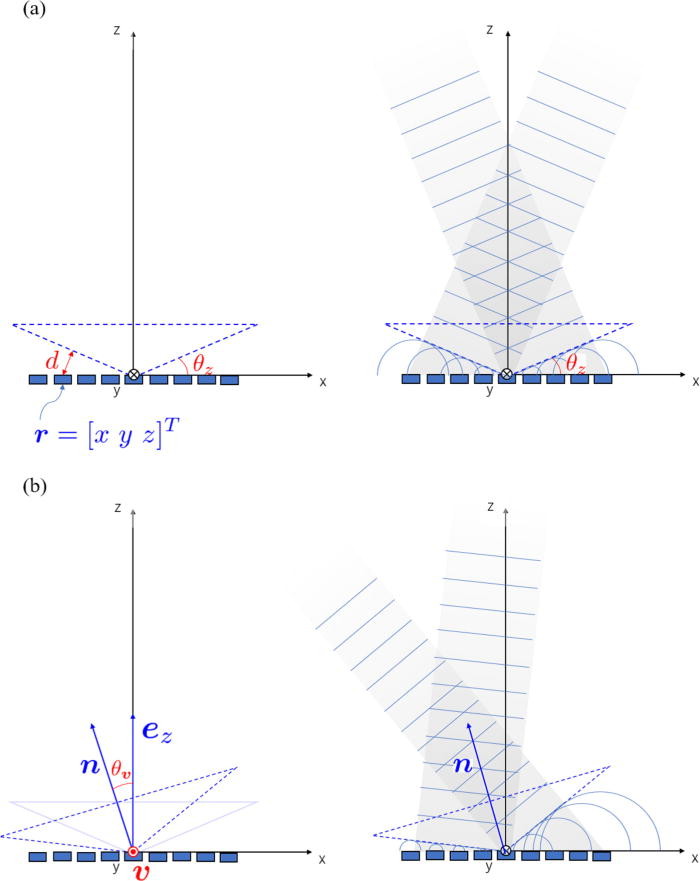
Here, apex is the apex of the virtual cone (dotted line in the figure below) that generates the beam, dir is the direction of the beam, and theta is the angle between the plane perpendicular to the beam and the side of the virtual cone that generates the beam ( in the figure below).
Optionally, you can specify the output intensity and phase offset. The default values are as above.
-
Hasegawa, Keisuke, et al. “Electronically steerable ultrasound-driven long narrow air stream.” Applied Physics Letters 111.6 (2017): 064104. ↩
Plane
Plane outputs a plane wave.
use autd3::prelude::*;
fn main() {
let nx = 0.;
let ny = 0.;
let nz = 0.;
let _ =
Plane {
    dir: UnitVector3::new_normalize(Vector3::new(nx, ny, nz)),
    option: PlaneOption {
        intensity: Intensity::MAX,
        phase_offset: Phase::ZERO,
    },
};
}
#include<autd3.hpp>
int main() {
using namespace autd3;
const auto nx = 0.0;
const auto ny = 0.0;
const auto nz = 1.0;
Plane(Vector3(nx, ny, nz),
PlaneOption{
.intensity = std::numeric_limits<Intensity>::max(),
.phase_offset = Phase::ZERO,
});
return 0; }
using AUTD3Sharp;
using AUTD3Sharp.Utils;
using AUTD3Sharp.Gain;
var nx = 0.0f;
var ny = 0.0f;
var nz = 1.0f;
new Plane(
    dir: new Vector3(nx, ny, nz),
    option: new PlaneOption
    {
        Intensity = Intensity.Max,
        PhaseOffset = Phase.Zero
    }
);
from pyautd3 import Intensity, Phase, Plane, PlaneOption
nx = 1.0
ny = 0.0
nz = 0.0
Plane(
    direction=[nx, ny, nz],
    option=PlaneOption(
        intensity=Intensity.MAX,
        phase_offset=Phase.ZERO,
    ),
)
Here, dir is the direction of the plane wave.
Optionally, you can specify the output amplitude and phase offset. The default values are as above.
Uniform
Uniform sets the same phase/intensity for all transducers.
use autd3::prelude::*;
fn main() {
let _ =
Uniform {
    intensity: Intensity::MAX,
    phase: Phase::ZERO,
};
}
#include<autd3.hpp>
#include <limits>
int main() {
using namespace autd3;
Uniform(std::numeric_limits<Intensity>::max(), Phase::ZERO);
return 0; }
using AUTD3Sharp;
using AUTD3Sharp.Gain;
new Uniform(
    intensity: Intensity.Max,
    phase: Phase.Zero
);
from pyautd3 import Intensity, Phase, Uniform
Uniform(intensity=Intensity.MAX, phase=Phase.ZERO)
Custom
Custom is a Gain that allows the user to freely generate sound fields.
use autd3::gain::Custom;
use autd3::prelude::*;

fn main() {
let _ =
Custom::new(|_dev| {
    |_tr| Drive {
        phase: Phase::ZERO,
        intensity: Intensity::MIN,
    }
});
}
#include<autd3.hpp>
#include <autd3/gain/custom.hpp>
int main() {
using namespace autd3;
gain::Custom([](const auto& dev) {
return [](const auto& tr) {
return Drive(Phase::ZERO, std::numeric_limits<Intensity>::min());
};
});
return 0; }
using System;
using AUTD3Sharp;
using AUTD3Sharp.Gain;
using static AUTD3Sharp.Units;

new Custom(dev => tr => new Drive(Phase.Zero, Intensity.Min));
from pyautd3 import Drive, Intensity, Phase
from pyautd3.gain import Custom

Custom(lambda _dev: lambda _tr: Drive(phase=Phase.ZERO, intensity=Intensity.MIN))
The argument of the Custom constructor is Fn(&Device) -> Fn(&Transducer) -> Drive.
GainGroup
GainGroup is a Gain that set different Gains for each transducer.
NOTE: If you only need to group by device, it is recommended to use
Group.
In GainGroup, keys are assigned to transducers, and each key is associated with a Gain.
use autd3::prelude::*;
use std::collections::HashMap;

fn main() -> Result<(), Box<dyn std::error::Error>> {
let x = 0.;
let y = 0.;
let z = 0.;
let _ =
GainGroup::new(
    |_dev| {
        |tr| match tr.idx() {
            0..=100 => Some("null"),
            _ => Some("focus"),
        }
    },
    HashMap::from([
        ("null", BoxedGain::new(Null {})),
        (
            "focus",
            BoxedGain::new(Focus {
                pos: Point3::new(x, y, z),
                option: Default::default(),
            }),
        ),
    ]),
);
Ok(())
}
NOTE: In the Rust version, the values of
HashMapmust all be of the same type, soBoxedGainis used here to unify the types.
#include<optional>
#include<autd3.hpp>
int main() {
using namespace autd3;
const auto x = 0.0;
const auto y = 0.0;
const auto z = 0.0;
GainGroup(
    [](const auto& dev) {
      return [](const auto& tr) -> std::optional<const char*> {
        if (tr.idx() <= 100) return "null";
        return "focus";
      };
    },
    std::unordered_map<const char*, std::shared_ptr<Gain>>{
        {"focus", std::make_shared<Focus>(Point3(x, y, z), FocusOption{})},
        {"null", std::make_shared<Null>()}});
return 0; }
NOTE: In C++,
std::optionalmust be used for the keys. Also, to unify the types,std::shared_ptr<autd3::Gain>is used.
using AUTD3Sharp.Utils;
using AUTD3Sharp.Gain;
using AUTD3Sharp.Driver.Datagram;
var x = 0.0f;
var y = 0.0f;
var z = 0.0f;
new GainGroup(
    keyMap: dev => tr => tr.Idx() <= 100 ? "null" : "focus",
    gainMap: new Dictionary<object, IGain> {
        { "null", new Null() },
        { "focus", new Focus(pos: new Point3(x, y, z), option: new FocusOption()) }
    }
);
from pyautd3 import Focus, FocusOption, Null, GainGroup
x = 1.0
y = 0.0
z = 0.0
GainGroup(
    key_map=lambda _: lambda tr: "null" if tr.idx() <= 100 else "focus",
    gain_map={"null": Null(), "focus": Focus(pos=[x, y, z], option=FocusOption())},
)
In the above example, transducers with local indices from 0 to 100 output Null, and the rest output Focus.
NOTE: In this sample,
&strare used as keys, but any type that can be used as a key inHashMapis acceptable.
Holo
Holo is a Gain for generating multiple focal points.
Install
cargo add autd3-gain-holo
target_link_libraries(<TARGET> PRIVATE autd3::gain::holo)
Included in the main library.
Included in the main library.
Included in the main library.
APIs
Several algorithms for generating multiple focal points have been proposed, and the SDK implements the following algorithms:
Naive- Superimposition of single focal point solutionsGS- Gershberg-SaxonGSPAT- Gershberg-Saxon for Phased Arrays of TransducersGreedy- Greedy algorithm and Brute-force search
Emission Constraints
The intensity of the calculation results of each algorithm must ultimately be limited to the range that the transducers can output.
This can be controlled with the optional EmissionConstraint, and one of the following four must be specified:
- Normalize: Normalize all transducer intensities by dividing by the maximum intensity.
- Uniform: Set the intensity of all transducers to the specified value.
- Clamp: Clamp the intensity to the specified range.
- Multiply: Multiply by a specified value after normalization.
Naive
Gain for multiple focal points by superimposing single focal point solutions.
use autd3::prelude::*;
use autd3_gain_holo::{EmissionConstraint, Pa, Naive, NaiveOption};

fn main() {
let x1 = 0.;
let y1 = 0.;
let z1 = 0.;
let x2 = 0.;
let y2 = 0.;
let z2 = 0.;
let _ =
Naive::new(
    vec![
        (Point3::new(x1, y1, z1), 5e3 * Pa),
        (Point3::new(x2, y2, z2), 5e3 * Pa),
    ],
    NaiveOption {
        constraint: EmissionConstraint::Clamp(Intensity::MIN, Intensity::MAX),
        ..Default::default()
    },
);
}
#include<autd3.hpp>
#include "autd3/gain/holo.hpp"
using namespace autd3;
using gain::holo::Pa;
int main() {
const auto x1 = 0.0;
const auto y1 = 0.0;
const auto z1 = 0.0;
const auto x2 = 0.0;
const auto y2 = 0.0;
const auto z2 = 0.0;
auto g = gain::holo::Naive(
std::vector<std::pair<Point3, gain::holo::Amplitude>>{
{Point3(x1, y1, z1), 5e3 * Pa},
{Point3(x2, y2, z2), 5e3 * Pa},
},
gain::holo::NaiveOption{
.constraint = gain::holo::EmissionConstraint::Clamp(
std::numeric_limits<Intensity>::min(),
std::numeric_limits<Intensity>::max()),
});
return 0; }
using AUTD3Sharp.Gain.Holo;

using AUTD3Sharp;
using AUTD3Sharp.Utils;
using static AUTD3Sharp.Units;
var x1 = 0.0f;
var y1 = 0.0f;
var z1 = 0.0f;
var x2 = 0.0f;
var y2 = 0.0f;
var z2 = 0.0f;
new Naive(
    foci: [
             (new Point3(x1, y1, z1), 5e3f * Pa),
             (new Point3(x2, y2, z2), 5e3f * Pa)
    ],
    option: new NaiveOption
    {
        EmissionConstraint = EmissionConstraint.Clamp(Intensity.Min, Intensity.Max),
    }
);
import numpy as np
from pyautd3 import Intensity
from pyautd3.gain.holo import Naive, EmissionConstraint, NaiveOption, Pa

x1 = 0.0
y1 = 0.0
z1 = 0.0
x2 = 0.0
y2 = 0.0
z2 = 0.0
Naive(
    foci=[(np.array([x1, y1, z1]), 5e3 * Pa), (np.array([x2, y2, z2]), 5e3 * Pa)],
    option=NaiveOption(
        constraint=EmissionConstraint.Clamp(Intensity.MIN, Intensity.MAX),
    ),
)
GS
Gershberg-Saxon, Gain for multiple focal points based on the paper by Marzo et al.1.
use autd3::prelude::*;
use autd3_gain_holo::{EmissionConstraint, Pa, GS, GSOption};
use std::num::NonZeroUsize;

fn main() {
let x1 = 0.;
let y1 = 0.;
let z1 = 0.;
let x2 = 0.;
let y2 = 0.;
let z2 = 0.;
let _ =
GS::new(
    vec![
        (Point3::new(x1, y1, z1), 5e3 * Pa),
        (Point3::new(x2, y2, z2), 5e3 * Pa),
    ],
    GSOption {
        repeat: NonZeroUsize::new(100).unwrap(),
        constraint: EmissionConstraint::Clamp(Intensity::MIN, Intensity::MAX),
    },
);
}
#include<autd3.hpp>
#include "autd3/gain/holo.hpp"
using namespace autd3;
using gain::holo::Pa;
int main() {
const auto x1 = 0.0;
const auto y1 = 0.0;
const auto z1 = 0.0;
const auto x2 = 0.0;
const auto y2 = 0.0;
const auto z2 = 0.0;
auto g = gain::holo::GS(
std::vector<std::pair<Point3, gain::holo::Amplitude>>{
{Point3(x1, y1, z1), 5e3 * Pa},
{Point3(x2, y2, z2), 5e3 * Pa},
},
gain::holo::GSOption{
.repeat = 100,
.constraint = gain::holo::EmissionConstraint::Clamp(
std::numeric_limits<Intensity>::min(),
std::numeric_limits<Intensity>::max()),
});
return 0; }
using AUTD3Sharp.Gain.Holo;

using AUTD3Sharp;
using AUTD3Sharp.Utils;
using static AUTD3Sharp.Units;
var x1 = 0.0f;
var y1 = 0.0f;
var z1 = 0.0f;
var x2 = 0.0f;
var y2 = 0.0f;
var z2 = 0.0f;
new GS(
    foci: [
             (new Point3(x1, y1, z1), 5e3f * Pa),
             (new Point3(x2, y2, z2), 5e3f * Pa)
    ],
    option: new GSOption
    {
        Repeat = 100,
        EmissionConstraint = EmissionConstraint.Clamp(Intensity.Min, Intensity.Max),
    }
);
import numpy as np
from pyautd3 import Intensity
from pyautd3.gain.holo import GS, EmissionConstraint, GSOption, Pa

x1 = 0.0
y1 = 0.0
z1 = 0.0
x2 = 0.0
y2 = 0.0
z2 = 0.0
GS(
    foci=[(np.array([x1, y1, z1]), 5e3 * Pa), (np.array([x2, y2, z2]), 5e3 * Pa)],
    option=GSOption(
        repeat=100,
        constraint=EmissionConstraint.Clamp(Intensity.MIN, Intensity.MAX),
    ),
)
repeat is the number of iterations, the default is as above.
For details on the parameters, refer to the paper1.
-
Marzo, Asier, and Bruce W. Drinkwater. “Holographic acoustic tweezers.” Proceedings of the National Academy of Sciences 116.1 (2019): 84-89. ↩ ↩2
GSPAT
Gershberg-Saxon for Phased Arrays of Transducers, Gain for multiple focal points based on the paper by Plasencia et al.1.
use autd3::prelude::*;
use autd3_gain_holo::{EmissionConstraint, Pa, GSPAT, GSPATOption};
use std::num::NonZeroUsize;

fn main() {
let x1 = 0.;
let y1 = 0.;
let z1 = 0.;
let x2 = 0.;
let y2 = 0.;
let z2 = 0.;
let _ =
GSPAT::new(
    vec![
        (Point3::new(x1, y1, z1), 5e3 * Pa),
        (Point3::new(x2, y2, z2), 5e3 * Pa),
    ],
    GSPATOption {
        repeat: NonZeroUsize::new(100).unwrap(),
        constraint: EmissionConstraint::Clamp(Intensity::MIN, Intensity::MAX),
    },
);
}
#include<autd3.hpp>
#include "autd3/gain/holo.hpp"
using namespace autd3;
using gain::holo::Pa;
int main() {
const auto x1 = 0.0;
const auto y1 = 0.0;
const auto z1 = 0.0;
const auto x2 = 0.0;
const auto y2 = 0.0;
const auto z2 = 0.0;
auto g = gain::holo::GSPAT(
std::vector<std::pair<Point3, gain::holo::Amplitude>>{
{Point3(x1, y1, z1), 5e3 * Pa},
{Point3(x2, y2, z2), 5e3 * Pa},
},
gain::holo::GSPATOption{
.repeat = 100,
.constraint = gain::holo::EmissionConstraint::Clamp(
std::numeric_limits<Intensity>::min(),
std::numeric_limits<Intensity>::max()),
});
return 0; }
using AUTD3Sharp.Gain.Holo;

using AUTD3Sharp;
using AUTD3Sharp.Utils;
using static AUTD3Sharp.Units;
var x1 = 0.0f;
var y1 = 0.0f;
var z1 = 0.0f;
var x2 = 0.0f;
var y2 = 0.0f;
var z2 = 0.0f;
new GSPAT(
    foci: [
             (new Point3(x1, y1, z1), 5e3f * Pa),
             (new Point3(x2, y2, z2), 5e3f * Pa)
    ],
    option: new GSPATOption
    {
        Repeat = 100,
        EmissionConstraint = EmissionConstraint.Clamp(Intensity.Min, Intensity.Max),
    }
);
import numpy as np
from pyautd3 import Intensity
from pyautd3.gain.holo import GSPAT, EmissionConstraint, GSPATOption, Pa

x1 = 0.0
y1 = 0.0
z1 = 0.0
x2 = 0.0
y2 = 0.0
z2 = 0.0
GSPAT(
    foci=[(np.array([x1, y1, z1]), 5e3 * Pa), (np.array([x2, y2, z2]), 5e3 * Pa)],
    option=GSPATOption(
        repeat=100,
        constraint=EmissionConstraint.Clamp(Intensity.MIN, Intensity.MAX),
    ),
)
repeat is the number of iterations, the default is as above.
For details on the parameters, refer to the paper1.
-
Plasencia, Diego Martinez, et al. “GS-PAT: high-speed multi-point sound-fields for phased arrays of transducers.” ACM Transactions on Graphics (TOG) 39.4 (2020): 138-1. ↩ ↩2
LM
Greedy
Greedy Algorithm with Brute-Force Search, Gain for multiple focal points based on the paper by Suzuki et al.1.
use autd3::prelude::*;
use autd3_gain_holo::{EmissionConstraint, Pa, Greedy, GreedyOption, abs_objective_func};
use std::num::NonZeroU8;

fn main() {
let x1 = 0.;
let y1 = 0.;
let z1 = 0.;
let x2 = 0.;
let y2 = 0.;
let z2 = 0.;
let _ =
Greedy::new(
    vec![
        (Point3::new(x1, y1, z1), 5e3 * Pa),
        (Point3::new(x2, y2, z2), 5e3 * Pa),
    ],
    GreedyOption {
        phase_quantization_levels: NonZeroU8::new(16).unwrap(),
        constraint: EmissionConstraint::Uniform(Intensity::MAX),
        objective_func: abs_objective_func,
    },
);
}
#include <autd3.hpp>
#include "autd3/gain/holo.hpp"
using namespace autd3;
using gain::holo::Pa;
int main() {
const auto x1 = 0.0;
const auto y1 = 0.0;
const auto z1 = 0.0;
const auto x2 = 0.0;
const auto y2 = 0.0;
const auto z2 = 0.0;
auto g = gain::holo::Greedy(
std::vector<std::pair<Point3, gain::holo::Amplitude>>{
{Point3(x1, y1, z1), 5e3 * Pa},
{Point3(x2, y2, z2), 5e3 * Pa},
},
gain::holo::GreedyOption{
.phase_quantization_levels = 16,
.constraint = gain::holo::EmissionConstraint::Uniform(
std::numeric_limits<Intensity>::max())});
return 0;
}
using AUTD3Sharp.Gain.Holo;

using AUTD3Sharp;
using AUTD3Sharp.Utils;
using static AUTD3Sharp.Units;
var x1 = 0.0f;
var y1 = 0.0f;
var z1 = 0.0f;
var x2 = 0.0f;
var y2 = 0.0f;
var z2 = 0.0f;
new Greedy(
    foci: [
             (new Point3(x1, y1, z1), 5e3f * Pa),
             (new Point3(x2, y2, z2), 5e3f * Pa)
    ],
    option: new GreedyOption
    {
        PhaseQuantizationLevels = 16,
        EmissionConstraint = EmissionConstraint.Uniform(Intensity.Max),
    }
);
import numpy as np
from pyautd3 import Intensity
from pyautd3.gain.holo import Greedy, EmissionConstraint, GreedyOption, Pa

x1 = 0.0
y1 = 0.0
z1 = 0.0
x2 = 0.0
y2 = 0.0
z2 = 0.0
Greedy(
    foci=[(np.array([x1, y1, z1]), 5e3 * Pa), (np.array([x2, y2, z2]), 5e3 * Pa)],
    option=GreedyOption(
        phase_quantization_levels=16,
        constraint=EmissionConstraint.Uniform(Intensity.MAX),
    ),
)
phase_quantization_levels is the discretization depth of the phase, the default is as above.
For details on the parameters, refer to the paper1.
-
Suzuki, Shun, et al. “Radiation Pressure Field Reconstruction for Ultrasound Midair Haptics by Greedy Algorithm with Brute-Force Search.” IEEE Transactions on Haptics (2021). ↩ ↩2
Spatio-Temporal Modulation
The SDK provides a feature for periodically switching sound fields called Spatio-Temporal Modulation (STM).
The SDK supports FociSTM for single to eight focal points and GainSTM for arbitrary Gain.
FociSTM and GainSTM use the timer on the AUTD3 hardware, providing high time precision but with some constraints.
Common API for FociSTM/GainSTM
Getting Sampling Configuration
You can get the sampling configuration with sampling_config.
use autd3::prelude::*;
fn main() -> Result<(), Box<dyn std::error::Error>> {
let stm = FociSTM {
    foci: vec![Point3::origin(), Point3::origin()],
    config: 1.0 * Hz,
};
dbg!(stm.sampling_config()?.freq()?); // -> 2Hz
Ok(())
}
#include<iostream>
#include<autd3.hpp>
int main() {
using namespace autd3;
FociSTM stm(
std::vector{
Point3::origin(),
Point3::origin(),
},
1.0f * Hz);
std::cout << stm.sampling_config().freq() << std::endl; // -> 2Hz
return 0; }
using AUTD3Sharp;
using AUTD3Sharp.Utils;
using static AUTD3Sharp.Units;
var stm = new FociSTM(foci: [Point3.Origin, Point3.Origin], config: 1.0f * Hz);
Console.WriteLine(stm.SamplingConfig().Freq()); // -> 2 Hz
import numpy as np
from pyautd3 import FociSTM, Hz
stm = FociSTM(
    foci=[np.array([0.0, 0.0, 0.0]), np.array([0.0, 0.0, 0.0])],
    config=1.0 * Hz,
)
print(stm.sampling_config().freq())  # -> 2Hz
FiniteLoop
In FociSTM/GainSTM, you can control the loop behavior.
The default is an infinite loop.
For details, refer to Segment/FiniteLoop.
Utilities
Only the Rust version provides utilities for generating linear and circular trajectories.
use autd3::prelude::*;
fn main() {
let start = Point3::origin();
let end = Point3::origin();
let center = Point3::origin();
let radius = 30.0 * mm;
let num_points = 50;
let n = Vector3::z_axis();
let intensity = Intensity::MAX;
let _ =
FociSTM {
    foci: Line {
        start,
        end,
        num_points,
        intensity,
    },
    config: 1.0 * Hz,
};

let _ =
FociSTM {
    foci: Circle {
        center,
        radius,
        num_points,
        n, // normal vector to the plane where the circle is drawn
        intensity,
    },
    config: 1.0 * Hz,
};
}FociSTM
- The maximum number of sound field patterns is
- In extended mode, it is
- The sampling rate is , where is a 16-bit unsigned integer greater than 0
The usage of FociSTM is as follows.
This is a sample that rotates a focus on the circumference of a circle with a radius of centered at a point directly above the center of the array.
The circumference is sampled at 200 points, rotating at . (That is, the sampling frequency is .)
use autd3::prelude::*;
fn main() -> Result<(), Box<dyn std::error::Error>> {
let autd = Controller::open([AUTD3::default()], Nop::new())?;
let center = autd.center() + Vector3::new(0., 0., 150.0 * mm);
let point_num = 200;
let radius = 30.0 * mm;
let _ =
FociSTM {
    foci: (0..point_num)
        .map(|i| {
            let theta = 2.0 * PI * i as f32 / point_num as f32;
            let p = radius * Vector3::new(theta.cos(), theta.sin(), 0.0);
            center + p
        })
        .collect::<Vec<_>>(),
    config: 1.0 * Hz,
};
Ok(())
}
#include <ranges>
#include<autd3.hpp>
#include<autd3/link/nop.hpp>
using namespace std::ranges::views;
int main() {
using namespace autd3;
auto autd = Controller::open({AUTD3{
.pos = Point3::origin(),
.rot = Quaternion::Identity(),
}},
link::Nop{});
const Point3 center = autd.center() + Vector3(0, 0, 150);
constexpr auto points_num = 200;
constexpr auto radius = 30.0f;
FociSTM(iota(0) | take(points_num) | transform([&](auto i) {
const auto theta = 2.0f * pi * static_cast<float>(i) /
static_cast<float>(points_num);
Point3 p =
center + radius * Vector3(std::cos(theta), std::sin(theta), 0);
return p;
}) | std::ranges::to<std::vector<Point3>>(),
1.0f * Hz);
return 0; }
using AUTD3Sharp;
using AUTD3Sharp.Utils;
using AUTD3Sharp.Link;
using static AUTD3Sharp.Units;
using var autd = Controller.Open([new AUTD3(pos: Point3.Origin, rot: Quaternion.Identity)], new Nop());
var center = autd.Center() + new Vector3(0, 0, 150);
const int pointNum = 200;
const float radius = 30.0f;
new FociSTM(
    foci: Enumerable.Range(0, pointNum).Select(i =>
    {
        var theta = 2.0f * MathF.PI * i / pointNum;
        return center + radius * new Vector3(MathF.Cos(theta), MathF.Sin(theta), 0);
    }),
    config: 1.0f * Hz
);
import numpy as np
from pyautd3 import AUTD3, Controller, FociSTM, Hz
from pyautd3.link.nop import Nop
autd = Controller.open([AUTD3(pos=[0.0, 0.0, 0.0], rot=[1, 0, 0, 0])], Nop())
center = autd.center() + np.array([0.0, 0.0, 150.0])
point_num = 200
radius = 30.0
FociSTM(
    foci=(
        center + radius * np.array([np.cos(theta), np.sin(theta), 0])
        for theta in (2.0 * np.pi * i / point_num for i in range(point_num))
    ),
    config=1.0 * Hz,
)
In config, you can specify the frequency, period, and sampling settings.
Due to constraints on the number of sampling points and the sampling period, it may not be possible to output at the specified frequency.
For example, in the above example, to rotate 200 points at , the sampling frequency should be .
However, if point_num=199, the sampling frequency must be , but there is no integer that satisfies , resulting in an error.
Using FociSTM::into_nearest, the nearest is selected, but note that the actual frequency may differ from the specified frequency.
Multiple Foci
FociSTM can output up to 8 foci simultaneously.
Below is an example with 2 foci.
use autd3::prelude::*;
fn main() -> Result<(), Box<dyn std::error::Error>> {
let autd = Controller::open([AUTD3::default()], Nop::new())?;
let center = autd.center() + Vector3::new(0., 0., 150.0 * mm);
let point_num = 200;
let radius = 30.0 * mm;
let _ =
FociSTM {
    foci: (0..point_num)
        .map(|i| {
            let theta = 2.0 * PI * i as f32 / point_num as f32;
            let p = radius * Vector3::new(theta.cos(), theta.sin(), 0.0);
            ControlPoints {
                points: [
                    ControlPoint {
                        point: center + p,
                        phase_offset: Phase::ZERO,
                    },
                    ControlPoint {
                        point: center - p,
                        phase_offset: Phase::ZERO,
                    },
                ],
                intensity: Intensity::MAX,
            }
        })
        .collect::<Vec<_>>(),
    config: 1.0 * Hz,
};
Ok(())
}
#include <ranges>
#include<autd3.hpp>
#include<autd3/link/nop.hpp>
using namespace std::ranges::views;
int main() {
using namespace autd3;
auto autd = Controller::open({AUTD3{
.pos = Point3::origin(),
.rot = Quaternion::Identity(),
}},
link::Nop{});
const Point3 center = autd.center() + Vector3(0, 0, 150);
constexpr auto points_num = 200;
constexpr auto radius = 30.0f;
FociSTM stm(iota(0) | take(points_num) | transform([&](auto i) {
const auto theta = 2.0f * pi * static_cast<float>(i) /
static_cast<float>(points_num);
Vector3 p = radius * Vector3(std::cos(theta), std::sin(theta), 0);
return ControlPoints<2>{
.points = {ControlPoint{.point = center + p,
.phase_offset = Phase::ZERO},
ControlPoint{.point = center - p,
.phase_offset = Phase::ZERO}},
.intensity = std::numeric_limits<Intensity>::max()};
}) | std::ranges::to<std::vector<ControlPoints<2>>>(),
1.0f * Hz);
return 0; }
using AUTD3Sharp;
using AUTD3Sharp.Utils;
using AUTD3Sharp.Link;
using static AUTD3Sharp.Units;
using var autd = Controller.Open([new AUTD3(pos: Point3.Origin, rot: Quaternion.Identity)], new Nop());
var center = autd.Center() + new Vector3(0, 0, 150);
const int pointNum = 200;
const float radius = 30.0f;
new FociSTM(
    foci: Enumerable.Range(0, pointNum).Select(i =>
        {
            var theta = 2.0f * MathF.PI * i / pointNum;
            var p = radius * new Vector3(MathF.Cos(theta), MathF.Sin(theta), 0);
            return new ControlPoints(
                points: [
                    new ControlPoint { Point = center + p, PhaseOffset = Phase.Zero},
                    new ControlPoint { Point = center - p, PhaseOffset = Phase.Zero}
                ],
                intensity: Intensity.Max
            );
        }),
    config: 1.0f * Hz
);
import numpy as np
from pyautd3 import AUTD3, Controller, ControlPoint, ControlPoints, Intensity, FociSTM, Hz, Phase
from pyautd3.link.nop import Nop
autd = Controller.open([AUTD3(pos=[0.0, 0.0, 0.0], rot=[1, 0, 0, 0])], Nop())
center = autd.center() + np.array([0.0, 0.0, 150.0])
point_num = 200
radius = 30.0
FociSTM(
    foci=(
        ControlPoints(
            points=[
                ControlPoint(
                    point=center + radius * np.array([np.cos(theta), np.sin(theta), 0]),
                    phase_offset=Phase.ZERO,
                ),
                ControlPoint(
                    point=center - radius * np.array([np.cos(theta), np.sin(theta), 0]),
                    phase_offset=Phase.ZERO,
                ),
            ],
            intensity=Intensity.MAX,
        )
        for theta in (2.0 * np.pi * i / point_num for i in range(point_num))
    ),
    config=1.0 * Hz,
)
The multi-focus sound field of FociSTM is a simple superposition of single-focus sound fields.
That is, for the position of the transducer , each focus position , ultrasonic frequency , and speed of sound , the phase is calculated as follows.
Here, is the phase offset of each focus.
For amplitude, the specified value from the software is used instead of .
Constraints
To reduce data volume, FociSTM encodes the focus position coordinates as signed fixed-point numbers with a unit of .
Therefore, for each axis direction, only foci within the range of from all transducers can be output.
Also, since internal calculations are performed with fixed-point numbers, the phase may differ from that of gain::Focus.
GainSTM
GainSTM is different from FociSTM in that it can handle arbitrary Gain.
However, the number of Gain that can be used is (in extended mode ).
The usage of GainSTM is as follows.
This is a sample that rotates a focus on the circumference of a circle with a radius of centered at a point directly above the center of the array.
The circumference is sampled at 200 points, rotating at . (That is, the sampling frequency is .)
use autd3::prelude::*;
fn main() -> Result<(), Box<dyn std::error::Error>> {
let autd = Controller::open([AUTD3::default()], Nop::new())?;
let center = autd.center() + Vector3::new(0., 0., 150.0 * mm);
let point_num = 200;
let radius = 30.0 * mm;
let _ =
GainSTM {
    gains: (0..point_num)
        .map(|i| {
            let theta = 2.0 * PI * i as f32 / point_num as f32;
            let p = radius * Vector3::new(theta.cos(), theta.sin(), 0.0);
            Focus {
                pos: center + p,
                option: FocusOption::default(),
            }
        })
        .collect::<Vec<_>>(),
    config: 1.0 * Hz,
    option: GainSTMOption {
        mode: GainSTMMode::PhaseIntensityFull,
    },
};
Ok(())
}
#include <ranges>
#include<autd3.hpp>
#include<autd3/link/nop.hpp>
using namespace std::ranges::views;
int main() {
using namespace autd3;
auto autd = Controller::open({AUTD3{
.pos = Point3::origin(),
.rot = Quaternion::Identity(),
}},
link::Nop{});
const Point3 center = autd.center() + Vector3(0, 0, 150);
constexpr auto points_num = 200;
constexpr auto radius = 30.0f;
GainSTM(iota(0) | take(points_num) | transform([&](auto i) {
const auto theta = 2.0f * pi * static_cast<float>(i) /
static_cast<float>(points_num);
return Focus(
center + radius * Vector3(std::cos(theta), std::sin(theta), 0),
FocusOption{});
}) | std::ranges::to<std::vector<Focus>>(),
1.0f * Hz, GainSTMOption{.mode = GainSTMMode::PhaseIntensityFull});
return 0; }
using AUTD3Sharp;
using AUTD3Sharp.Utils;
using AUTD3Sharp.Gain;
using AUTD3Sharp.Link;
using static AUTD3Sharp.Units;
using var autd = Controller.Open([new AUTD3(pos: Point3.Origin, rot: Quaternion.Identity)], new Nop());
var center = autd.Center() + new Vector3(0, 0, 150);
const int pointNum = 200;
const float radius = 30.0f;
new GainSTM(
    gains: Enumerable.Range(0, pointNum).Select(i =>
    {
        var theta = 2.0f * MathF.PI * i / pointNum;
        return new Focus(
            pos: center + radius * new Vector3(MathF.Cos(theta), MathF.Sin(theta), 0),
            option: new FocusOption()
        );
    }),
    config: 1.0f * Hz,
    option: new GainSTMOption
    {
        Mode = GainSTMMode.PhaseIntensityFull
    }
);
import numpy as np
from pyautd3 import AUTD3, Controller, Focus, FocusOption, GainSTM, GainSTMMode, GainSTMOption, Hz
from pyautd3.link.nop import Nop
autd = Controller.open([AUTD3(pos=[0.0, 0.0, 0.0], rot=[1, 0, 0, 0])], Nop())
center = autd.center() + np.array([0.0, 0.0, 150.0])
point_num = 200
radius = 30.0
GainSTM(
    gains=(
        Focus(
            pos=center + radius * np.array([np.cos(theta), np.sin(theta), 0]),
            option=FocusOption(),
        )
        for theta in (2.0 * np.pi * i / point_num for i in range(point_num))
    ),
    config=1.0 * Hz,
    option=GainSTMOption(
        mode=GainSTMMode.PhaseIntensityFull,
    ),
)
GainSTMMode
GainSTM sends all phase/intensity data, resulting in high latency1.
To address this issue, GainSTM has a PhaseFull mode that sends only the phase, reducing the transmission time by half, and a PhaseHalf mode that compresses the phase to 4 bits, reducing the transmission time to a quarter.
In these two modes, the maximum intensity is used regardless of the intensity setting of Gain.
The default mode is PhaseIntensityFull, which sends both intensity and phase data.
-
Approximately 75 times the latency of
FociSTM<1>↩
Modulation
Modulation is a mechanism to control amplitude modulation.
Modulation data is multiplied by the sound pressure amplitude.
For example, when applying Sine modulation of , the sound pressure amplitude will be as follows, and the envelope of the positive (or negative) part of the sound pressure amplitude will follow a sine wave.
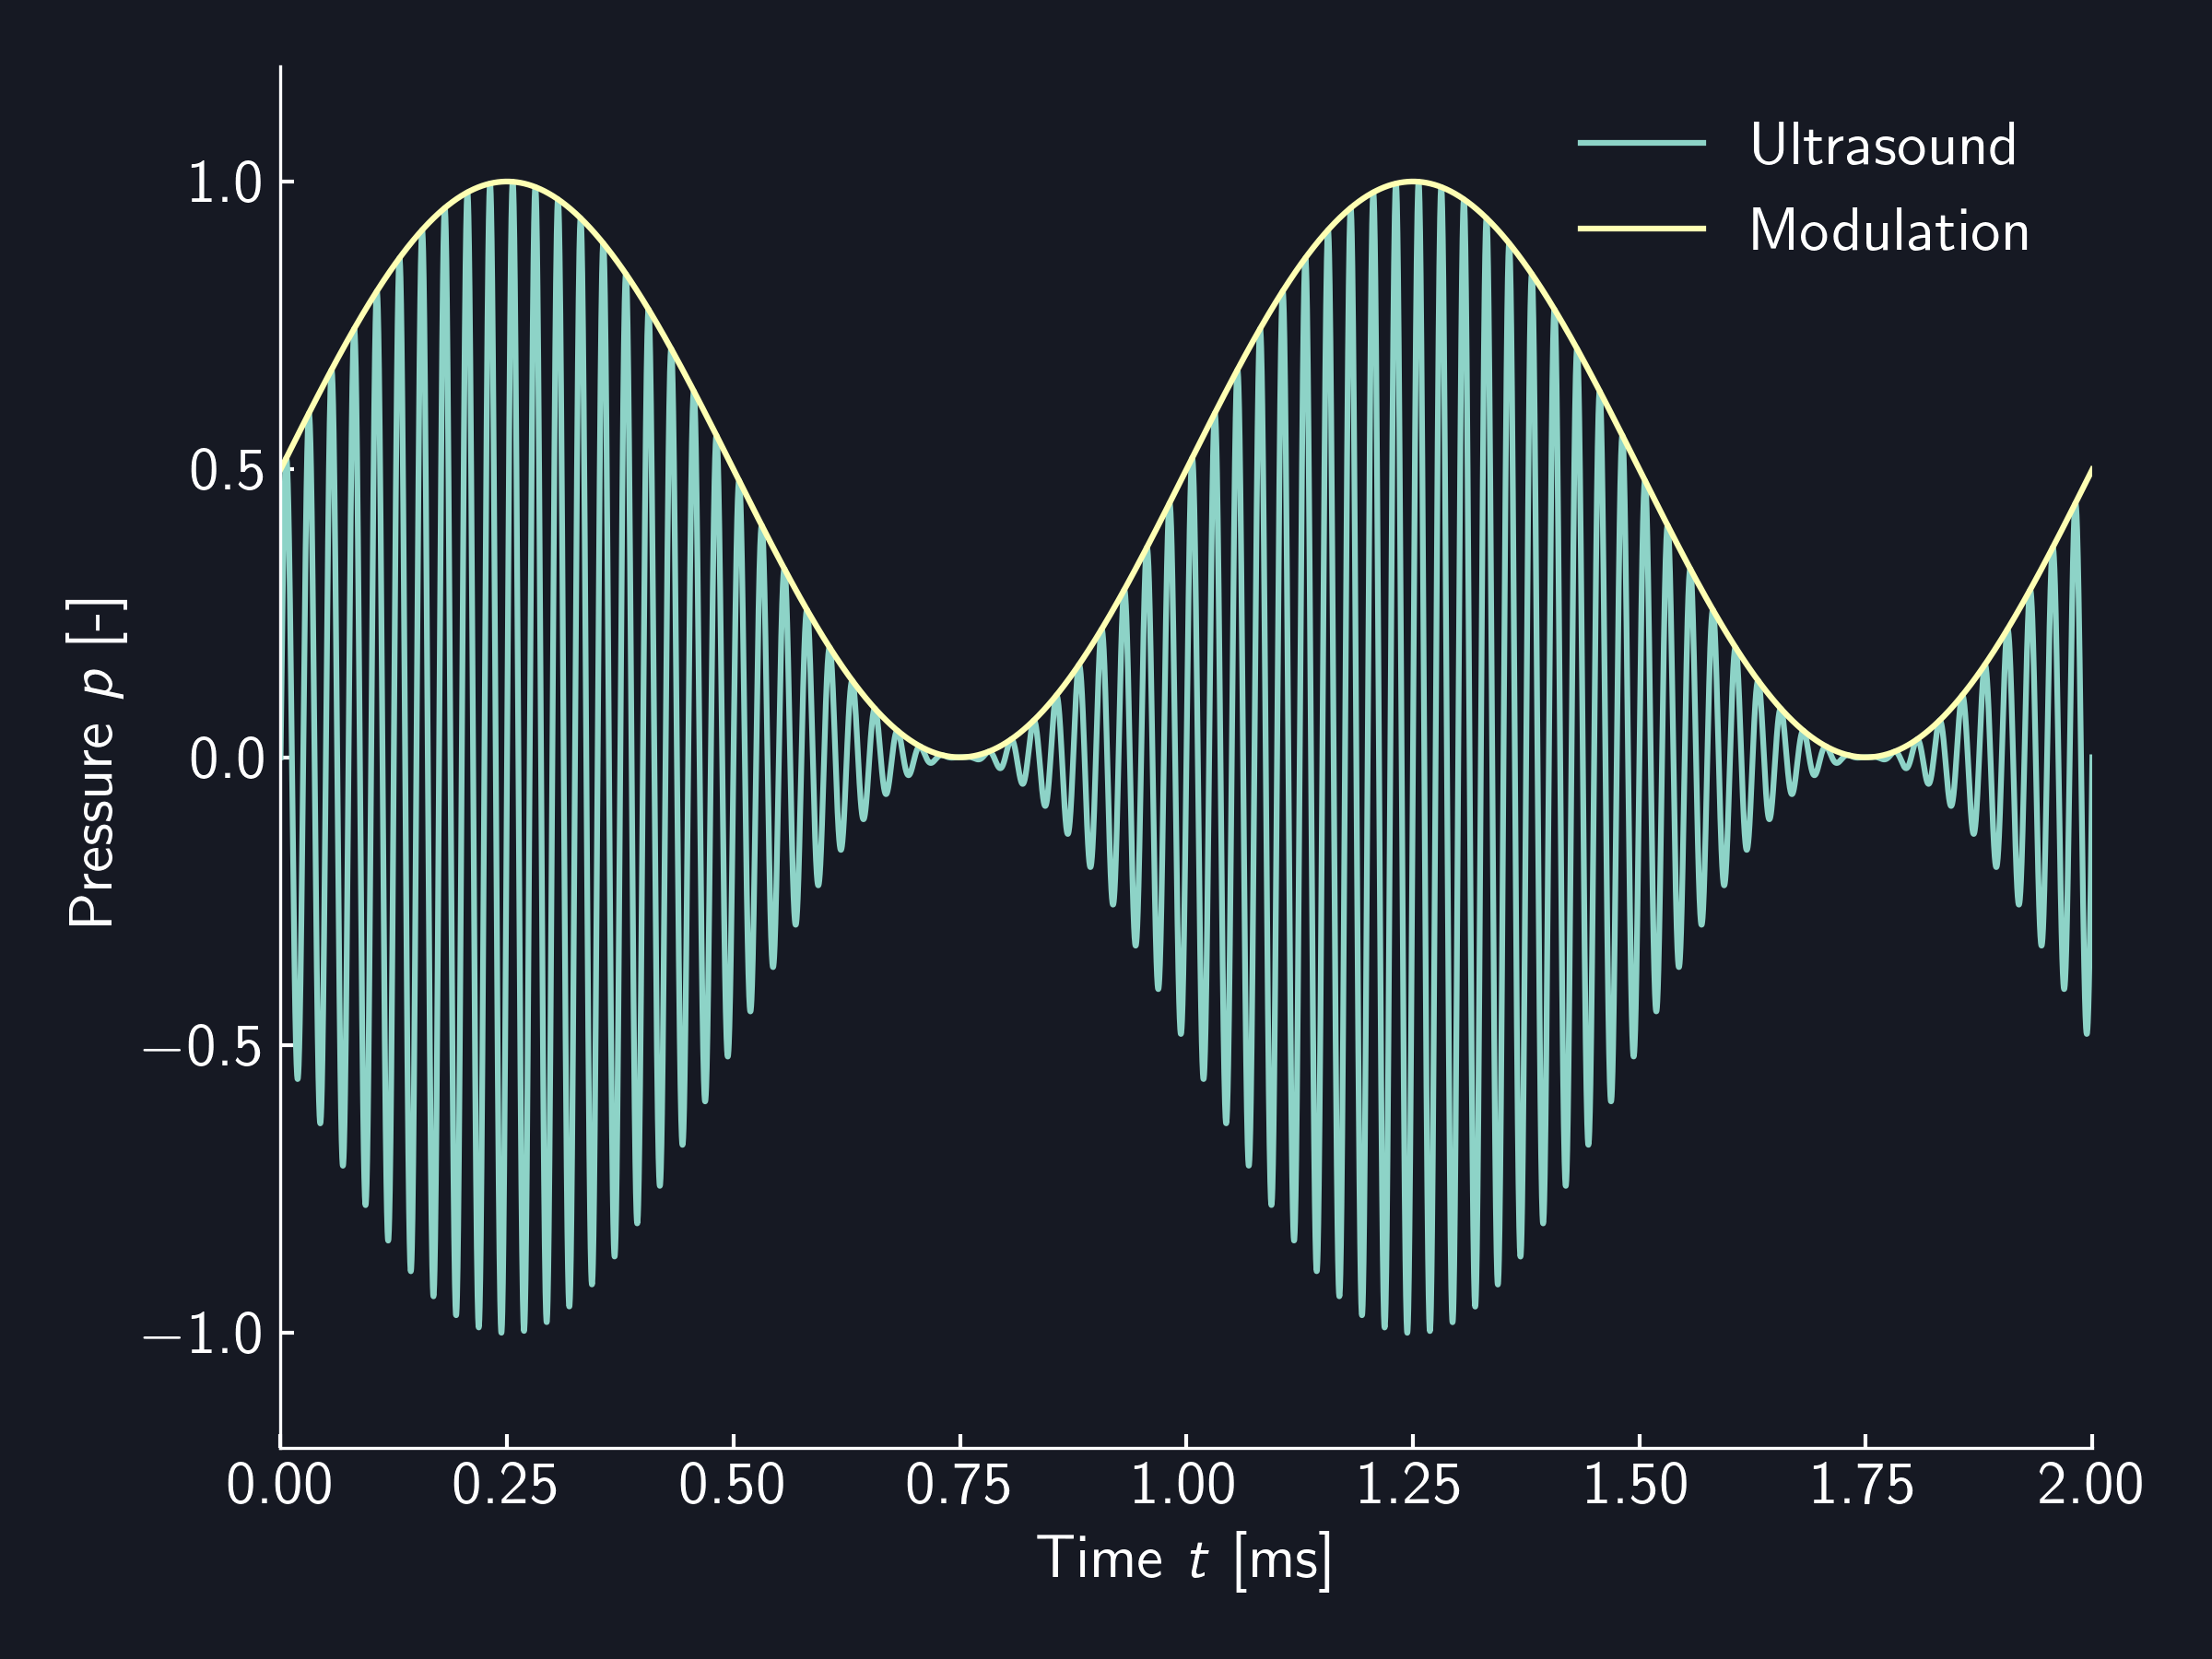
Currently, Modulation has the following limitations.
- The buffer size is up to 32768
- 65536 when using extended mode
- The sampling rate is . Here, is a 16-bit unsigned integer greater than 0.
The SDK provides several types of Modulation to generate AM by default.
- Static - Without modulation
- Sine - Sine wave
- Fourier - Superposition of sine waves
- Square - Square wave
- Custom - User-defined modulation
- RadiationPressure - Apply modulation to radiation pressure instead of sound pressure
- Fir - Apply Fir filter
Common API for Modulation
Sampling Configuration
The sampling configuration of Modulation can be obtained with sampling_config.
use autd3::prelude::*;
fn main() -> Result<(), Box<dyn std::error::Error>> {
let m = Sine {
    freq: 150 * Hz,
    option: SineOption::default(),
};
dbg!(m.sampling_config().freq()?); // -> 4kHz
    Ok(())
}
#include<iostream>
#include<autd3.hpp>
#include<autd3/link/nop.hpp>
int main() {
using namespace autd3;
const auto m = Sine(150 * Hz, SineOption{});
std::cout << m.sampling_config().freq() << std::endl; // -> 4kHz
return 0; }
using AUTD3Sharp;
using AUTD3Sharp.Modulation;
using static AUTD3Sharp.Units;
var m = new Sine(freq: 150u * Hz, option: new SineOption());
Console.WriteLine(m.SamplingConfig().Freq()); // -> 4kHz
from pyautd3 import Hz
from pyautd3.modulation import Sine, SineOption
m = Sine(freq=150 * Hz, option=SineOption())
print(m.sampling_config().freq())  # -> 4kHz
Additionally, some Modulation can optionally change the sampling configuration.
For more details on sampling configuration, refer to About Sampling Configuration.
FiniteLoop
Modulation can control the behavior of loops.
The default is an infinite loop.
For more details, refer to Segment/FiniteLoop.
Static
No modulation.
use autd3::prelude::*;
fn main() {
let _ =
Static { intensity: 0xFF };
}
#include<autd3.hpp>
int main() {
using namespace autd3;
Static(0xFF);
return 0; }
using AUTD3Sharp.Modulation;
new Static(intensity: 0xFF);
from pyautd3 import Static
Static(intensity=0xFF)
The intensity can be specified with intensity.
The default is as above.
Sine
Modulation to transform sound pressure into a sine wave.
use autd3::prelude::*;
fn main() {
let _ =
Sine {
    freq: 150 * Hz,
    option: SineOption {
        intensity: u8::MAX,
        offset: 0x80,
        phase: 0. * rad,
        clamp: false,
        sampling_config: SamplingConfig::FREQ_4K,
    },
};
}
#include<autd3.hpp>
int main() {
using namespace autd3;
Sine(150 * Hz, SineOption{
.intensity = 0xFF,
.offset = 0x80,
.phase = 0.0f * rad,
.clamp = false,
.sampling_config = SamplingConfig::FREQ_4K,
});
return 0; }
using AUTD3Sharp;
using AUTD3Sharp.Modulation;
using static AUTD3Sharp.Units;
new Sine(
    freq: 150u * Hz,
    option: new SineOption
    {
        Intensity = 0xFF,
        Offset = 0x80,
        Phase = 0f * rad,
        Clamp = false,
        SamplingConfig = SamplingConfig.Freq4K
    }
);
from pyautd3 import Hz, SamplingConfig, Sine, SineOption, rad
Sine(
    freq=150 * Hz,
    option=SineOption(
        intensity=0xFF,
        offset=0x80,
        phase=0.0 * rad,
        clamp=False,
        sampling_config=SamplingConfig.FREQ_4K,
    ),
)
Sine applies AM so that the waveform of the sound pressure becomes
where represents the floor function.
If clamp is false, it returns an error if intensity, offset are specified such that the above formula results in values outside the range of .
To clamp values outside the range to instead of returning an error, specify true for clamp.
The default values for these are as above.
Frequency Constraints
Sine is strict about frequency by default, and if a frequency that cannot be output due to the sampling frequency is specified, it returns an error.
In that case, you have to change the sampling settings or use into_nearest to modulate at the nearest frequency that can be output.
use autd3::prelude::*;
fn main() {
    let _ =
Sine {
    freq: 150. * Hz,
    option: SineOption::default(),
}
.into_nearest();
}
#include<autd3.hpp>
int main() {
using namespace autd3;
Sine(150.0f * Hz, SineOption{}).into_nearest();
return 0; }
using AUTD3Sharp.Modulation;
using static AUTD3Sharp.Units;
new Sine(freq: 150.0f * Hz, option: new SineOption()).IntoNearest();
from pyautd3 import Hz, Sine, SineOption
Sine(freq=150.0 * Hz, option=SineOption()).into_nearest()
Fourier
Modulation that generates a waveform by superimposing multiple sine waves of different frequencies.
use autd3::modulation::{Fourier, FourierOption};
use autd3::prelude::*;

fn main() {
let _ =
Fourier {
    components: vec![
        Sine {
            freq: 100 * Hz,
            option: Default::default(),
        },
        Sine {
            freq: 150 * Hz,
            option: Default::default(),
        },
    ],
    option: FourierOption {
        scale_factor: None,
        clamp: false,
        offset: 0x00,
    },
};
}
#include<autd3.hpp>
#include <autd3/modulation/fourier.hpp>
int main() {
using namespace autd3;
modulation::Fourier({Sine(100 * Hz, SineOption{}),
Sine(150 * Hz, SineOption{})},
modulation::FourierOption{
.scale_factor = std::nullopt,
.clamp = false,
.offset = 0x00,
});
return 0; }
using AUTD3Sharp.Modulation;

using static AUTD3Sharp.Units;
new Fourier(
    components: [
        new Sine(freq: 100u * Hz, option: new SineOption()),
        new Sine(freq: 150u * Hz, option: new SineOption())
    ],
    option: new FourierOption
    {
        ScaleFactor = null,
        Clamp = false,
        Offset = 0x00
    }
);
from pyautd3 import Hz, Sine, SineOption
from pyautd3.modulation import Fourier, FourierOption

Fourier(
    components=[
        Sine(freq=100 * Hz, option=SineOption()),
        Sine(freq=150 * Hz, option=SineOption()),
    ],
    option=FourierOption(
        scale_factor=None,
        clamp=False,
        offset=0x00,
    ),
)
Scale Factor and Value Clamping
The calculation of Fourier is performed using the following formula,
If the scale factor is not specified, is used.
If clamp is false, it returns an error if intensity, offset are specified such that the above formula results in values outside the range of .
To clamp values outside the range to instead of returning an error, specify true for clamp.
The default values for these are as above.
Square
Modulation in the form of a square wave.
use autd3::prelude::*;
fn main() {
let _ =
Square {
    freq: 150 * Hz,
    option: SquareOption {
        low: u8::MIN,
        high: u8::MAX,
        duty: 0.5,
        sampling_config: SamplingConfig::FREQ_4K,
    },
};
}
#include<autd3.hpp>
int main() {
using namespace autd3;
Square(150 * Hz, SquareOption{
.low = 0x00,
.high = 0xFF,
.duty = 0.5f,
.sampling_config = SamplingConfig::FREQ_4K,
});
return 0; }
using AUTD3Sharp;
using AUTD3Sharp.Modulation;
using static AUTD3Sharp.Units;
new Square(
    freq: 150u * Hz,
    option: new SquareOption
    {
        Low = 0x00,
        High = 0xFF,
        Duty = 0.5f,
        SamplingConfig = SamplingConfig.Freq4K
    }
);
from pyautd3 import Hz, SamplingConfig, Square, SquareOption
Square(
    freq=150 * Hz,
    option=SquareOption(
        low=0x00,
        high=0xFF,
        duty=0.5,
        sampling_config=SamplingConfig.FREQ_4K,
    ),
)
Frequency Constraints
Square is strict about frequency by default, and if a frequency that cannot be output due to the sampling frequency is specified, it returns an error.
In that case, you can change the sampling settings or use into_nearest to modulate at the nearest frequency that can be output.
use autd3::prelude::*;
fn main() {
let _ =
Square {
    freq: 150.0 * Hz,
    option: Default::default(),
}
.into_nearest();
}
#include<autd3.hpp>
int main() {
using namespace autd3;
Square(150.0f * Hz, SquareOption{}).into_nearest();
return 0; }
using AUTD3Sharp.Modulation;
using static AUTD3Sharp.Units;
new Square(freq: 150.0f * Hz, option: new SquareOption()).IntoNearest();
from pyautd3 import Hz, Square, SquareOption
Square(freq=150.0 * Hz, option=SquareOption()).into_nearest()
Custom
Custom is a Modulation that outputs the specified unsigned 8-bit data sequence.
use autd3::modulation::Custom;

use autd3::prelude::*;
fn main() {
let _ =
Custom {
    buffer: vec![0xFF, 0x00],
    sampling_config: 4.0 * kHz,
};
}
#include<vector>
#include<autd3.hpp>
#include <autd3/modulation/custom.hpp>
int main() {
using namespace autd3;
modulation::Custom(std::vector<uint8_t>{0xFF, 0x00}, 4000.0f * Hz);
return 0; }
using AUTD3Sharp;
using static AUTD3Sharp.Units;
using AUTD3Sharp.Modulation;

new Custom(
    buffer: [0xFF, 0x00],
    samplingConfig: 4000f * Hz
);
from pyautd3 import Hz
import numpy as np
from pyautd3.modulation import Custom

Custom(
    buffer=np.array([0xFF, 0x00]),
    sampling_config=4000.0 * Hz,
)
RadiationPressure
RadiationPressure is a Modulation that applies modulation to radiation pressure (proportional to the square of sound pressure) instead of sound pressure.
For example, when RadiationPressure is applied to a Sine modulation, the radiation pressure of the sound pressure amplitude will be as follows, and the envelope of the radiation pressure will follow a sine wave.
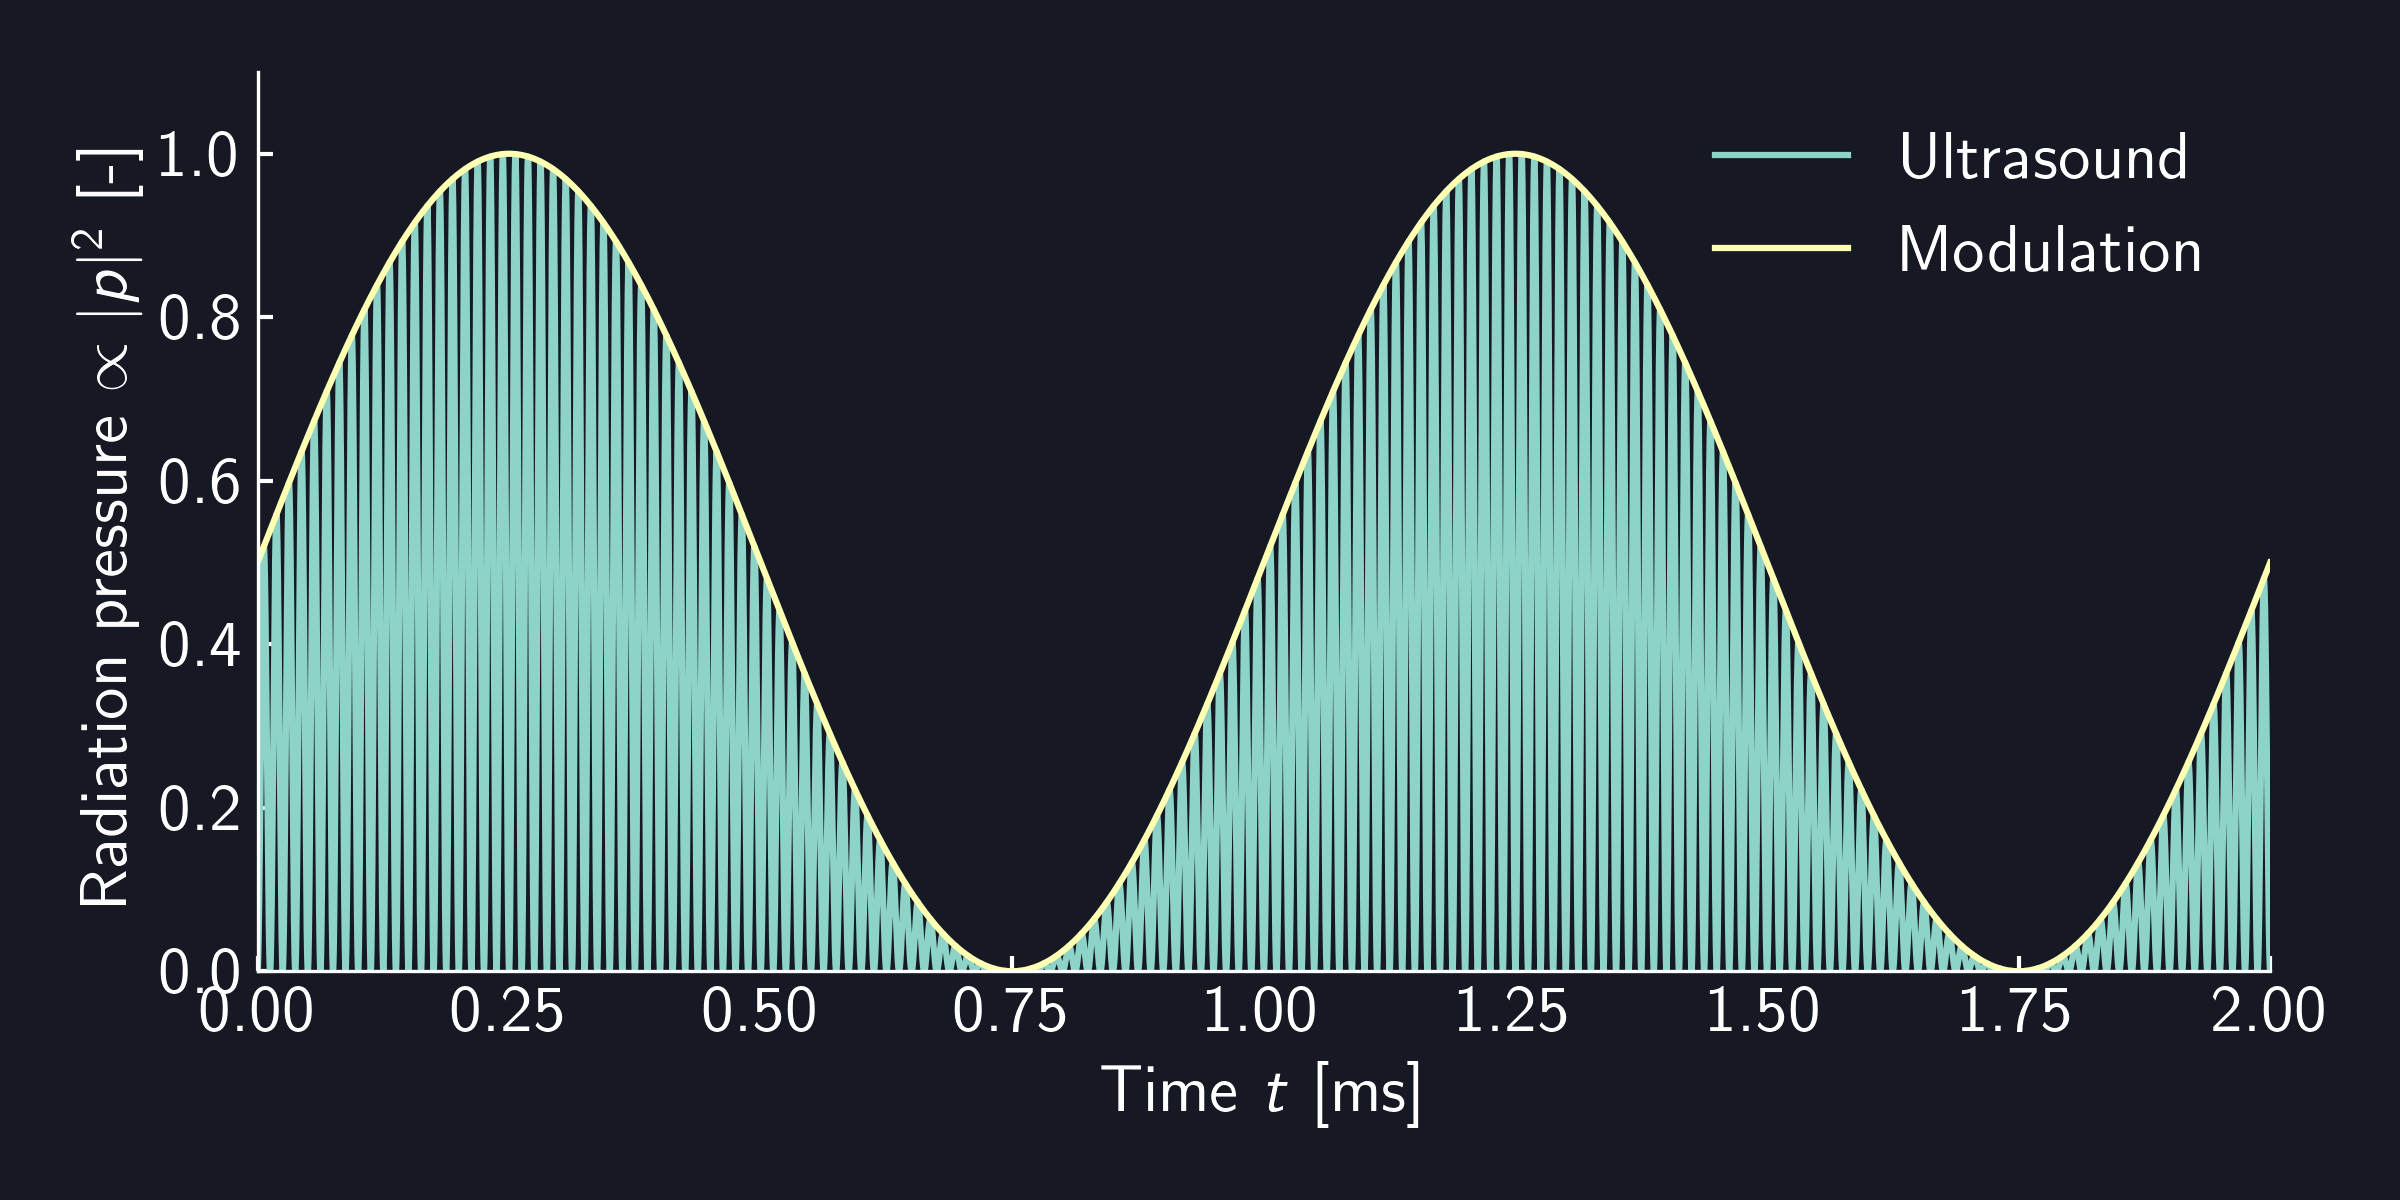
use autd3::prelude::*;
use autd3::modulation::RadiationPressure;

fn main() {
let _ =
RadiationPressure {
    target: Sine {
        freq: 150 * Hz,
        option: Default::default(),
    },
};
}
#include<autd3.hpp>
#include <autd3/modulation/radiation_pressure.hpp>
int main() {
using namespace autd3;
modulation::RadiationPressure(Sine(150 * Hz, SineOption{}));
return 0; }
using AUTD3Sharp.Modulation;
using static AUTD3Sharp.Units;

new RadiationPressure(target: new Sine(freq: 150u * Hz, option: new SineOption()));
from pyautd3 import Hz, Sine, SineOption
from pyautd3.modulation import RadiationPressure

RadiationPressure(target=Sine(freq=150 * Hz, option=SineOption()))
Fir
You can apply an FIR filter using Fir.
Below is an example of applying an LPF with a sampling frequency of , 199 taps, and a cutoff frequency of .
use autd3::prelude::*;
use autd3::modulation::Fir;

fn main() -> Result<(), Box<dyn std::error::Error>> {
let _ =
Fir::new(
    Sine {
        freq: 150. * Hz,
        option: SineOption {
            sampling_config: SamplingConfig::new(20.0 * kHz),
            ..Default::default()
        },
    },
    vec![
        -0.000009, -0.000013, -0.000016, -0.000021, -0.000025, -0.000030, -0.000036,
        -0.000042, -0.000049, -0.000056, -0.000064, -0.000072, -0.000080, -0.000088,
        -0.000096, -0.000105, -0.000113, -0.000120, -0.000128, -0.000134, -0.000139,
        -0.000143, -0.000146, -0.000146, -0.000145, -0.000141, -0.000135, -0.000124,
        -0.000111, -0.000093, -0.000071, -0.000044, -0.000012, 0.000026, 0.000071,
        0.000122, 0.000180, 0.000247, 0.000321, 0.000405, 0.000497, 0.000599, 0.000712,
        0.000835, 0.000968, 0.001113, 0.001270, 0.001439, 0.001619, 0.001812, 0.002018,
        0.002236, 0.002467, 0.002711, 0.002968, 0.003237, 0.003518, 0.003812, 0.004118,
        0.004435, 0.004764, 0.005103, 0.005452, 0.005811, 0.006178, 0.006554, 0.006937,
        0.007326, 0.007720, 0.008119, 0.008521, 0.008925, 0.009331, 0.009737, 0.010141,
        0.010543, 0.010941, 0.011335, 0.011722, 0.012101, 0.012472, 0.012833, 0.013183,
        0.013520, 0.013843, 0.014152, 0.014445, 0.014720, 0.014978, 0.015217, 0.015435,
        0.015633, 0.015810, 0.015964, 0.016096, 0.016204, 0.016289, 0.016350, 0.016386,
        0.016399, 0.016386, 0.016350, 0.016289, 0.016204, 0.016096, 0.015964, 0.015810,
        0.015633, 0.015435, 0.015217, 0.014978, 0.014720, 0.014445, 0.014152, 0.013843,
        0.013520, 0.013183, 0.012833, 0.012472, 0.012101, 0.011722, 0.011335, 0.010941,
        0.010543, 0.010141, 0.009737, 0.009331, 0.008925, 0.008521, 0.008119, 0.007720,
        0.007326, 0.006937, 0.006554, 0.006178, 0.005811, 0.005452, 0.005103, 0.004764,
        0.004435, 0.004118, 0.003812, 0.003518, 0.003237, 0.002968, 0.002711, 0.002467,
        0.002236, 0.002018, 0.001812, 0.001619, 0.001439, 0.001270, 0.001113, 0.000968,
        0.000835, 0.000712, 0.000599, 0.000497, 0.000405, 0.000321, 0.000247, 0.000180,
        0.000122, 0.000071, 0.000026, -0.000012, -0.000044, -0.000071, -0.000093,
        -0.000111, -0.000124, -0.000135, -0.000141, -0.000145, -0.000146, -0.000146,
        -0.000143, -0.000139, -0.000134, -0.000128, -0.000120, -0.000113, -0.000105,
        -0.000096, -0.000088, -0.000080, -0.000072, -0.000064, -0.000056, -0.000049,
        -0.000042, -0.000036, -0.000030, -0.000025, -0.000021, -0.000016, -0.000013,
        -0.000009,
    ],
);
Ok(())
}
#include<autd3.hpp>
#include <autd3/modulation/fir.hpp>
int main() {
using namespace autd3;
modulation::Fir(
Sine(150 * Hz,
SineOption{
.sampling_config = SamplingConfig(20.0f * kHz),
}),
std::vector{
-0.000009f, -0.000013f, -0.000016f, -0.000021f, -0.000025f, -0.000030f,
-0.000036f, -0.000042f, -0.000049f, -0.000056f, -0.000064f, -0.000072f,
-0.000080f, -0.000088f, -0.000096f, -0.000105f, -0.000113f, -0.000120f,
-0.000128f, -0.000134f, -0.000139f, -0.000143f, -0.000146f, -0.000146f,
-0.000145f, -0.000141f, -0.000135f, -0.000124f, -0.000111f, -0.000093f,
-0.000071f, -0.000044f, -0.000012f, 0.000026f, 0.000071f, 0.000122f,
0.000180f, 0.000247f, 0.000321f, 0.000405f, 0.000497f, 0.000599f,
0.000712f, 0.000835f, 0.000968f, 0.001113f, 0.001270f, 0.001439f,
0.001619f, 0.001812f, 0.002018f, 0.002236f, 0.002467f, 0.002711f,
0.002968f, 0.003237f, 0.003518f, 0.003812f, 0.004118f, 0.004435f,
0.004764f, 0.005103f, 0.005452f, 0.005811f, 0.006178f, 0.006554f,
0.006937f, 0.007326f, 0.007720f, 0.008119f, 0.008521f, 0.008925f,
0.009331f, 0.009737f, 0.010141f, 0.010543f, 0.010941f, 0.011335f,
0.011722f, 0.012101f, 0.012472f, 0.012833f, 0.013183f, 0.013520f,
0.013843f, 0.014152f, 0.014445f, 0.014720f, 0.014978f, 0.015217f,
0.015435f, 0.015633f, 0.015810f, 0.015964f, 0.016096f, 0.016204f,
0.016289f, 0.016350f, 0.016386f, 0.016399f, 0.016386f, 0.016350f,
0.016289f, 0.016204f, 0.016096f, 0.015964f, 0.015810f, 0.015633f,
0.015435f, 0.015217f, 0.014978f, 0.014720f, 0.014445f, 0.014152f,
0.013843f, 0.013520f, 0.013183f, 0.012833f, 0.012472f, 0.012101f,
0.011722f, 0.011335f, 0.010941f, 0.010543f, 0.010141f, 0.009737f,
0.009331f, 0.008925f, 0.008521f, 0.008119f, 0.007720f, 0.007326f,
0.006937f, 0.006554f, 0.006178f, 0.005811f, 0.005452f, 0.005103f,
0.004764f, 0.004435f, 0.004118f, 0.003812f, 0.003518f, 0.003237f,
0.002968f, 0.002711f, 0.002467f, 0.002236f, 0.002018f, 0.001812f,
0.001619f, 0.001439f, 0.001270f, 0.001113f, 0.000968f, 0.000835f,
0.000712f, 0.000599f, 0.000497f, 0.000405f, 0.000321f, 0.000247f,
0.000180f, 0.000122f, 0.000071f, 0.000026f, -0.000012f, -0.000044f,
-0.000071f, -0.000093f, -0.000111f, -0.000124f, -0.000135f, -0.000141f,
-0.000145f, -0.000146f, -0.000146f, -0.000143f, -0.000139f, -0.000134f,
-0.000128f, -0.000120f, -0.000113f, -0.000105f, -0.000096f, -0.000088f,
-0.000080f, -0.000072f, -0.000064f, -0.000056f, -0.000049f, -0.000042f,
-0.000036f, -0.000030f, -0.000025f, -0.000021f, -0.000016f, -0.000013f,
-0.000009f});
return 0; }
using AUTD3Sharp;
using AUTD3Sharp.Modulation;
using static AUTD3Sharp.Units;

new Fir(
    target: new Sine(freq: 150u * Hz, option: new SineOption
    {
        SamplingConfig = new SamplingConfig(20f * kHz)
    }),
    coef: [-0.000009f, -0.000013f, -0.000016f, -0.000021f, -0.000025f,
            -0.000030f, -0.000036f, -0.000042f, -0.000049f, -0.000056f,
            -0.000064f, -0.000072f, -0.000080f, -0.000088f, -0.000096f,
            -0.000105f, -0.000113f, -0.000120f, -0.000128f, -0.000134f,
            -0.000139f, -0.000143f, -0.000146f, -0.000146f, -0.000145f,
            -0.000141f, -0.000135f, -0.000124f, -0.000111f, -0.000093f,
            -0.000071f, -0.000044f, -0.000012f, 0.000026f,  0.000071f,
            0.000122f,  0.000180f,  0.000247f,  0.000321f,  0.000405f,
            0.000497f,  0.000599f,  0.000712f,  0.000835f,  0.000968f,
            0.001113f,  0.001270f,  0.001439f,  0.001619f,  0.001812f,
            0.002018f,  0.002236f,  0.002467f,  0.002711f,  0.002968f,
            0.003237f,  0.003518f,  0.003812f,  0.004118f,  0.004435f,
            0.004764f,  0.005103f,  0.005452f,  0.005811f,  0.006178f,
            0.006554f,  0.006937f,  0.007326f,  0.007720f,  0.008119f,
            0.008521f,  0.008925f,  0.009331f,  0.009737f,  0.010141f,
            0.010543f,  0.010941f,  0.011335f,  0.011722f,  0.012101f,
            0.012472f,  0.012833f,  0.013183f,  0.013520f,  0.013843f,
            0.014152f,  0.014445f,  0.014720f,  0.014978f,  0.015217f,
            0.015435f,  0.015633f,  0.015810f,  0.015964f,  0.016096f,
            0.016204f,  0.016289f,  0.016350f,  0.016386f,  0.016399f,
            0.016386f,  0.016350f,  0.016289f,  0.016204f,  0.016096f,
            0.015964f,  0.015810f,  0.015633f,  0.015435f,  0.015217f,
            0.014978f,  0.014720f,  0.014445f,  0.014152f,  0.013843f,
            0.013520f,  0.013183f,  0.012833f,  0.012472f,  0.012101f,
            0.011722f,  0.011335f,  0.010941f,  0.010543f,  0.010141f,
            0.009737f,  0.009331f,  0.008925f,  0.008521f,  0.008119f,
            0.007720f,  0.007326f,  0.006937f,  0.006554f,  0.006178f,
            0.005811f,  0.005452f,  0.005103f,  0.004764f,  0.004435f,
            0.004118f,  0.003812f,  0.003518f,  0.003237f,  0.002968f,
            0.002711f,  0.002467f,  0.002236f,  0.002018f,  0.001812f,
            0.001619f,  0.001439f,  0.001270f,  0.001113f,  0.000968f,
            0.000835f,  0.000712f,  0.000599f,  0.000497f,  0.000405f,
            0.000321f,  0.000247f,  0.000180f,  0.000122f,  0.000071f,
            0.000026f,  -0.000012f, -0.000044f, -0.000071f, -0.000093f,
            -0.000111f, -0.000124f, -0.000135f, -0.000141f, -0.000145f,
            -0.000146f, -0.000146f, -0.000143f, -0.000139f, -0.000134f,
            -0.000128f, -0.000120f, -0.000113f, -0.000105f, -0.000096f,
            -0.000088f, -0.000080f, -0.000072f, -0.000064f, -0.000056f,
            -0.000049f, -0.000042f, -0.000036f, -0.000030f, -0.000025f,
            -0.000021f, -0.000016f, -0.000013f, -0.000009f]
);
from pyautd3 import Hz, Sine, SineOption, kHz, SamplingConfig
from pyautd3.modulation import Fir

Fir(
    target=Sine(
        freq=150 * Hz,
        option=SineOption(
            sampling_config=SamplingConfig(20.0 * kHz),
        ),
    ),
    coef=[
        -0.000009, -0.000013, -0.000016, -0.000021, -0.000025, -0.000030, -0.000036,
        -0.000042, -0.000049, -0.000056, -0.000064, -0.000072, -0.000080, -0.000088,
        -0.000096, -0.000105, -0.000113, -0.000120, -0.000128, -0.000134, -0.000139,
        -0.000143, -0.000146, -0.000146, -0.000145, -0.000141, -0.000135, -0.000124,
        -0.000111, -0.000093, -0.000071, -0.000044, -0.000012, 0.000026, 0.000071,
        0.000122, 0.000180, 0.000247, 0.000321, 0.000405, 0.000497, 0.000599, 0.000712,
        0.000835, 0.000968, 0.001113, 0.001270, 0.001439, 0.001619, 0.001812, 0.002018,
        0.002236, 0.002467, 0.002711, 0.002968, 0.003237, 0.003518, 0.003812, 0.004118,
        0.004435, 0.004764, 0.005103, 0.005452, 0.005811, 0.006178, 0.006554, 0.006937,
        0.007326, 0.007720, 0.008119, 0.008521, 0.008925, 0.009331, 0.009737, 0.010141,
        0.010543, 0.010941, 0.011335, 0.011722, 0.012101, 0.012472, 0.012833, 0.013183,
        0.013520, 0.013843, 0.014152, 0.014445, 0.014720, 0.014978, 0.015217, 0.015435,
        0.015633, 0.015810, 0.015964, 0.016096, 0.016204, 0.016289, 0.016350, 0.016386,
        0.016399, 0.016386, 0.016350, 0.016289, 0.016204, 0.016096, 0.015964, 0.015810,
        0.015633, 0.015435, 0.015217, 0.014978, 0.014720, 0.014445, 0.014152, 0.013843,
        0.013520, 0.013183, 0.012833, 0.012472, 0.012101, 0.011722, 0.011335, 0.010941,
        0.010543, 0.010141, 0.009737, 0.009331, 0.008925, 0.008521, 0.008119, 0.007720,
        0.007326, 0.006937, 0.006554, 0.006178, 0.005811, 0.005452, 0.005103, 0.004764,
        0.004435, 0.004118, 0.003812, 0.003518, 0.003237, 0.002968, 0.002711, 0.002467,
        0.002236, 0.002018, 0.001812, 0.001619, 0.001439, 0.001270, 0.001113, 0.000968,
        0.000835, 0.000712, 0.000599, 0.000497, 0.000405, 0.000321, 0.000247, 0.000180,
        0.000122, 0.000071, 0.000026, -0.000012, -0.000044, -0.000071, -0.000093,
        -0.000111, -0.000124, -0.000135, -0.000141, -0.000145, -0.000146, -0.000146,
        -0.000143, -0.000139, -0.000134, -0.000128, -0.000120, -0.000113, -0.000105,
        -0.000096, -0.000088, -0.000080, -0.000072, -0.000064, -0.000056, -0.000049,
        -0.000042, -0.000036, -0.000030, -0.000025, -0.000021, -0.000016, -0.000013,
        -0.000009,
    ],
)
About Sampling Configuration
This section explains the sampling configuration for Modulation and FociSTM/GainSTM.
The sampling frequency is , where is a 16-bit unsigned integer greater than 0.
Additionally, the maximum sampling frequency that can be specified is determined by the Silencer settings. For more details, refer to Silencer.
The constructor for the sampling configuration can specify the division ratio , the sampling frequency, or the sampling period.
use std::num::NonZeroU16;
use std::time::Duration;
use autd3::prelude::*;
fn main() -> Result<(), Box<dyn std::error::Error>> {
let _ =
SamplingConfig::new(NonZeroU16::new(10).unwrap());
// or
let _ =
SamplingConfig::new(4000.0 * Hz);
// or
let _ =
SamplingConfig::new(Duration::from_micros(250));
Ok(())
}
#include<chrono>
#include<autd3.hpp>
#include<autd3/link/nop.hpp>
int main() {
using namespace autd3;
SamplingConfig(10);
// or
SamplingConfig(4000.0f * Hz);
// or
SamplingConfig(std::chrono::microseconds(250));
return 0; }
using AUTD3Sharp;
using static AUTD3Sharp.Units;
new SamplingConfig(10);
// or
new SamplingConfig(4000f * Hz);
// or
new SamplingConfig(Duration.FromMicros(250));
from pyautd3 import Duration, Hz, SamplingConfig
SamplingConfig(10)
# or
SamplingConfig(4000.0 * Hz)
# or
SamplingConfig(Duration.from_micros(250))
Relaxation of Sampling Frequency Limits
Not recommended for use, but there is a method to use the frequency/period closest to the specified value within the possible output frequencies/periods.
use std::time::Duration;
use autd3::prelude::*;
fn main() {
let _ =
SamplingConfig::new(4000.0 * Hz).into_nearest();
// or
let _ =
SamplingConfig::new(Duration::from_micros(250)).into_nearest();
}
#include<autd3.hpp>
#include<chrono>
int main() {
using namespace autd3;
const auto s =
SamplingConfig(4000.0f * Hz).into_nearest();
// or
const auto sp =
SamplingConfig(std::chrono::microseconds(250)).into_nearest();
return 0; }
using AUTD3Sharp;
using AUTD3Sharp.Modulation;
using static AUTD3Sharp.Units;
new SamplingConfig(4000.0f * Hz).IntoNearest();
// or
new SamplingConfig(Duration.FromMicros(250)).IntoNearest();
from pyautd3 import Duration, Hz, SamplingConfig
SamplingConfig(4000.0 * Hz).into_nearest()
# or
SamplingConfig(Duration.from_micros(250)).into_nearest()
Segment/FiniteLoop
Segment
The data areas of Modulation, Gain, FociSTM, and GainSTM each have two Segments.
Unless otherwise specified, Segment::S0 is used.
The Segment to which data is written is specified with WithSegment.
use autd3::prelude::*;
fn main() {
let _ =
WithSegment {
    inner: Static::default(),
    segment: Segment::S1,
    transition_mode: transition_mode::Immediate,
};
}
#include<autd3.hpp>
int main() {
using namespace autd3;
WithSegment(Static{}, Segment::S1, transition_mode::Immediate());
return 0; }
using AUTD3Sharp;
using AUTD3Sharp.TransitionMode;
using AUTD3Sharp.Modulation;
new WithSegment(
    inner: new Static(),
    segment: Segment.S1,
    transitionMode: new Immediate()
);
from pyautd3 import Segment, Static, transition_mode, WithSegment
WithSegment(
    inner=Static(),
    segment=Segment.S1,
    transition_mode=transition_mode.Immediate(),
)
The transition_mode specifies the conditions for switching Segments.
-
Only available when the destination segment is in an infinite loop
Immediate: Switch immediatelyExt: Switch immediately and enter extended mode (automatically switch segments after outputting data from eachSegment)
-
Only available when the destination segment is in a finite loop
SyncIdx: Switch when the data index of the destinationSegmentbecomesSysTime(DcSysTime): Switch at the specified timeGPIO(GPIOIn): Switch when a signal is input to the specified GPIO pin
NOTE:
Gainonly supportsImmediate.
To specify the loop behavior of the destination loop, refer to
FiniteLoop.
To write data without switching Segments, specify Later for transition_mode.
Switching Segments
To switch Segments only, use SwapSegment.
use autd3::prelude::*;
fn main() {
SwapSegmentModulation(Segment::S1, transition_mode::Immediate);
}
#include<autd3.hpp>
#include<autd3/link/nop.hpp>
int main() {
using namespace autd3;
SwapSegmentModulation(Segment::S1, transition_mode::Immediate());
return 0; }
using AUTD3Sharp;
using AUTD3Sharp.TransitionMode;
new SwapSegmentModulation(Segment.S1, new Immediate());
from pyautd3 import Segment, SwapSegmentModulation, transition_mode
SwapSegmentModulation(Segment.S1, transition_mode.Immediate())
FiniteLoop
Modulation, FociSTM, and GainSTM can control loop behavior with WithFiniteLoop.
use std::num::NonZeroU16;
use autd3::prelude::*;
fn main() {
let _ =
WithFiniteLoop {
    inner: Static::default(),
    loop_count: NonZeroU16::new(1).unwrap(),
    segment: Segment::S1,
    transition_mode: transition_mode::SyncIdx,
};
}
#include<autd3.hpp>
int main() {
using namespace autd3;
WithFiniteLoop(Static{}, 1, Segment::S1, transition_mode::SyncIdx());
return 0; }
using AUTD3Sharp;
using AUTD3Sharp.TransitionMode;
using AUTD3Sharp.Modulation;
new WithFiniteLoop(
    inner: new Static(),
    loopCount: 1,
    segment: Segment.S1,
    transitionMode: new SyncIdx()
);
from pyautd3 import Segment, Static, transition_mode, WithFiniteLoop

WithFiniteLoop(
    inner=Static(),
    loop_count=1,
    segment=Segment.S1,
    transition_mode=transition_mode.SyncIdx(),
)
Silencer
AUTD3 provides a Silencer to reduce noise of the output. The Silencer suppresses sudden changes in the drive signal of the transducers, making it quieter.
Theory
For details, refer to the paper by Suzuki et al.1.
In summary,
- Amplitude-modulated ultrasound generates audible sound.
- When driving ultrasonic transducers, phase changes cause amplitude fluctuations.
- Therefore, audible noise is generated.
- By linearly interpolating phase changes and gradually changing them, amplitude fluctuations can be suppressed.
- Therefore, noise can be reduced.
- The finer the interpolation, the smaller the noise.
Silencer Settings
To configure the Silencer, send Silencer.
The Silencer is set to appropriate values by default.
To disable the Silencer, send disable.
use autd3::prelude::*;
fn main() {
let _ =
Silencer::default();
let _ =
Silencer::disable();
}
#include<autd3.hpp>
int main() {
using namespace autd3;
Silencer();
Silencer::disable();
return 0; }
using AUTD3Sharp;
new Silencer();
Silencer.Disable();
from pyautd3 import Silencer
Silencer()
Silencer.disable()
For finer settings, you need to choose between the following two modes:
By default, it is set to Fixed completion time mode.
Fixed update rate mode
Phase Change in Fixed update rate mode
In this mode, the Silencer linearly interpolates and gradually changes the phase to reduce noise. In other words, it is almost equivalent to passing the time series data of phase through a moving average filter. However, it differs in that it considers the periodicity of the phase data.
For example, consider the case where the period of ultrasound is . That is, corresponds to , and corresponds to . Here, suppose the phase changes from to at time . In this case, the phase change by the Silencer will be as shown in the following figure.

On the other hand, suppose the phase changes from to at time . In this case, the phase change by the Silencer will be as shown in the following figure. This is because is closer than .

In other words, the Silencer updates the phase as follows for the current and target value :
where represents the update amount per step (step of Silencer).
The update frequency is .
The smaller is, the smoother the phase change and the more noise is suppressed.

Due to the nature of this implementation, it may behave differently from a moving average filter. One case is when the phase change amount is greater than , as shown above, and another case is when the phase changes again in the middle. An example of phase change in the second case is shown below. From the perspective of fidelity to the original time series, the moving average filter is correct, but considering the phase change amount greater than or making variable (i.e., making the filter length variable) is difficult, so the current implementation is adopted.

Amplitude Change in Fixed update rate mode
Since amplitude fluctuations cause noise, applying the same filter to the intensity parameter can suppress noise due to AM.
Unlike phase, the intensity parameter is not periodic, so it is updated as follows for the current and target value :
Setting Fixed update rate mode
To set Fixed update rate mode, do as follows. The arguments correspond to the aforementioned (unit is ).
use autd3::prelude::*;
use std::num::NonZeroU16;
fn main() {
let _ =
Silencer {
    config: FixedUpdateRate {
        intensity: NonZeroU16::MIN,
        phase: NonZeroU16::MIN,
    },
};
}
#include<autd3.hpp>
int main() {
using namespace autd3;
Silencer{FixedUpdateRate{.intensity = 1, .phase = 1}};
return 0; }
using AUTD3Sharp;
new Silencer(
    config: new FixedUpdateRate
    {
        Intensity = 1,
        Phase = 1
    }
);
from pyautd3 import Silencer, FixedUpdateRate
Silencer(
    config=FixedUpdateRate(
        intensity=1,
        phase=1,
    ),
)
Fixed completion time mode
In this mode, phase/intensity changes are completed within a fixed time.
Setting Fixed completion time mode
To set Fixed completion time mode, do as follows.
intensity and phase correspond to the completion time of intensity/phase changes, respectively.
These must be integer multiples of the ultrasound period ().
use autd3::prelude::*;
use std::time::Duration;
fn main() {
let _ =
Silencer {
    config: FixedCompletionTime {
        intensity: Duration::from_micros(250),
        phase: Duration::from_micros(250),
        strict: true,
    },
};
}
#include<chrono>
#include<autd3.hpp>
int main() {
using namespace autd3;
Silencer{FixedCompletionTime{.intensity = std::chrono::microseconds(250),
.phase = std::chrono::microseconds(250),
.strict = true}};
return 0; }
using AUTD3Sharp;
new Silencer(
    config: new FixedCompletionTime
    {
        Intensity = Duration.FromMicros(250),
        Phase = Duration.FromMicros(250),
        Strict = true
    }
);
from pyautd3 import Duration, FixedCompletionTime, Silencer
Silencer(
config=FixedCompletionTime(
intensity=Duration.from_micros(250),
phase=Duration.from_micros(250),
strict=True,
),
)
The default values are for phase changes and for intensity changes. Disabling the Silencer is equivalent to completing phase/intensity changes within the ultrasound period ().
In this mode, an error is returned if the phase/intensity changes specified by Modulation, FociSTM, or GainSTM cannot be completed within the time specified by the Silencer.
Therefore, the following conditions must be met:
- Silencer intensity change completion time
Modulationsampling period - Silencer intensity change completion time
FociSTM/GainSTMsampling period - Silencer phase change completion time
FociSTM/GainSTMsampling period
If strict is set to false, no error is returned even if these conditions are not met, but it is not recommended.
-
Suzuki, Shun, et al. “Reducing amplitude fluctuation by gradual phase shift in midair ultrasound haptics.” IEEE transactions on haptics 13.1 (2020): 87-93. ↩
Phase Correction
PhaseCorrection allows you to correct the phase.
use autd3::prelude::*;
fn main() {
let _ =
PhaseCorrection::new(|_dev| |_tr| Phase::ZERO);
}#include<autd3.hpp>
int main() {
using namespace autd3;
PhaseCorrection([](const auto&) {
return [](const auto&) { return Phase::ZERO; };
});
return 0; }
using AUTD3Sharp;
using AUTD3Sharp.Utils;
new PhaseCorrection(_dev => _tr => Phase.Zero);
from pyautd3 import Phase, PhaseCorrection
PhaseCorrection(lambda _dev: lambda _tr: Phase.ZERO)
The constructor argument for PhaseCorrection is Fn(&Device) -> Fn(&Transducer) -> Phase, which specifies the phase value for each transducer to be added to the values of Gain, FociSTM, and GainSTM.
Output mask
NOTE: Available since firmware v12.1.0
OutputMask can be sent to stop the output of each transducer regardless of the Intensity values of Gain, FociSTM, and GainSTM.
use autd3::prelude::*;
fn main() {
let _ =
OutputMask::new(|_dev| |_tr| false);
}#include<autd3.hpp>
int main() {
using namespace autd3;
OutputMask([](const auto&) { return [](const auto&) { return false; }; });
return 0; }
using AUTD3Sharp;
new OutputMask(_dev => _tr => false);
from pyautd3 import OutputMask
OutputMask(lambda _dev: lambda _tr: False)
The constructor argument for OutputMask is Fn(&Device) -> Fn(&Transducer) -> bool and the output of transducers set to false will be disabled.
Intensity and Pulse Width
There is a nonlinear relationship between the duty ratio of the PWM signal and the ultrasound output.
To correct this relationship, you can use PulseWidthEncoder.
Inside the firmware, there is a table that determines the pulse width (–) of the PWM signal using the value (–) obtained by multiplying the Intensity data of Gain/FociSTM/GainSTM by the data of Modulation (–) and dividing by .
This table can be modified by PulseWidthEncoder.
Note that the period of the PWM signal is 512.
By default, to make the intensity value and ultrasound output (theoretically) linear, is written to the table. Here, is the period and represents the nearest integer.
For example, if you send the following PulseWidthEncoder, the relationship between the intensity value and the pulse width will be linear (i.e., the intensity value and ultrasound output will be nonlinear).
use autd3::prelude::*;
fn main() {
let _ =
PulseWidthEncoder::new(|_dev| |i| PulseWidth::from_duty(i.0 as f32 / 510.0));
}#include<autd3.hpp>
#include<autd3/link/nop.hpp>
#include<vector>
int main() {
using namespace autd3;
auto autd =
Controller::open({AUTD3{}}, link::Nop{});
PulseWidthEncoder([](const auto& dev) {
return [](const auto i) {
return PulseWidth::from_duty(static_cast<float>(i.value()) / 510.0f);
};
});
return 0; }
using AUTD3Sharp;
new PulseWidthEncoder(_dev => i => PulseWidth.FromDuty((float)i.Item1 / 510.0f));
from pyautd3 import PulseWidthEncoder, PulseWidth
PulseWidthEncoder(lambda _dev: lambda i: PulseWidth.from_duty(i.value / 510.0))
The constructor argument is a function Fn(&Device) -> Fn(Intensity) -> PulseWidth that returns a function that returns the pulse width for each device using the table index as an argument.
GPIOOutputs
GPIOOutputs allows you to set the output of GPIO output pins for each device.
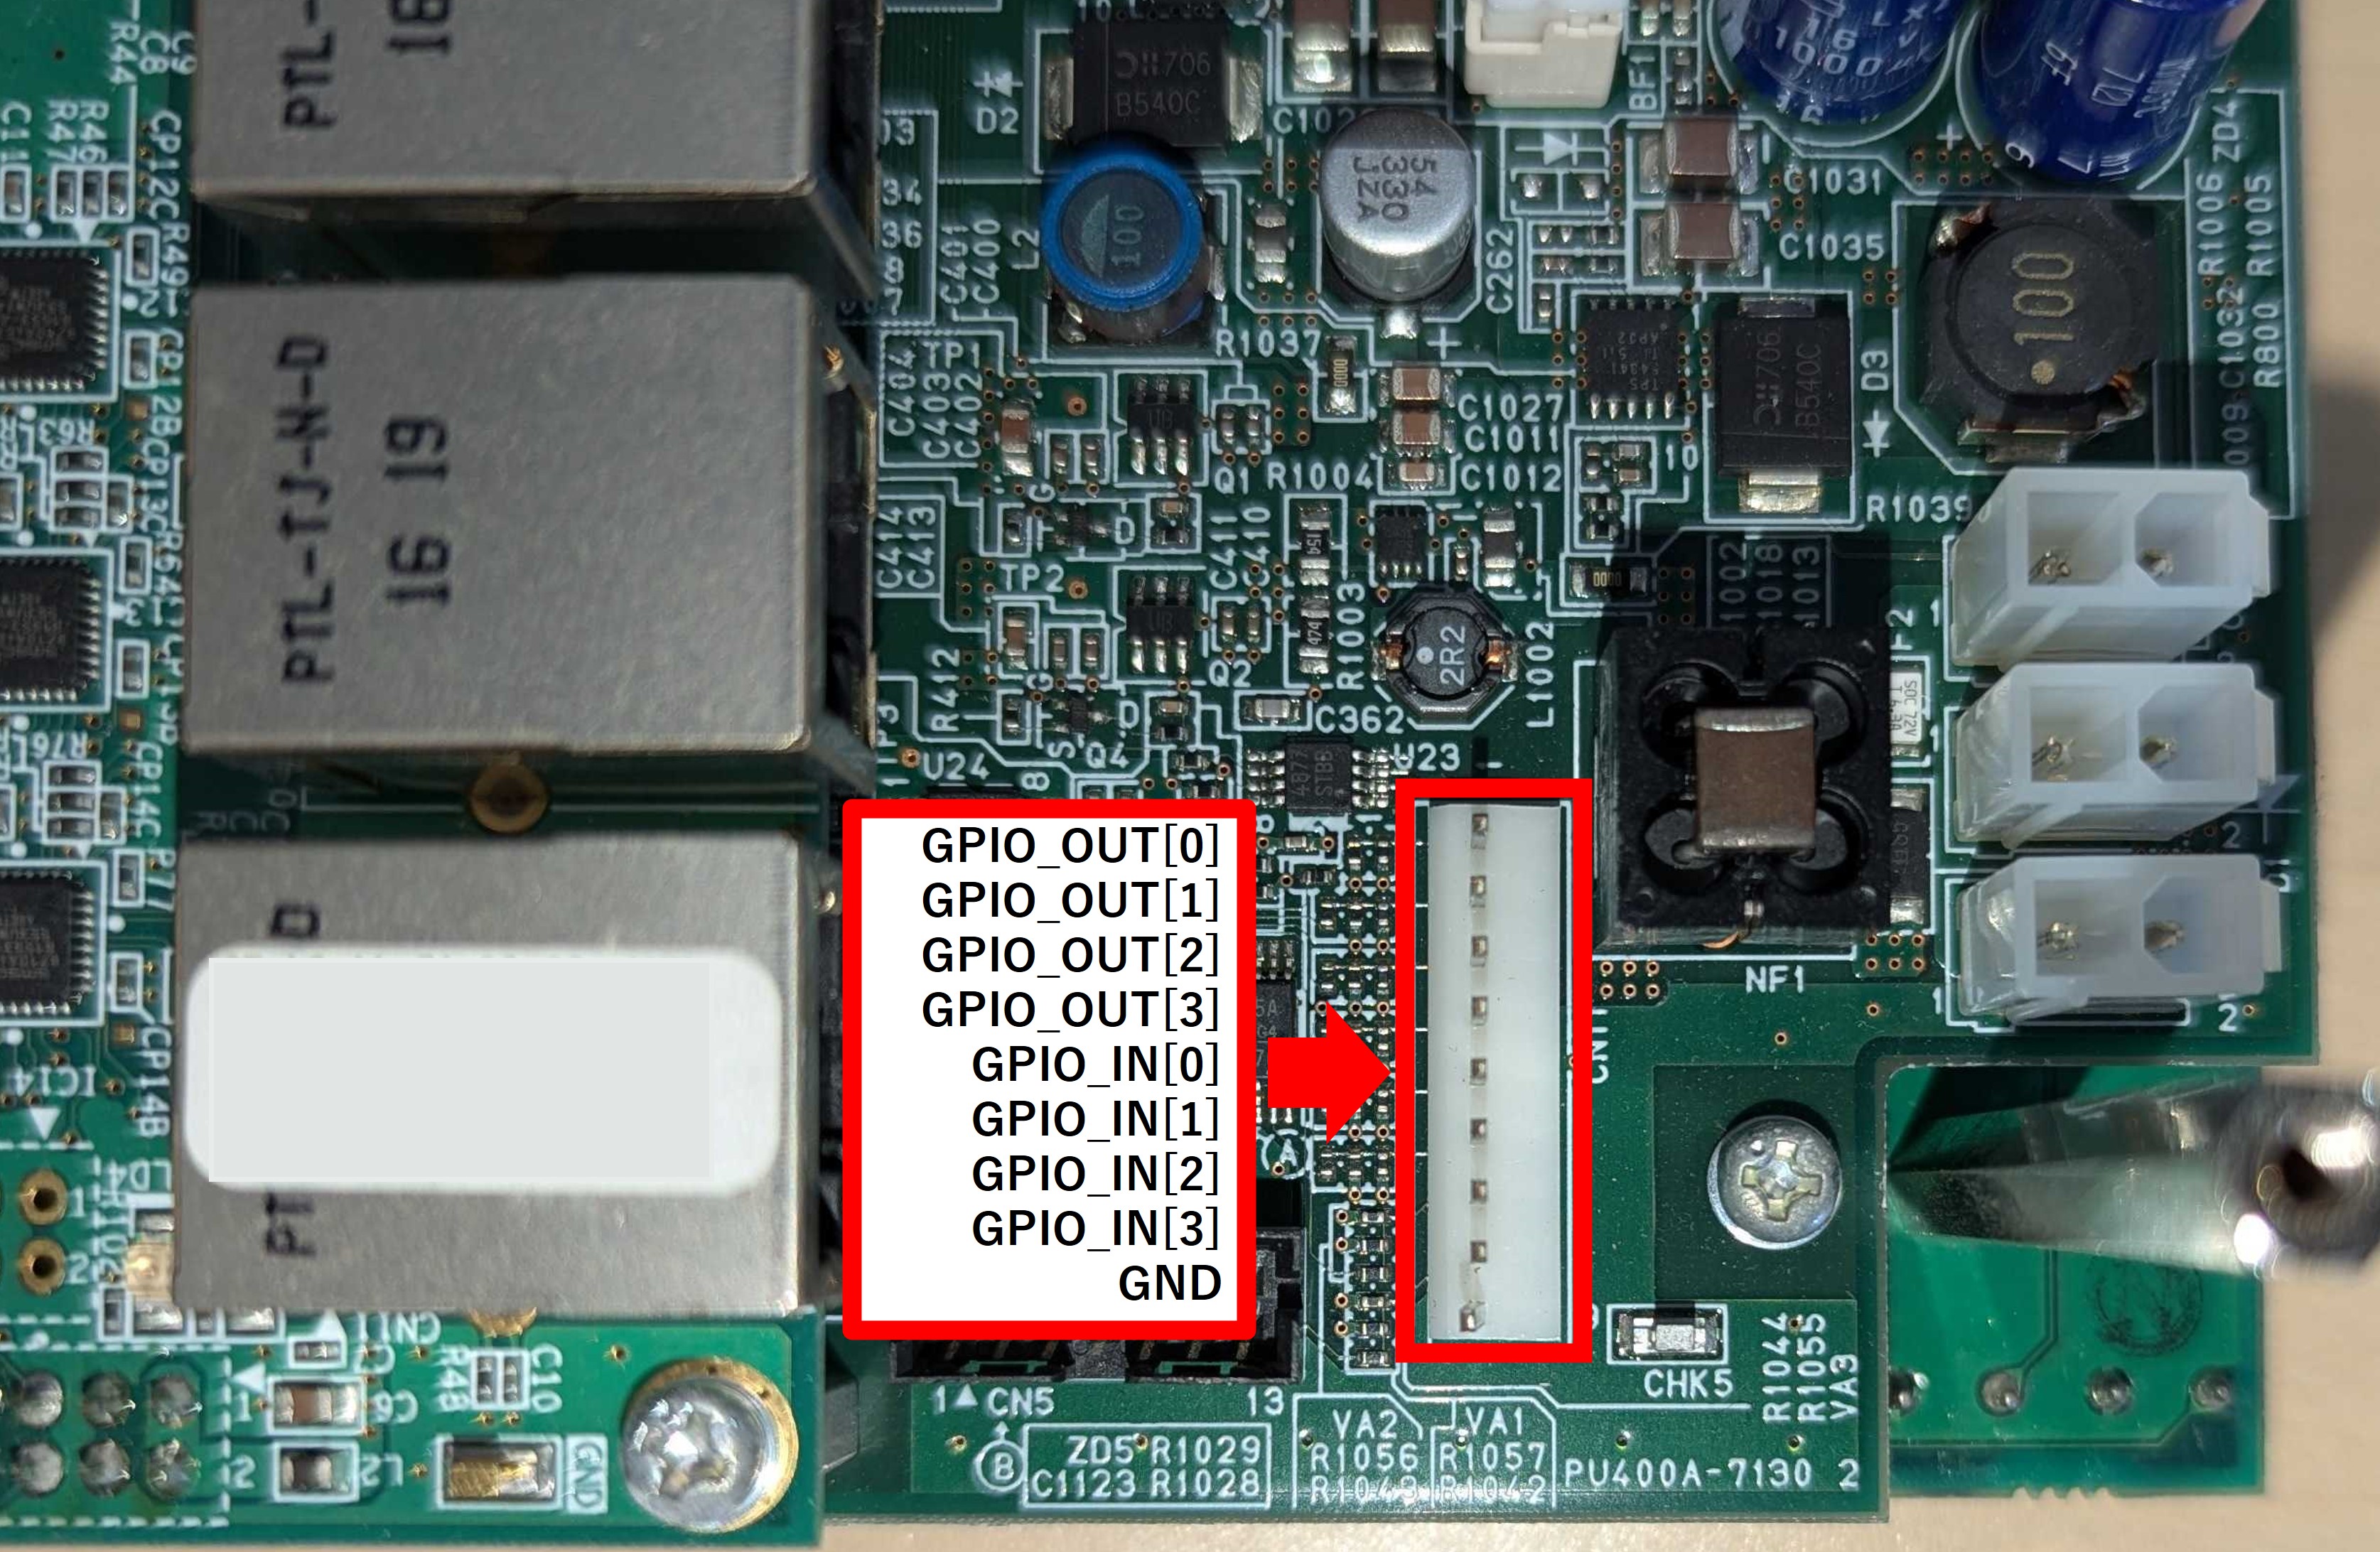
use autd3::prelude::*;
fn main() {
let _ =
GPIOOutputs::new(|_dev, gpio| {
if gpio == GPIOOut::O0 {
Some(GPIOOutputType::BaseSignal)
} else {
None
}
});
}#include<autd3.hpp>
int main() {
using namespace autd3;
GPIOOutputs([](const auto& dev,
const auto& gpio) -> std::optional<GPIOOutputType> {
if (gpio == GPIOOut::O0)
return GPIOOutputType::BaseSignal;
else
return std::nullopt;
});
return 0; }
using AUTD3Sharp;
using AUTD3Sharp.Utils;
new GPIOOutputs(
(dev, gpio) => gpio == GPIOOut.O0 ? GPIOOutputType.BaseSignal : null
);
from pyautd3 import GPIOOutputs, GPIOOutputType, GPIOOut
GPIOOutputs(
lambda _dev, gpio: (
GPIOOutputType.BaseSignal if gpio == GPIOOut.O0 else None
),
)
The following data can be output.
BaseSignal: Reference signal (50% duty cycle square wave with the same frequency as ultrasound)Thermo: Whether the temperature sensor is assertedForceFan: Whether the ForceFan flag is assertedSync: EtherCAT synchronization signalModSegment: Modulation segment (High if segment is 1)ModIdx(u16): High when the modulation index is the specified valueStmSegment: STM segment (High if segment is 1)StmIdx(u16): High when the STM index is the specified valueIsStmMode: Whether FociSTM/GainSTM is being usedPwmOut(&Transducer): PWM output of the specified transducerSysTimeEq(DcSysTime): High during the specified system timeDirect(bool): Output the specified value (iftrue, High; iffalse, Low)
Fan Control
AUTD3 devices have fans with three modes: Auto, Off, and On.
In Auto mode, the temperature monitoring IC monitors the temperature of the IC and automatically activates the fan when it exceeds a certain temperature. In Off mode, the fan is always off, and in On mode, the fan is always on.
The mode can be switched using the jumper switch next to the fan. It is a bit difficult to understand, but as shown in the figure below, shorting the fan side sets it to Auto, the middle to Off, and the right side to On.
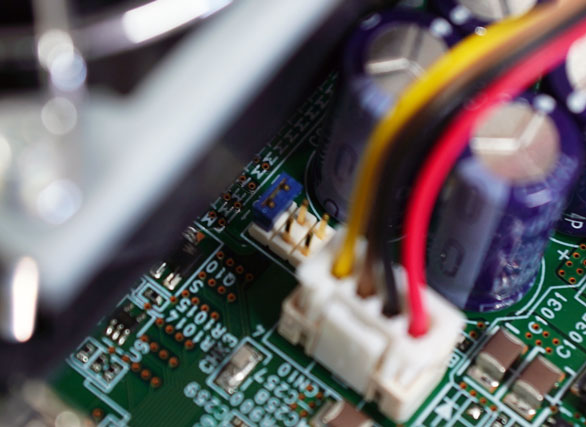
In Auto mode, the fan automatically activates when the temperature rises.
In Auto mode, the fan can be forcibly activated with ForceFan.
use autd3::prelude::*;
fn main() {
let _ =
ForceFan::new(|_dev| true);
}#include<autd3.hpp>
int main() {
using namespace autd3;
ForceFan([](const auto&) { return true; });
return 0; }
using AUTD3Sharp;
new ForceFan(_ => true);
from pyautd3 import ForceFan
ForceFan(lambda _: True)
The argument of the ForceFan constructor is Fn(&Device) -> bool, which specifies whether to forcibly drive the fan for each device.
NOTE: You cannot forcibly turn off the fan in Auto mode.
Group
Using the Group, you can group devices by device, and send different data for each group.
use autd3::prelude::*;
use std::collections::HashMap;
fn main() {
let x = 0.;
let y = 0.;
let z = 0.;
let _ =
Group::new(
|dev| match dev.idx() {
0 => Some("focus"),
1 => Some("null"),
_ => None,
},
HashMap::from([
(
"focus",
BoxedDatagram::new(Focus {
pos: Point3::new(x, y, z),
option: Default::default(),
}),
),
("null", BoxedDatagram::new(Null {})),
]),
);
}NOTE: In the Rust version, since the values of
HashMapmust all be of the same type,BoxedDatagramis used here to unify the types.
#include<autd3.hpp>
int main() {
using namespace autd3;
const auto x = 0.0;
const auto y = 0.0;
const auto z = 0.0;
autd3::Group(
[](const Device& dev) -> std::optional<const char*> {
if (dev.idx() == 0) {
return "null";
} else if (dev.idx() == 1) {
return "focus";
} else {
return std::nullopt;
}
},
std::unordered_map<const char*, std::shared_ptr<driver::Datagram>>{
{"focus",
std::make_shared<Focus>(Focus(Point3(x, y, z), FocusOption{}))},
{"null", std::make_shared<Null>()}});
return 0; }
NOTE: In C++,
std::optionalmust be used for the keys. Also, to unify the types,std::shared_ptr<driver::Datagram>is used.
using AUTD3Sharp;
using AUTD3Sharp.Link;
using AUTD3Sharp.Gain;
using AUTD3Sharp.Modulation;
using AUTD3Sharp.Utils;
var x = 0.0f;
var y = 0.0f;
var z = 0.0f;
new AUTD3Sharp.Group(dev =>
{
return dev.Idx() switch
{
0 => "null",
1 => "focus",
_ => null
};
},
new GroupDictionary {
{ "null", new Null() },
{ "focus", new Focus(pos: new Point3(x, y, z), option: new FocusOption()) }
}
);
from pyautd3 import Device, Group
from pyautd3.gain import Focus, FocusOption, Null
x = 0.0
y = 0.0
z = 0.0
def key_map(dev: Device) -> str | None:
if dev.idx == 0:
return "null"
if dev.idx == 1:
return "focus"
return None
Group(
key_map=key_map,
data_map={"null": Null(), "focus": Focus(pos=[x, y, z], option=FocusOption())},
)
Unlike GainGroup, you can use any data that can be sent with the usual send.
However, you can only group by device.
NOTE: In this sample, strings are used as keys, but you can use anything that can be used as a key for
HashMap.
AUTD3 Simulator
AUTD Simulator (hereinafter referred to as the simulator) is a simulator for AUTD and works on Windows/Linux/macOS.
AUTD Server
The simulator is included with the AUTD Server.
The installer is distributed on GitHub, so download it and follow the instructions to install it.
When you run AUTD Server, you will see a screen like the one below. Open the Simulator tab and press the Run button to start the simulator.
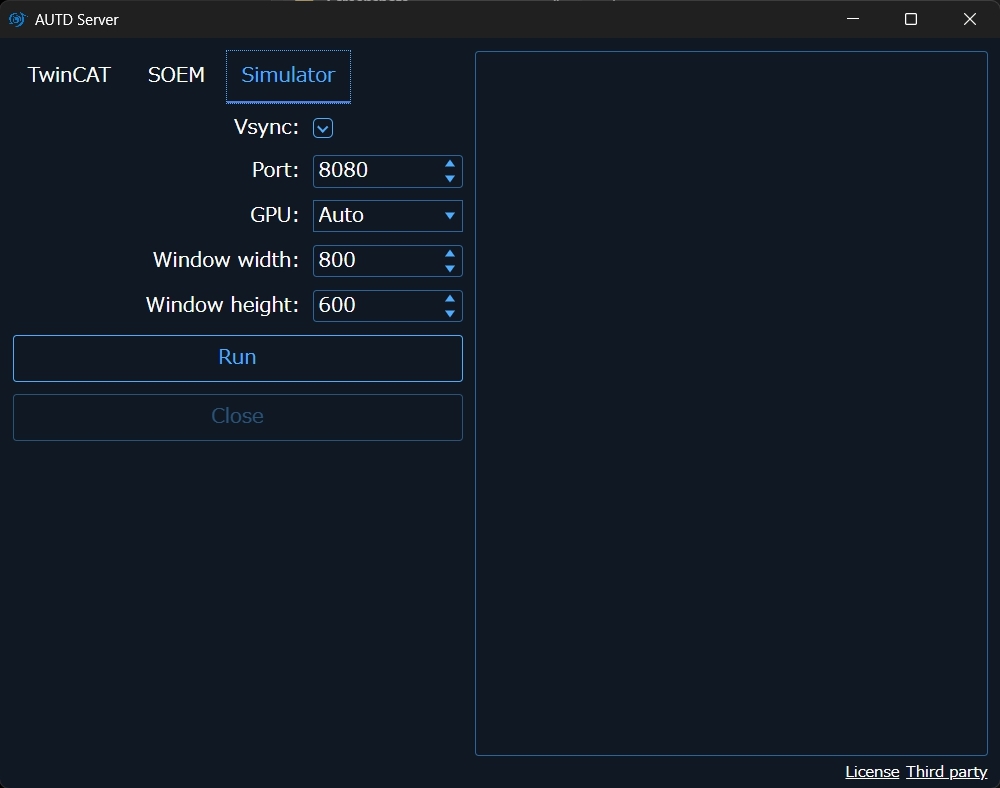
When the simulator starts, it will be in a waiting state.
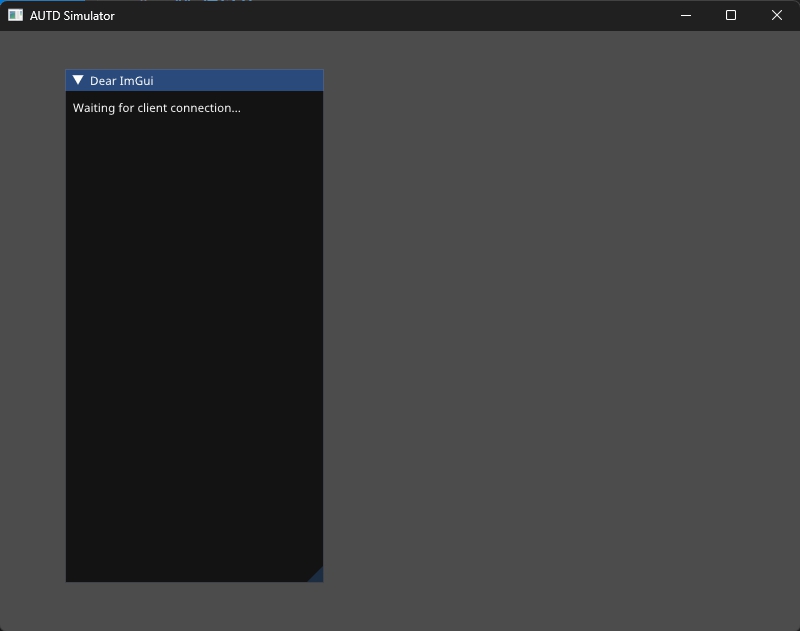
In this state, when you open the Controller using the Remote link, circles representing the positions of the transducers and a black panel in the center of the screen will be displayed on the simulator.
This black panel is called a “Slice”, and you can use this “Slice” to visualize the sound field at any position. At that time, the phase of the transducers is represented by hue, and the amplitude is represented by color intensity.
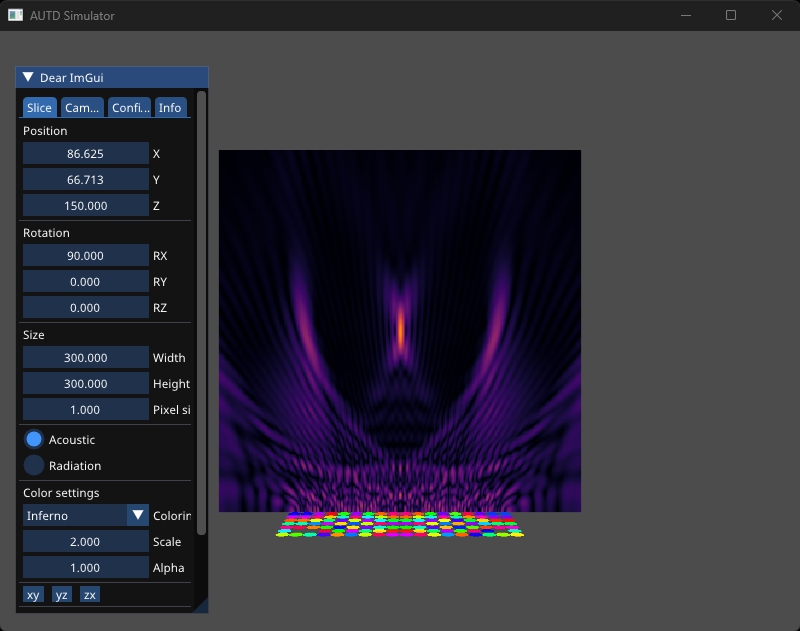
Note that the sound field displayed by the simulator is a simple superposition of spherical waves, and does not consider directivity or nonlinear effects.
You can operate the Slice and camera using the GUI displayed on the left side of the screen.
Slice Tab
In the Slice tab, you can change the size, position, and rotation of the Slice. Rotation is specified by XYZ Euler angles. Pressing the “xy”, “yz”, or “zx” buttons rotates the Slice to be parallel to each plane.
In addition, in the “Color settings” section, you can change the coloring palette and the Max pressure. If the colors become saturated when using a large number of devices, you can increase the value of “Max pressure”.
Camera Tab
In the Camera tab, you can change the position, rotation, Field of View, Near clip, and Far clip settings of the camera. Rotation is specified by XYZ Euler angles.
Config Tab
In the Config tab, you can set the speed of sound, font size, and background color.
You can also toggle the show/enable/overheat settings for each device. If show is turned off, the device will not be displayed but will still contribute to the sound field. If enable is turned off, the device will not contribute to the sound field. If overheat is turned on, you can simulate a state where the temperature sensor is asserted.
Info Tab
In the Info tab, you can check the information of Silencer, Modulation, and STM for each device.
You can check the settings of Silencer, but they are not reflected in the sound field.
If “Mod enable” is turned on, Modulation will be reflected in the sound field.
Modulation and STM determine which index data to output based on real time. This time is represented by “System time”, which is the elapsed time in nanoseconds since January 1, 2000, 0:00:00.
If “Auto play” is turned on, “System time” is automatically set. Otherwise, you can manually advance the time.
Emulator
By using the Emulator, you can perform more detailed calculations of output phase/pulse width, output voltage, output sound wave, and sound field compared to the Simulator.
NOTE: Currently, the
Emulatoris only available in Rust and Python. There are no plans to port it to C++ or C#.
Install
cargo add autd3-emulatorpip install pyautd3_emulator
APIs
The data output by the Emulator is a Polars DataFrame.
For more details, please refer to the Polars documentation.
Transducer Table
Displays a list of transducers.
Each column contains the device index, the (local) index of the transducer, position, and axial direction.
use autd3::prelude::*;
use autd3_emulator::*;
fn main() {
let emulator = Emulator::new([AUTD3::default()]);
let df = emulator.transducer_table();
dbg!(df);
}from pyautd3 import AUTD3
from pyautd3_emulator import Emulator
with Emulator([AUTD3()]) as emulator:
df = emulator.transducer_table()
print(df)
┌─────────┬────────┬────────────┬────────────┬───────┬─────┬─────┬─────┐
│ dev_idx ┆ tr_idx ┆ x[mm] ┆ y[mm] ┆ z[mm] ┆ nx ┆ ny ┆ nz │
│ --- ┆ --- ┆ --- ┆ --- ┆ --- ┆ --- ┆ --- ┆ --- │
│ u16 ┆ u8 ┆ f32 ┆ f32 ┆ f32 ┆ f32 ┆ f32 ┆ f32 │
╞═════════╪════════╪════════════╪════════════╪═══════╪═════╪═════╪═════╡
│ 0 ┆ 0 ┆ 0.0 ┆ 0.0 ┆ 0.0 ┆ 0.0 ┆ 0.0 ┆ 1.0 │
│ 0 ┆ 1 ┆ 10.16 ┆ 0.0 ┆ 0.0 ┆ 0.0 ┆ 0.0 ┆ 1.0 │
│ 0 ┆ 2 ┆ 20.32 ┆ 0.0 ┆ 0.0 ┆ 0.0 ┆ 0.0 ┆ 1.0 │
│ 0 ┆ 3 ┆ 30.48 ┆ 0.0 ┆ 0.0 ┆ 0.0 ┆ 0.0 ┆ 1.0 │
│ 0 ┆ 4 ┆ 40.639999 ┆ 0.0 ┆ 0.0 ┆ 0.0 ┆ 0.0 ┆ 1.0 │
│ … ┆ … ┆ … ┆ … ┆ … ┆ … ┆ … ┆ … │
│ 0 ┆ 244 ┆ 132.080002 ┆ 132.080002 ┆ 0.0 ┆ 0.0 ┆ 0.0 ┆ 1.0 │
│ 0 ┆ 245 ┆ 142.23999 ┆ 132.080002 ┆ 0.0 ┆ 0.0 ┆ 0.0 ┆ 1.0 │
│ 0 ┆ 246 ┆ 152.399994 ┆ 132.080002 ┆ 0.0 ┆ 0.0 ┆ 0.0 ┆ 1.0 │
│ 0 ┆ 247 ┆ 162.559998 ┆ 132.080002 ┆ 0.0 ┆ 0.0 ┆ 0.0 ┆ 1.0 │
│ 0 ┆ 248 ┆ 172.720001 ┆ 132.080002 ┆ 0.0 ┆ 0.0 ┆ 0.0 ┆ 1.0 │
└─────────┴────────┴────────────┴────────────┴───────┴─────┴─────┴─────┘
Calculation of Output Phase/Pulse Width
use autd3::prelude::*;
use autd3_emulator::*;
use std::time::Duration;
fn main() -> Result<(), Box<dyn std::error::Error>> {
let emulator = Emulator::new([AUTD3::default()]);
let record = emulator.record(|autd| {
autd.send(Silencer::default())?;
autd.send((
Sine {
freq: 200 * Hz,
option: Default::default(),
},
Uniform {
intensity: Intensity::MAX,
phase: Phase::ZERO,
},
))?;
autd.tick(Duration::from_millis(10))?;
Ok(())
})?;
let df = record.phase();
dbg!(df);
let df = record.pulse_width();
dbg!(df);
Ok(())
}from pyautd3 import (
AUTD3,
Duration,
Hz,
Intensity,
Phase,
Silencer,
Sine,
SineOption,
Uniform,
)
from pyautd3_emulator import Emulator, Recorder
with Emulator([AUTD3()]) as emulator:
def f(autd: Recorder) -> None:
autd.send(Silencer())
autd.send(
(
Sine(freq=200.0 * Hz, option=SineOption()),
Uniform(intensity=Intensity.MAX, phase=Phase.ZERO),
),
)
autd.tick(Duration.from_millis(10))
record = emulator.record(f)
df = record.phase()
print(df)
df = record.pulse_width()
print(df)
NOTE: The time interval specified by
tickmust be a multiple of .
At each time ( unit), the phase/pulse width is stored in each column.
Each column name is <phase/pulse_width>@<time>[ns].
Each row corresponds to the rows in the Transducer Table.
┌─────────────┬────────────────┬────────────────┬────────────────┬───┬────────────────┬───────────────┬───────────────┬───────────────┐
│ phase@0[ns] ┆ phase@25000[ns ┆ phase@50000[ns ┆ phase@75000[ns ┆ … ┆ phase@9900000[ ┆ phase@9925000 ┆ phase@9950000 ┆ phase@9975000 │
│ --- ┆ ] ┆ ] ┆ ] ┆ ┆ ns] ┆ [ns] ┆ [ns] ┆ [ns] │
│ u8 ┆ --- ┆ --- ┆ --- ┆ ┆ --- ┆ --- ┆ --- ┆ --- │
│ ┆ u8 ┆ u8 ┆ u8 ┆ ┆ u8 ┆ u8 ┆ u8 ┆ u8 │
╞═════════════╪════════════════╪════════════════╪════════════════╪═══╪════════════════╪═══════════════╪═══════════════╪═══════════════╡
│ 0 ┆ 0 ┆ 0 ┆ 0 ┆ … ┆ 0 ┆ 0 ┆ 0 ┆ 0 │
│ 0 ┆ 0 ┆ 0 ┆ 0 ┆ … ┆ 0 ┆ 0 ┆ 0 ┆ 0 │
│ 0 ┆ 0 ┆ 0 ┆ 0 ┆ … ┆ 0 ┆ 0 ┆ 0 ┆ 0 │
│ 0 ┆ 0 ┆ 0 ┆ 0 ┆ … ┆ 0 ┆ 0 ┆ 0 ┆ 0 │
│ 0 ┆ 0 ┆ 0 ┆ 0 ┆ … ┆ 0 ┆ 0 ┆ 0 ┆ 0 │
│ … ┆ … ┆ … ┆ … ┆ … ┆ … ┆ … ┆ … ┆ … │
│ 0 ┆ 0 ┆ 0 ┆ 0 ┆ … ┆ 0 ┆ 0 ┆ 0 ┆ 0 │
│ 0 ┆ 0 ┆ 0 ┆ 0 ┆ … ┆ 0 ┆ 0 ┆ 0 ┆ 0 │
│ 0 ┆ 0 ┆ 0 ┆ 0 ┆ … ┆ 0 ┆ 0 ┆ 0 ┆ 0 │
│ 0 ┆ 0 ┆ 0 ┆ 0 ┆ … ┆ 0 ┆ 0 ┆ 0 ┆ 0 │
│ 0 ┆ 0 ┆ 0 ┆ 0 ┆ … ┆ 0 ┆ 0 ┆ 0 ┆ 0 │
└─────────────┴────────────────┴────────────────┴────────────────┴───┴────────────────┴───────────────┴───────────────┴───────────────┘
┌───────────────────┬───────────────────────┬───────────────────────┬───────────────────────┬───┬─────────────────────────┬─────────────────────────┬────────────────────────┬────────────────────────┐
│ pulse_width@0[ns] ┆ pulse_width@25000[ns] ┆ pulse_width@50000[ns] ┆ pulse_width@75000[ns] ┆ … ┆ pulse_width@9900000[ns] ┆ pulse_width@9925000[ns] ┆ pulse_width@9950000[ns ┆ pulse_width@9975000[ns │
│ --- ┆ --- ┆ --- ┆ --- ┆ ┆ --- ┆ --- ┆ ] ┆ ] │
│ u16 ┆ u16 ┆ u16 ┆ u16 ┆ ┆ u16 ┆ u16 ┆ --- ┆ --- │
│ ┆ ┆ ┆ ┆ ┆ ┆ ┆ u16 ┆ u16 │
╞═══════════════════╪═══════════════════════╪═══════════════════════╪═══════════════════════╪═══╪═════════════════════════╪═════════════════════════╪════════════════════════╪════════════════════════╡
│ 8 ┆ 16 ┆ 24 ┆ 33 ┆ … ┆ 50 ┆ 53 ┆ 55 ┆ 57 │
│ 8 ┆ 16 ┆ 24 ┆ 33 ┆ … ┆ 50 ┆ 53 ┆ 55 ┆ 57 │
│ 8 ┆ 16 ┆ 24 ┆ 33 ┆ … ┆ 50 ┆ 53 ┆ 55 ┆ 57 │
│ 8 ┆ 16 ┆ 24 ┆ 33 ┆ … ┆ 50 ┆ 53 ┆ 55 ┆ 57 │
│ 8 ┆ 16 ┆ 24 ┆ 33 ┆ … ┆ 50 ┆ 53 ┆ 55 ┆ 57 │
│ … ┆ … ┆ … ┆ … ┆ … ┆ … ┆ … ┆ … ┆ … │
│ 8 ┆ 16 ┆ 24 ┆ 33 ┆ … ┆ 50 ┆ 53 ┆ 55 ┆ 57 │
│ 8 ┆ 16 ┆ 24 ┆ 33 ┆ … ┆ 50 ┆ 53 ┆ 55 ┆ 57 │
│ 8 ┆ 16 ┆ 24 ┆ 33 ┆ … ┆ 50 ┆ 53 ┆ 55 ┆ 57 │
│ 8 ┆ 16 ┆ 24 ┆ 33 ┆ … ┆ 50 ┆ 53 ┆ 55 ┆ 57 │
│ 8 ┆ 16 ┆ 24 ┆ 33 ┆ … ┆ 50 ┆ 53 ┆ 55 ┆ 57 │
└───────────────────┴───────────────────────┴───────────────────────┴───────────────────────┴───┴─────────────────────────┴─────────────────────────┴────────────────────────┴────────────────────────┘
Output Voltage
use autd3::prelude::*;
use autd3_emulator::*;
use std::time::Duration;
fn main() -> Result<(), Box<dyn std::error::Error>> {
let emulator = Emulator::new([AUTD3::default()]);
let record = emulator.record(|autd| {
autd.send(Silencer::disable())?;
autd.send((
Static { intensity: 0xFF },
Uniform {
intensity: Intensity::MAX,
phase: Phase(0x40),
},
))?;
autd.tick(Duration::from_millis(1))?;
Ok(())
})?;
let df = record.output_voltage();
dbg!(df);
Ok(())
}from pyautd3 import AUTD3, Duration, Intensity, Phase, Silencer, Static, Uniform
from pyautd3_emulator import Emulator, Recorder
with Emulator([AUTD3()]) as emulator:
def f(autd: Recorder) -> None:
autd.send(Silencer.disable())
autd.send((Static(), Uniform(phase=Phase(0x40), intensity=Intensity.MAX)))
autd.tick(Duration.from_millis(1))
record = emulator.record(f)
df = record.output_voltage()
print(df)
The output voltage at each time ( unit) is stored in each column.
Each column name is voltage[V]@<time>[25us/512].
Each row corresponds to the rows in the Transducer Table.
┌────────────────────────┬────────────────────────┬────────────────────────┬────────────────────────┬───┬────────────────────────────┬────────────────────────────┬────────────────────────────┬────────────────────────────┐
│ voltage[V]@0[25us/512] ┆ voltage[V]@1[25us/512] ┆ voltage[V]@2[25us/512] ┆ voltage[V]@3[25us/512] ┆ … ┆ voltage[V]@20476[25us/512] ┆ voltage[V]@20477[25us/512] ┆ voltage[V]@20478[25us/512] ┆ voltage[V]@20479[25us/512] │
│ --- ┆ --- ┆ --- ┆ --- ┆ ┆ --- ┆ --- ┆ --- ┆ --- │
│ f32 ┆ f32 ┆ f32 ┆ f32 ┆ ┆ f32 ┆ f32 ┆ f32 ┆ f32 │
╞════════════════════════╪════════════════════════╪════════════════════════╪════════════════════════╪═══╪════════════════════════════╪════════════════════════════╪════════════════════════════╪════════════════════════════╡
│ 12.0 ┆ 12.0 ┆ 12.0 ┆ 12.0 ┆ … ┆ -12.0 ┆ -12.0 ┆ -12.0 ┆ -12.0 │
│ 12.0 ┆ 12.0 ┆ 12.0 ┆ 12.0 ┆ … ┆ -12.0 ┆ -12.0 ┆ -12.0 ┆ -12.0 │
│ 12.0 ┆ 12.0 ┆ 12.0 ┆ 12.0 ┆ … ┆ -12.0 ┆ -12.0 ┆ -12.0 ┆ -12.0 │
│ 12.0 ┆ 12.0 ┆ 12.0 ┆ 12.0 ┆ … ┆ -12.0 ┆ -12.0 ┆ -12.0 ┆ -12.0 │
│ 12.0 ┆ 12.0 ┆ 12.0 ┆ 12.0 ┆ … ┆ -12.0 ┆ -12.0 ┆ -12.0 ┆ -12.0 │
│ … ┆ … ┆ … ┆ … ┆ … ┆ … ┆ … ┆ … ┆ … │
│ 12.0 ┆ 12.0 ┆ 12.0 ┆ 12.0 ┆ … ┆ -12.0 ┆ -12.0 ┆ -12.0 ┆ -12.0 │
│ 12.0 ┆ 12.0 ┆ 12.0 ┆ 12.0 ┆ … ┆ -12.0 ┆ -12.0 ┆ -12.0 ┆ -12.0 │
│ 12.0 ┆ 12.0 ┆ 12.0 ┆ 12.0 ┆ … ┆ -12.0 ┆ -12.0 ┆ -12.0 ┆ -12.0 │
│ 12.0 ┆ 12.0 ┆ 12.0 ┆ 12.0 ┆ … ┆ -12.0 ┆ -12.0 ┆ -12.0 ┆ -12.0 │
│ 12.0 ┆ 12.0 ┆ 12.0 ┆ 12.0 ┆ … ┆ -12.0 ┆ -12.0 ┆ -12.0 ┆ -12.0 │
└────────────────────────┴────────────────────────┴────────────────────────┴────────────────────────┴───┴────────────────────────────┴────────────────────────────┴────────────────────────────┴────────────────────────────┘
Output Sound Pressure
use autd3::prelude::*;
use autd3_emulator::*;
use std::time::Duration;
fn main() -> Result<(), Box<dyn std::error::Error>> {
let emulator = Emulator::new([AUTD3::default()]);
let record = emulator.record(|autd| {
autd.send(Silencer::disable())?;
autd.send((
Static { intensity: 0xFF },
Uniform {
intensity: Intensity::MAX,
phase: Phase(0x40),
},
))?;
autd.tick(Duration::from_millis(1))?;
Ok(())
})?;
let df = record.output_ultrasound();
dbg!(df);
Ok(())
}from pyautd3 import AUTD3, Duration, Intensity, Phase, Silencer, Static, Uniform
from pyautd3_emulator import Emulator, Recorder
with Emulator([AUTD3()]) as emulator:
def f(autd: Recorder) -> None:
autd.send(Silencer.disable())
autd.send((Static(), Uniform(phase=Phase(0x40), intensity=Intensity.MAX)))
autd.tick(Duration.from_millis(1))
record = emulator.record(f)
df = record.output_ultrasound()
print(df)
The normalized output sound pressure at each time ( unit) is stored in each column.
Each column name is p[a.u.]@<time>[25us/512].
Each row corresponds to the rows in the Transducer Table.
┌─────────────────────┬─────────────────────┬─────────────────────┬─────────────────────┬───┬─────────────────────────┬─────────────────────────┬─────────────────────────┬─────────────────────────┐
│ p[a.u.]@0[25us/512] ┆ p[a.u.]@1[25us/512] ┆ p[a.u.]@2[25us/512] ┆ p[a.u.]@3[25us/512] ┆ … ┆ p[a.u.]@20476[25us/512] ┆ p[a.u.]@20477[25us/512] ┆ p[a.u.]@20478[25us/512] ┆ p[a.u.]@20479[25us/512] │
│ --- ┆ --- ┆ --- ┆ --- ┆ ┆ --- ┆ --- ┆ --- ┆ --- │
│ f32 ┆ f32 ┆ f32 ┆ f32 ┆ ┆ f32 ┆ f32 ┆ f32 ┆ f32 │
╞═════════════════════╪═════════════════════╪═════════════════════╪═════════════════════╪═══╪═════════════════════════╪═════════════════════════╪═════════════════════════╪═════════════════════════╡
│ 0.0 ┆ -0.000272 ┆ -0.000481 ┆ -0.000618 ┆ … ┆ -0.36185 ┆ -0.350698 ┆ -0.339501 ┆ -0.328258 │
│ 0.0 ┆ -0.000272 ┆ -0.000481 ┆ -0.000618 ┆ … ┆ -0.36185 ┆ -0.350698 ┆ -0.339501 ┆ -0.328258 │
│ 0.0 ┆ -0.000272 ┆ -0.000481 ┆ -0.000618 ┆ … ┆ -0.36185 ┆ -0.350698 ┆ -0.339501 ┆ -0.328258 │
│ 0.0 ┆ -0.000272 ┆ -0.000481 ┆ -0.000618 ┆ … ┆ -0.36185 ┆ -0.350698 ┆ -0.339501 ┆ -0.328258 │
│ 0.0 ┆ -0.000272 ┆ -0.000481 ┆ -0.000618 ┆ … ┆ -0.36185 ┆ -0.350698 ┆ -0.339501 ┆ -0.328258 │
│ … ┆ … ┆ … ┆ … ┆ … ┆ … ┆ … ┆ … ┆ … │
│ 0.0 ┆ -0.000272 ┆ -0.000481 ┆ -0.000618 ┆ … ┆ -0.36185 ┆ -0.350698 ┆ -0.339501 ┆ -0.328258 │
│ 0.0 ┆ -0.000272 ┆ -0.000481 ┆ -0.000618 ┆ … ┆ -0.36185 ┆ -0.350698 ┆ -0.339501 ┆ -0.328258 │
│ 0.0 ┆ -0.000272 ┆ -0.000481 ┆ -0.000618 ┆ … ┆ -0.36185 ┆ -0.350698 ┆ -0.339501 ┆ -0.328258 │
│ 0.0 ┆ -0.000272 ┆ -0.000481 ┆ -0.000618 ┆ … ┆ -0.36185 ┆ -0.350698 ┆ -0.339501 ┆ -0.328258 │
│ 0.0 ┆ -0.000272 ┆ -0.000481 ┆ -0.000618 ┆ … ┆ -0.36185 ┆ -0.350698 ┆ -0.339501 ┆ -0.328258 │
└─────────────────────┴─────────────────────┴─────────────────────┴─────────────────────┴───┴─────────────────────────┴─────────────────────────┴─────────────────────────┴─────────────────────────┘
Calculation of Sound Field (Instantaneous Value)
use autd3::prelude::*;
use autd3_emulator::*;
use std::time::Duration;
fn main() -> Result<(), Box<dyn std::error::Error>> {
let emulator = Emulator::new([AUTD3::default()]);
let focus = emulator.center() + Vector3::new(0., 0., 150. * mm);
let record = emulator.record(|autd| {
autd.send(Silencer::disable())?;
autd.send((
Static { intensity: 0xFF },
Focus {
pos: focus,
option: Default::default(),
},
))?;
autd.tick(Duration::from_millis(1))?;
Ok(())
})?;
let mut sound_field = record.sound_field(
RangeXY {
x: focus.x - 20.0..=focus.x + 20.0,
y: focus.y - 20.0..=focus.y + 20.0,
z: focus.z,
resolution: 1.,
},
InstantRecordOption {
sound_speed: 340e3 * mm,
time_step: Duration::from_micros(1),
memory_limits_hint_mb: 128,
gpu: true,
},
)?;
let df = sound_field.observe_points();
dbg!(df);
let df = sound_field
.skip(Duration::from_micros(500))?
.next(Duration::from_micros(500))?;
dbg!(df);
Ok(())
}NOTE: The
gpuoption is only available if thegpufeature is enabled. Enabling thegpuoption will execute the calculation on the GPU.
import numpy as np
from pyautd3 import AUTD3, Focus, FocusOption, Silencer, Static, Duration
from pyautd3_emulator import Emulator, RangeXYZ, Recorder, InstantRecordOption
with Emulator([AUTD3()]) as emulator:
focus = emulator.center() + np.array([0.0, 0.0, 150.0])
def f(autd: Recorder) -> None:
autd.send(Silencer.disable())
autd.send((Static(), Focus(pos=focus, option=FocusOption())))
autd.tick(Duration.from_millis(1))
record = emulator.record(f)
sound_field = record.sound_field(
RangeXYZ(
x=(focus[0] - 20.0, focus[0] + 20.0),
y=(focus[1] - 20.0, focus[1] + 20.0),
z=(focus[2], focus[2]),
resolution=1.0,
),
InstantRecordOption(
sound_speed=340e3,
time_step=Duration.from_micros(1),
memory_limits_hint_mb=128,
),
)
df = sound_field.observe_points()
print(df)
df = sound_field.skip(Duration.from_micros(500)).next(
Duration.from_micros(500),
)
print(df)
NOTE: In Rust, besides
RangeXYZ, you can useRangeZXY,RangeXYfor 2D,RangeXfor 1D and so on, orVec<Vector3>to specify arbitrary points. In Python, onlyRangeXYZis available.
Due to the potential for high memory consumption, the next function is used to retrieve only specific times.
The skip function can be used to skip a specified amount of time.
The output sound pressure at each observation point is stored in each column in chronological order (unit specified by time_step).
Each column name is p[Pa]@<time>[ns].
Each row corresponds to the observation points obtained with observe_points.
┌────────────┬───────────┬───────┐
│ x[mm] ┆ y[mm] ┆ z[mm] │
│ --- ┆ --- ┆ --- │
│ f32 ┆ f32 ┆ f32 │
╞════════════╪═══════════╪═══════╡
│ 66.625267 ┆ 46.713196 ┆ 150.0 │
│ 67.625267 ┆ 46.713196 ┆ 150.0 │
│ 68.625267 ┆ 46.713196 ┆ 150.0 │
│ 69.625267 ┆ 46.713196 ┆ 150.0 │
│ 70.625267 ┆ 46.713196 ┆ 150.0 │
│ … ┆ … ┆ … │
│ 102.625267 ┆ 86.713196 ┆ 150.0 │
│ 103.625267 ┆ 86.713196 ┆ 150.0 │
│ 104.625267 ┆ 86.713196 ┆ 150.0 │
│ 105.625267 ┆ 86.713196 ┆ 150.0 │
│ 106.625267 ┆ 86.713196 ┆ 150.0 │
└────────────┴───────────┴───────┘
┌──────────────────┬──────────────────┬──────────────────┬──────────────────┬───┬──────────────────┬──────────────────┬──────────────────┬──────────────────┐
│ p[Pa]@500000[ns] ┆ p[Pa]@501000[ns] ┆ p[Pa]@502000[ns] ┆ p[Pa]@503000[ns] ┆ … ┆ p[Pa]@996000[ns] ┆ p[Pa]@997000[ns] ┆ p[Pa]@998000[ns] ┆ p[Pa]@999000[ns] │
│ --- ┆ --- ┆ --- ┆ --- ┆ ┆ --- ┆ --- ┆ --- ┆ --- │
│ f32 ┆ f32 ┆ f32 ┆ f32 ┆ ┆ f32 ┆ f32 ┆ f32 ┆ f32 │
╞══════════════════╪══════════════════╪══════════════════╪══════════════════╪═══╪══════════════════╪══════════════════╪══════════════════╪══════════════════╡
│ 22.249609 ┆ 14.994699 ┆ 11.20509 ┆ 3.416157 ┆ … ┆ 167.468948 ┆ 143.434677 ┆ 115.029839 ┆ 78.702179 │
│ 22.973528 ┆ 17.704706 ┆ 14.598668 ┆ 6.462077 ┆ … ┆ 128.688828 ┆ 102.245392 ┆ 73.068733 ┆ 39.29715 │
│ 23.043713 ┆ 20.534163 ┆ 15.762163 ┆ 9.015405 ┆ … ┆ 72.13736 ┆ 50.06559 ┆ 25.516897 ┆ -1.414132 │
│ 21.61729 ┆ 19.986338 ┆ 16.669203 ┆ 11.957072 ┆ … ┆ 6.599095 ┆ -8.152014 ┆ -22.183277 ┆ -34.678905 │
│ 17.479811 ┆ 18.30769 ┆ 16.697689 ┆ 12.929367 ┆ … ┆ -61.525105 ┆ -64.023788 ┆ -62.711498 ┆ -56.925694 │
│ … ┆ … ┆ … ┆ … ┆ … ┆ … ┆ … ┆ … ┆ … │
│ 14.888723 ┆ 14.758762 ┆ 13.289121 ┆ 9.737269 ┆ … ┆ -73.181961 ┆ -85.114655 ┆ -92.114983 ┆ -93.623962 │
│ 17.559294 ┆ 15.889968 ┆ 12.346513 ┆ 7.979947 ┆ … ┆ -28.419638 ┆ -61.184322 ┆ -90.326851 ┆ -113.895905 │
│ 18.171673 ┆ 15.26449 ┆ 10.946121 ┆ 5.410897 ┆ … ┆ 19.804182 ┆ -28.594215 ┆ -73.595749 ┆ -115.230705 │
│ 18.815191 ┆ 12.321008 ┆ 7.800498 ┆ 3.680776 ┆ … ┆ 65.869225 ┆ 9.351333 ┆ -48.561874 ┆ -98.87677 │
│ 16.717573 ┆ 10.482997 ┆ 4.044011 ┆ 0.89806 ┆ … ┆ 102.099556 ┆ 44.310383 ┆ -16.616224 ┆ -70.65287 │
└──────────────────┴──────────────────┴──────────────────┴──────────────────┴───┴──────────────────┴──────────────────┴──────────────────┴──────────────────┘
Calculation of Sound Field (RMS)
use autd3::prelude::*;
use autd3_emulator::*;
use std::time::Duration;
fn main() -> Result<(), Box<dyn std::error::Error>> {
let emulator = Emulator::new([AUTD3::default()]);
let focus = emulator.center() + Vector3::new(0., 0., 150. * mm);
let record = emulator.record(|autd| {
autd.send(Silencer::disable())?;
autd.send((
Static { intensity: 0xFF },
Focus {
pos: focus,
option: Default::default(),
},
))?;
autd.tick(Duration::from_micros(25))?;
Ok(())
})?;
let mut sound_field = record.sound_field(
RangeXY {
x: focus.x - 20.0..=focus.x + 20.0,
y: focus.y - 20.0..=focus.y + 20.0,
z: focus.z,
resolution: 1.,
},
RmsRecordOption {
sound_speed: 340e3 * mm,
gpu: true,
},
)?;
let df = sound_field.observe_points();
dbg!(df);
let df = sound_field.next(Duration::from_micros(25))?;
dbg!(df);
Ok(())
}NOTE: The
gpuoption is only available if thegpufeature is enabled.
import numpy as np
from pyautd3 import AUTD3, Duration, Focus, FocusOption, Silencer, Static
from pyautd3_emulator import Emulator, RangeXYZ, Recorder, RmsRecordOption
with Emulator([AUTD3()]) as emulator:
focus = emulator.center() + np.array([0.0, 0.0, 150.0])
def f(autd: Recorder) -> None:
autd.send(Silencer.disable())
autd.send((Static(), Focus(pos=focus, option=FocusOption())))
autd.tick(Duration.from_micros(25))
record = emulator.record(f)
sound_field = record.sound_field(
RangeXYZ(
x=(focus[0] - 20.0, focus[0] + 20.0),
y=(focus[1] - 20.0, focus[1] + 20.0),
z=(focus[2], focus[2]),
resolution=1.0,
),
RmsRecordOption(
sound_speed=340e3,
),
)
df = sound_field.observe_points()
print(df)
df = sound_field.next(Duration.from_micros(25))
print(df)
NOTE: The time must advance by at least .
NOTE: The values calculated by RMS are not the RMS of the instantaneous sound field above. They are a linear superposition that ignores propagation delays and transducer responses.
The RMS of the output sound pressure at each observation point is stored in each column in chronological order (unit is ).
Each column name is rms[Pa]@<time>[ns].
Each row corresponds to the observation points obtained with observe_points.
┌────────────┬───────────┬───────┐
│ x[mm] ┆ y[mm] ┆ z[mm] │
│ --- ┆ --- ┆ --- │
│ f32 ┆ f32 ┆ f32 │
╞════════════╪═══════════╪═══════╡
│ 66.625267 ┆ 46.713196 ┆ 150.0 │
│ 67.625267 ┆ 46.713196 ┆ 150.0 │
│ 68.625267 ┆ 46.713196 ┆ 150.0 │
│ 69.625267 ┆ 46.713196 ┆ 150.0 │
│ 70.625267 ┆ 46.713196 ┆ 150.0 │
│ … ┆ … ┆ … │
│ 102.625267 ┆ 86.713196 ┆ 150.0 │
│ 103.625267 ┆ 86.713196 ┆ 150.0 │
│ 104.625267 ┆ 86.713196 ┆ 150.0 │
│ 105.625267 ┆ 86.713196 ┆ 150.0 │
│ 106.625267 ┆ 86.713196 ┆ 150.0 │
└────────────┴───────────┴───────┘
┌───────────────┐
│ rms[Pa]@0[ns] │
│ --- │
│ f32 │
╞═══════════════╡
│ 97.675339 │
│ 83.525314 │
│ 60.54364 │
│ 34.229084 │
│ 33.827206 │
│ … │
│ 51.324219 │
│ 75.84668 │
│ 102.852501 │
│ 120.575188 │
│ 125.698715 │
└───────────────┘
For more examples, please refer to autd3-emulator (Rust) and pyautd3 (Python).
Advanced Topics
The following introduces advanced settings for core users.
Creating Custom Gain
In the Rust library, you can create your own Gain.
NOTE: This feature is not available in the C++, C#, and Python libraries. However, you can use Custom for the same purpose.
Here, let’s actually define a FocalPoint that generates a single focal point like Focus.
use autd3::core::derive::*;
use autd3::prelude::*;
#[derive(Gain, Debug)]
pub struct FocalPoint {
pos: Point3,
}
#[derive(Clone, Copy)]
pub struct Impl {
pos: Point3,
wavenumber: f32,
}
impl GainCalculator<'_> for Impl {
fn calc(&self, tr: &Transducer) -> Drive {
Drive {
phase: Phase::from(-(self.pos - tr.position()).norm() * self.wavenumber * rad),
intensity: Intensity::MAX,
}
}
}
impl GainCalculatorGenerator<'_> for Impl {
type Calculator = Impl;
fn generate(&mut self, _: &Device) -> Self::Calculator {
*self
}
}
impl Gain<'_> for FocalPoint {
type G = Impl;
fn init(
self,
_geometry: &Geometry,
env: &Environment,
_mask: &TransducerMask,
) -> Result<Self::G, GainError> {
Ok(Impl {
pos: self.pos,
wavenumber: env.wavenumber(),
})
}
}
fn main() {}Gain::init returns a (struct that implements) GainContextGenerator that generates a (struct that implements) GainCalculator for each device.
The actual phase and intensity calculations are performed in the GainCalculator::calc function.
Creating Custom Modulation
In the Rust version, you can create your own Modulation.
Here, let’s create a Burst that outputs only at a certain moment during the period1.
NOTE: This feature is not available in the C++, C#, and Python libraries. However, you can use Custom for the same purpose.
Below is a sample of this Burst.
use autd3::prelude::*;
use autd3::core::derive::*;
#[derive(Modulation, Debug)]
pub struct Burst {
config: SamplingConfig,
}
impl Burst {
pub fn new() -> Self {
Self {
config: SamplingConfig::FREQ_4K,
}
}
}
impl Modulation for Burst {
fn calc(self) -> Result<Vec<u8>, ModulationError> {
Ok((0..4000)
.map(|i| if i == 3999 { u8::MAX } else { u8::MIN })
.collect())
}
fn sampling_config(&self) -> SamplingConfig {
self.config
}
}
fn main() {
}-
Not included in the SDK. ↩
Building a Remote Server
By building a remote server, you can delegate the communication process with AUTD to the server.
Setup
To run a remote server, you need to install Rust.
Next, create a new Rust project with the following commands:
cargo new autd_remote_server
cd autd_remote_server
Next, add the autd3-link-remote crate and tokio as an asynchronous runtime.
cargo add autd3-link-remote --features server
cargo add tokio --features full
Next, add an appropriate Link. Here, for the sake of explanation, we use the dummy Nop link from the autd3 crate.
cargo add autd3 --features link-nop
Next, edit src/main.rs as follows.
In the first argument of RemoteServer::new, specify the port number to use, and in the second argument, specify the Link factory to use.
use autd3_link_remote::RemoteServer;
#[tokio::main]
async fn main() -> Result<(), Box<dyn std::error::Error>> {
RemoteServer::new(8080, autd3::link::Nop::new)
.with_graceful_shutdown(async { tokio::signal::ctrl_c().await.unwrap() })
.run()
.await?;
Ok(())
}After that, you just need to connect to the server using the Remote link on the client side.
Versioning
AUTD3 follows Semantic Versioning starting from v8.2.0.
The version of the AUTD3 SDK is represented as vX.Y.Z.
- X represents the major version, and compatibility is not guaranteed between SDKs with different major versions.
- Y represents the minor version, which is incremented when backward-compatible features are added.
- Z represents the patch version, which is incremented when backward-compatible bug fixes are made.
Firmware Version
The firmware version is also represented as vX.Y.Z and follows Semantic Versioning.
However, the firmware version is different from the software version.
Refer to the release notes for the compatibility table between firmware and software versions.
FAQ
- Frequent link disconnections
- Errors when using
RemoteTwinCATlink - How to access transducer phase/amplitude data?
- How to access AM modulation data?
- Others
Frequent link disconnections
- If this frequently occurs when outputting ultrasound, check if the power supply is sufficient.
- Each device can consume up to 50W.
Errors when using RemoteTwinCAT link
- It may be blocked by the firewall, so either disable the firewall or open TCP/UDP port 48898.
- Disconnect all LAN connections other than the server on the client PC.
How to access transducer phase/amplitude data?
- Use
Controller::inspect. - Create your desired
Gain. Refer to Creating Custom Gain.
How to access AM modulation data?
- Use
Controller::inspect. - Create your desired
Modulation. Refer to Creating Custom Modulation.
Others
- Feel free to ask questions or report bugs on GitHub Issues.
Citation
When using this SDK, please consider citing the following papers.
- S. Suzuki, S. Inoue, M. Fujiwara, Y. Makino and H. Shinoda, “AUTD3: Scalable Airborne Ultrasound Tactile Display,” in IEEE Transactions on Haptics, doi: 10.1109/TOH.2021.3069976.
- S. Inoue, Y. Makino and H. Shinoda “Scalable Architecture for Airborne Ultrasound Tactile Display”, Asia Haptics 2016
LICENSE
The autd3 library itself is licensed under the MIT license.
The autd3 library depends on several third-party libraries. Refer to each repository for details on their licenses.
Release Notes
| Date | Software Version | Firmware Version |
|---|---|---|
| 2025/11/25 | 38.0.1 | 12.1.0 |
| 2025/11/17 | 38.0.0 | 12.1.0 |
| 2025/11/05 | 37.0.1 | 12.1.0 |
| 2025/10/22 | 37.0.0 | 12.1.0 |
| 2025/10/02 | 36.0.2 | 10.0.0+ |
| 2025/07/01 | 35.0.1 | 10.0.0+ |
| 2025/06/25 | 34.0.0 | 10.0.0-12.0.0 |
| 2025/05/25 | 33.0.0 | 10.0.0/11.0.0 |
| 2025/04/22 | 32.1.1 | 10.0.0/11.0.0 |
| 2025/04/16 | 32.1.0 | 10.0.0/11.0.0 |
| 2025/03/26 | 32.0.1 | 10.0.0/11.0.0 |
| 2025/03/24 | 32.0.0 | 10.0.0/11.0.0 |
| 2025/03/07 | 31.0.1 | 10.0.0 |
| 2025/02/24 | 30.0.1 | 10.0.0 |
| 2025/02/10 | 29.0.0 | 10.0.0 |
| 2024/10/15 | 28.1.0 | 10.0.0 |
| 2024/10/14 | 28.0.1 | 10.0.0 |
| 2024/10/12 | 28.0.0 | 10.0.0 |
| 2024/08/09 | 27.0.0 | 9.0.0 |
| 2024/06/29 | 26.0.0 | 8.0.1 |
| 2024/06/18 | 25.3.2 | 8.0.1 |
| 2024/06/17 | 25.3.1 | 8.0.1 |
| 2024/06/14 | 25.2.3 | 8.0.1 |
| 2024/06/10 | 25.1.0 | 8.0.1 |
| 2024/06/08 | 25.0.1 | 8.0.0 |
| 2024/06/06 | 25.0.0 | 8.0.0 |
| 2024/05/22 | 24.1.0 | 7.0.0 |
| 2024/05/18 | 24.0.0 | 7.0.0 |
| 2024/05/13 | 23.1.0 | 7.0.0 |
| 2024/05/11 | 23.0.1 | 7.0.0 |
| 2024/05/11 | 23.0.0 | 7.0.0 |
| 2024/04/08 | 22.1.0 | 6.1.x |
| 2024/03/30 | 22.0.4 | 6.0.x |
| 2024/02/25 | 22.0.1 | 6.0.x |
| 2024/01/29 | 21.1.0 | 5.1.x |
| 2024/01/26 | 21.0.1 | 5.1.x |
| 2024/01/11 | 20.0.3 | 5.0.x |
| 2024/01/05 | 20.0.0 | 5.0.x |
| 2023/12/14 | 19.1.0 | 4.1.x |
| 2023/12/10 | 19.0.0 | 4.1.x |
| 2023/12/04 | 18.0.1 | 4.0.x |
| 2023/12/02 | 18.0.0 | 4.0.x |
| 2023/11/29 | 17.0.3 | 4.0.x |
| 2023/11/28 | 17.0.2 | 4.0.x |
| 2023/11/27 | 17.0.1 | 4.0.x |
| 2023/11/27 | 17.0.0 | 4.0.x |
| 2023/10/14 | 16.0.0 | 3.0.x |
| 2023/10/04 | 15.3.1 | 3.0.x |
| 2023/10/04 | 15.3.0 | 3.0.x |
| 2023/09/29 | 15.2.1 | 3.0.x |
| 2023/09/28 | 15.2.0 | 3.0.x |
| 2023/09/22 | 15.1.2 | 3.0.x |
| 2023/09/15 | 15.1.1 | 3.0.x |
| 2023/09/14 | 15.1.0 | 3.0.x |
| 2023/09/14 | 15.0.2 | 3.0.x |
| 2023/08/07 | 14.2.2 | N/A |
| 2023/08/01 | 14.2.1 | N/A |
| 2023/07/28 | 14.2.0 | N/A |
| 2023/07/27 | 14.1.0 | N/A |
| 2023/07/19 | 14.0.1 | N/A |
| 2023/07/18 | 14.0.0 | N/A |
| 2023/07/11 | 13.0.0 | N/A |
| 2023/07/04 | 12.3.1 | N/A |
| 2023/07/04 | 12.3.0 | N/A |
| 2023/06/24 | 12.2.0 | N/A |
| 2023/06/23 | 12.1.1 | N/A |
| 2023/06/22 | 12.1.0 | N/A |
| 2023/06/21 | 12.0.0 | N/A |
| 2023/06/12 | 11.1.0 | N/A |
| 2023/06/09 | 11.0.2 | N/A |
| 2023/06/09 | 11.0.1 | N/A |
| 2023/06/08 | 11.0.0 | N/A |
| 2023/05/30 | 10.0.0 | N/A |
| 2023/05/01 | 9.0.1 | N/A |
| 2023/04/29 | 9.0.0 | N/A |
| 2023/04/26 | 8.5.0 | N/A |
| 2023/04/23 | 8.4.1 | N/A |
| 2023/04/18 | 8.4.0 | N/A |
| 2023/03/21 | 8.3.0 | N/A |
| 2023/03/10 | 8.2.0 | N/A |
| 2023/02/19 | 8.1.2 | N/A |
| 2023/02/03 | 8.1.1 | N/A |
| 2023/02/02 | 8.1.0 | N/A |
| 2023/01/24 | 2.8.0 | N/A |
| 2023/01/18 | 2.7.6 | N/A |
| 2023/01/17 | 2.7.5 | N/A |
| 2023/01/12 | 2.7.4 | N/A |
| 2022/12/29 | 2.7.2 | N/A |
| 2022/12/24 | 2.7.1 | N/A |
| 2022/12/16 | 2.7.0 | N/A |
| 2022/12/13 | 2.6.8 | N/A |
| 2022/12/10 | 2.6.7 | N/A |
| 2022/12/06 | 2.6.6 | N/A |
| 2022/11/28 | 2.6.5 | N/A |
| 2022/11/22 | 2.6.4 | N/A |
| 2022/11/21 | 2.6.3 | N/A |
| 2022/11/15 | 2.6.2 | N/A |
| 2022/11/13 | 2.6.1 | N/A |
| 2022/11/10 | 2.6.0 | N/A |
| 2022/11/08 | 2.5.2 | N/A |
| 2022/11/06 | 2.5.1 | N/A |
| 2022/11/04 | 2.5.0 | N/A |
| 2022/10/25 | 2.4.5 | N/A |
| 2022/10/21 | 2.4.4 | N/A |
| 2022/10/18 | 2.4.3 | N/A |
| 2022/10/14 | 2.4.2 | N/A |
| 2022/10/09 | 2.4.1 | N/A |
| 2022/09/28 | 2.4.0 | N/A |
| 2022/08/14 | 2.3.1 | N/A |
| 2022/08/08 | 2.3.0 | N/A |
| 2022/06/29 | 2.2.2 | N/A |
| 2022/06/22 | 2.2.1 | N/A |
| 2022/06/10 | 2.2.0 | N/A |
| 2022/06/02 | 2.1.0 | N/A |
| 2022/05/25 | 2.0.3 | N/A |
| 2022/05/24 | 2.0.2 | N/A |
| 2022/05/22 | 2.0.1 | N/A |
| 2022/05/17 | 2.0.0 | N/A |
Document History
| Date | Description |
|---|---|
| 2025/11/25 | Version 38.0.1 Initial release |
| 2025/11/17 | Version 38.0.0 Initial release |
| 2025/11/05 | Version 37.0.1 Initial release |
| 2025/10/22 | Version 37.0.0 Initial release |
| 2025/10/02 | Version 36.0.2 Initial release |
| 2025/07/01 | Version 35.0.1 Initial release |
| 2025/06/25 | Version 34.0.0 Initial release |
| 2025/05/28 | Version 33.0.0 Initial release |
| 2025/04/22 | Version 32.1.1 Initial release |
| 2025/04/16 | Version 32.1.0 Initial release |
| 2025/03/26 | Version 32.0.1 Initial release |
| 2025/03/25 | Version 32.0.0 Initial release |
| 2025/03/07 | Version 31.0.1 Initial release |
| 2025/02/24 | Version 30.0.1 Initial release |
| 2025/02/10 | Version 29.0.0 Initial release |
| 2024/10/15 | Version 28.1.0 Initial release |
| 2024/10/14 | Version 28.0.1 Initial release |
| 2024/10/12 | Version 28.0.0 Initial release |
| 2024/08/09 | Version 27.0.0 Initial release |
| 2024/06/29 | Version 26.0.0 Initial release |
| 2024/06/18 | Version 25.3.2 Initial release |
| 2024/06/17 | Version 25.3.1 Initial release |
| 2024/06/14 | Version 25.2.3 Initial release |
| 2024/06/10 | Version 25.1.0 Initial release |
| 2024/06/08 | Version 25.0.1 Initial release |
| 2024/06/06 | Version 25.0.0 Initial release |
| 2024/05/22 | Version 24.1.0 Initial release |
| 2024/05/18 | Version 24.0.0 Initial release |
| 2024/05/13 | Version 23.1.0 Initial release |
| 2024/05/11 | Version 23.0.1 Initial release |
| 2024/05/11 | Version 23.0.0 Initial release |
| 2024/04/08 | Version 22.1.0 Initial release |
| 2024/03/30 | Version 22.0.4 Initial release |
| 2024/02/25 | Version 22.0.1 Initial release |
| 2024/01/29 | Version 21.1.0 Initial release |
| 2024/01/26 | Version 21.0.1 Initial release |
| 2024/01/11 | Version 20.0.3 Initial release |
| 2024/01/05 | Version 20.0.0 Initial release |
| 2023/12/14 | Version 19.1.0 Initial release |
| 2023/12/10 | Version 19.0.0 Initial release |
| 2023/12/04 | Version 18.0.1 Initial release |
| 2023/12/02 | Version 18.0.0 Initial release |
| 2023/11/29 | Version 17.0.3 Initial release |
| 2023/11/28 | Version 17.0.2 Initial release |
| 2023/10/14 | Version 16.0.0 Initial release |
| 2023/10/04 | Version 15.3.1 Initial release |
| 2023/10/04 | Version 15.3.0 Initial release |
| 2023/09/29 | Version 15.2.1 Initial release |
| 2023/09/28 | Version 15.2.0 Initial release |
| 2023/09/22 | Version 15.1.2 Initial release |
| 2023/09/15 | Version 15.1.1 Initial release |
| 2023/09/14 | Version 15.1.0 Initial release |
| 2023/09/14 | Version 15.0.2 Initial release |
| 2023/08/07 | Version 14.2.2 Initial release |
| 2023/08/01 | Version 14.2.1 Initial release |
| 2023/07/28 | Version 14.2.0 Initial release |
| 2023/07/27 | Version 14.1.0 Initial release |
| 2023/07/19 | Version 14.0.1 Initial release |
| 2023/07/19 | Version 14.0.0 Initial release |
| 2023/07/11 | Version 13.0.0 Initial release |
| 2023/07/04 | Version 12.3.1 Initial release |
| 2023/07/04 | Version 12.3.0 Initial release |
| 2023/06/24 | Version 12.2.0 Initial release |
| 2023/06/23 | Version 12.1.1 Initial release |
| 2023/06/22 | Version 12.1.0 Initial release |
| 2023/06/21 | Version 12.0.0 Initial release |
| 2023/06/12 | Version 11.1.0 Initial release |
| 2023/05/01 | Version 9.0.1 Initial release |
| 2023/04/29 | Version 9.0.0 Initial release |
| 2023/04/26 | Version 8.5.0 Initial release |
| 2023/04/23 | Version 8.4.1 Initial release |
| 2023/04/18 | Version 8.4.0 Initial release |
| 2023/03/21 | Version 8.3.0 Initial release |
| 2023/03/10 | Version 8.2.0 Initial release |
| 2023/02/19 | Version 8.1.2 Initial release |
| 2023/02/03 | Version 8.1.1 Initial release |
| 2023/02/02 | Version 8.1.0 Initial release |
| 2023/01/24 | Version 2.8.0 Initial release |
| 2023/01/18 | Version 2.7.6 Initial release |
| 2023/01/17 | Version 2.7.5 Initial release |
| 2023/01/12 | Version 2.7.4 Initial release |
| 2022/12/29 | Version 2.7.2 Initial release |
| 2022/12/24 | Version 2.7.1 Initial release |
| 2022/12/16 | Version 2.7.0 Initial release |
| 2022/12/13 | Version 2.6.8 Initial release |
| 2022/12/10 | Version 2.6.7 Initial release |
| 2022/12/06 | Version 2.6.6 Initial release |
| 2022/11/28 | Version 2.6.5 Initial release |
| 2022/11/22 | Version 2.6.4 Initial release |
| 2022/11/21 | Version 2.6.3 Initial release |
| 2022/11/15 | Version 2.6.2 Initial release |
| 2022/11/13 | Version 2.6.1 Initial release |
| 2022/11/10 | Version 2.6.0 Initial release |
| 2022/11/08 | Version 2.5.2 Initial release |
| 2022/11/06 | Version 2.5.1 Initial release |
| 2022/11/04 | Version 2.5.0 Initial release |
| 2022/10/25 | Version 2.4.5 Initial release |
| 2022/10/21 | Version 2.4.4 Initial release |
| 2022/10/18 | Version 2.4.3 Initial release |
| 2022/10/14 | Version 2.4.2 Initial release |
| 2022/10/09 | Version 2.4.1 Initial release |
| 2022/09/28 | Version 2.4.0 Initial release |
| 2022/08/14 | Version 2.3.1 Initial release |
| 2022/08/08 | Version 2.3.0 Initial release |
| 2022/07/28 | Version 2.2.2 Added FAQ and TwinCAT |
| 2022/06/29 | Version 2.2.2 Initial release |
| 2022/06/22 | Version 2.2.1 Initial release |
| 2022/06/10 | Version 2.2.0 Initial release |
| 2022/06/02 | Version 2.1.0 Initial release |
| 2022/05/25 | Version 2.0.3 Initial release |
| 2022/05/24 | Version 2.0.2 Initial release |
| 2022/05/23 | Added FFI/python, FFI/csharp, migration guide |
| 2022/05/22 | Version 2.0.1 Initial release |
| 2022/05/17 | Version 2.0.0 Initial release |