Firmware
For the AUTD3 device to operate correctly, a version of the CPU / FPGA firmware compatible with the SDK must be flashed.
Firmware updates are performed using the Firmware tab of the GUI console autd3-console.
See Console for how to obtain it.
OTA over an Ethernet cable
Section titled “OTA over an Ethernet cable”If both the CPU and the FPGA run firmware v0.9.0 or later, the device can be updated with nothing but an Ethernet cable. If either is older than v0.9.0, use the JTAG procedure below.
Prerequisites
Section titled “Prerequisites”Each EtherCAT link requires its own configuration and preparation. See Link for details.
Procedure
Section titled “Procedure”- Connect the AUTD3 and the PC with an Ethernet cable, then turn on the power
- Launch autd3-console and open the Firmware tab
- Select Version and Target (
Both/FPGA/CPU). UseBothunless you have a reason not to (updating only the CPU leaves the FPGA on a different version, which the SDK refuses to connect to) - Make sure Method is
EtherCAT (OTA)(the default) - Choose
echocat/TwinCAT/Remoteunder Link and fill in the settings (the defaults are fine) - Press Flash. Progress is shown in the log at the bottom of the panel. The CPU takes tens of seconds, the FPGA about 90 seconds per device
- The update is complete when
Ok!appears in the log. No power cycle is needed
Do not power off the devices during the update. If the update fails, power-cycle the devices and try again.
Updating via JTAG
Section titled “Updating via JTAG”Prerequisites
Section titled “Prerequisites”Flashing the firmware requires the following external tools.
In each case, the executable must be on the PATH (on Windows, the installation location is detected automatically).
- FPGA flashing: Vivado (
vivado/vivado_lab) and a XILINX Platform Cable for the connection.
- CPU flashing: J-Link Software (
JLink/JLinkExe) and a J-Link Plus probe via a J-Link 9-Pin Cortex-M Adapter.
Flashing Procedure
Section titled “Flashing Procedure”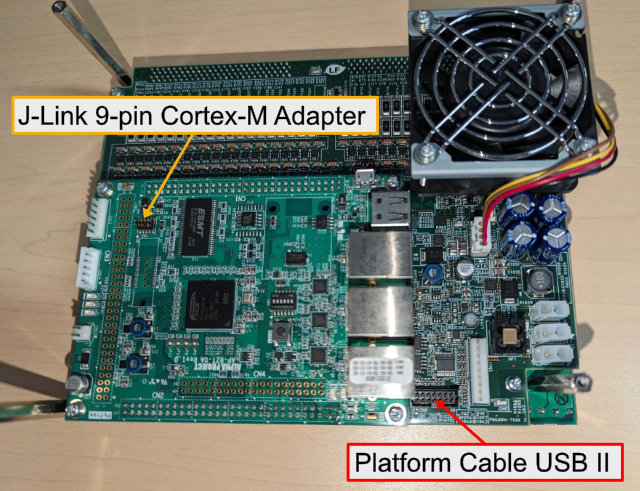
- Turn off the AUTD3 power
- Connect the cables described above. The connection points are as shown in the figure above.
- Turn on the AUTD3 power
- Launch autd3-console and open the Firmware tab.
- Select the version to flash from Version
- Choose the target to flash under Target (
Both/FPGA/CPU). - Choose
JTAGunder Method - Press Flash. Progress is shown in the log at the bottom of the panel. Flashing takes several minutes.
- After flashing completes, power-cycle the AUTD3 to apply the new firmware.